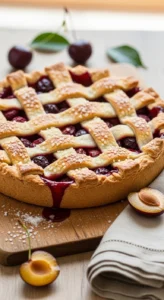
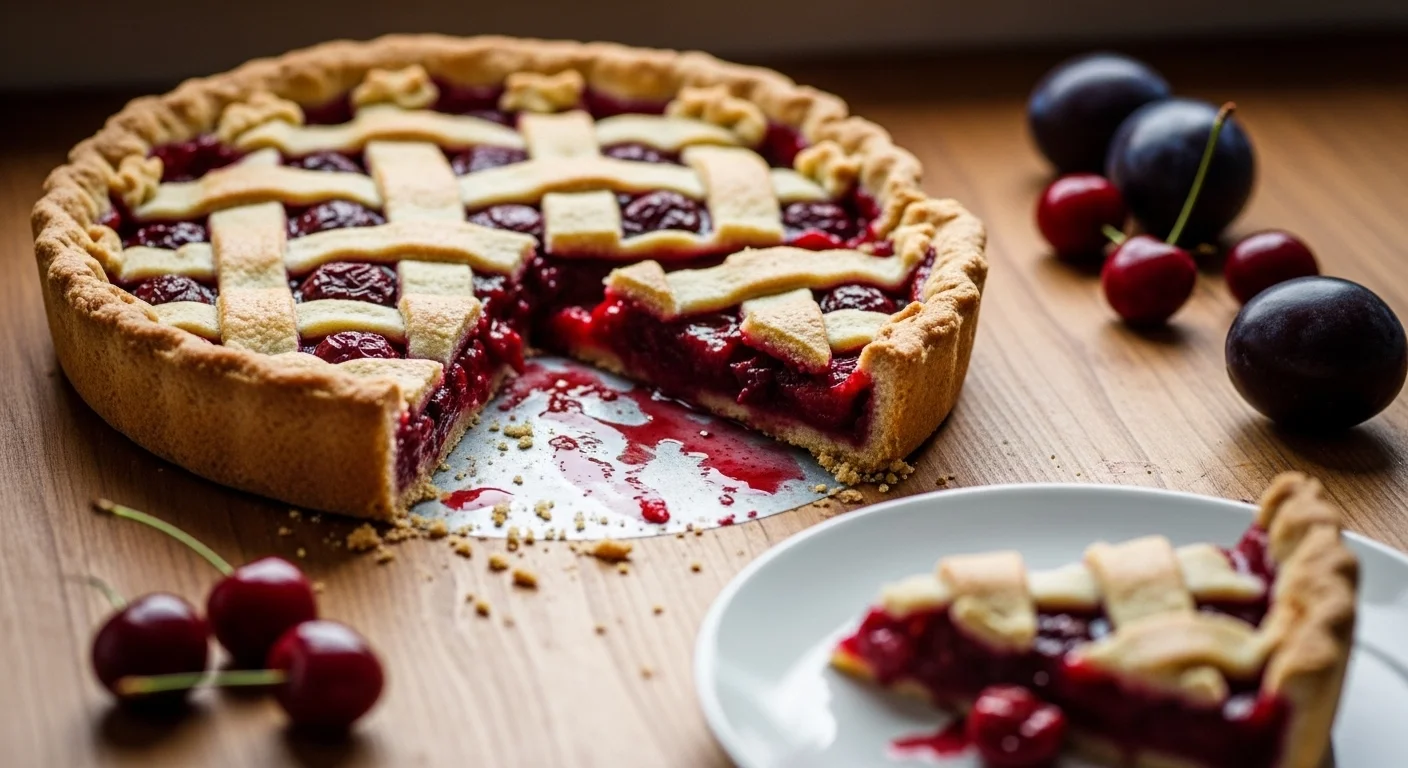
Cherry Plum Pie Recipe
So you bought cherries and plums thinking you’d be healthy… and now they’re just sitting there judging you? 😅 Don’t worry—I’ve got the perfect solution: turn them into a pie so good it feels illegal. Sweet, slightly tart, juicy, buttery… basically everything your taste buds have been begging for.
Let’s make a Cherry Plum Pie that screams “I totally have my life together,” even if you’re baking in pajamas.
Why This Recipe is Awesome
First of all—it’s ridiculously easy. Like, “I didn’t mess it up, so you definitely won’t” kind of easy.
- You get the perfect balance of sweet cherries and tangy plums
- The crust? Golden, flaky, and borderline addictive
- It looks fancy but secretly requires minimal effort (we love that)
- Works for dessert, brunch, or “just because I exist” moments
Also, FYI: your kitchen will smell like a bakery, and your neighbors might suddenly become very friendly.
Ingredients You’ll Need
Here’s everything you need—no weird, hard-to-find stuff:
- 2 cups fresh cherries (pitted, because nobody likes surprises)
- 2 cups fresh plums (sliced, skins on = extra flavor)
- ¾ cup granulated sugar (adjust if you like it less sweet)
- 2 tbsp cornstarch (thickens things up like magic)
- 1 tbsp lemon juice (hello, flavor boost!)
- 1 tsp vanilla extract
- ½ tsp cinnamon (optional, but highly recommended)
- 1 prepared pie crust (store-bought = totally acceptable, no shame)
- 1 tbsp butter (cut into tiny pieces)
- 1 egg (for that golden crust glow-up)
Pro tip: Use ripe fruit—not rock-hard, not mushy. Somewhere in the “perfectly snackable” zone.
Step-by-Step Instructions
- Preheat your oven to 190°C (375°F).
Yes, actually do this first. Don’t be that person who forgets and waits 20 minutes later. - Prepare the filling.
Toss cherries, plums, sugar, cornstarch, lemon juice, vanilla, and cinnamon into a bowl. Mix until everything looks juicy and slightly glossy. - Roll out your pie crust.
Place it into your pie dish and press it down gently. No need to wrestle it—be kind. - Add the filling.
Pour that fruity goodness into the crust. Spread it evenly, then dot with small butter pieces. - Top it off.
Add a second crust or make a cute lattice pattern if you’re feeling fancy (or just trying to impress Instagram). - Brush with egg wash.
Beat the egg and brush it over the top crust. This step = golden perfection. - Bake for 45–50 minutes.
Look for a bubbly filling and golden crust. If the edges brown too fast, cover them with foil. - Let it cool (ugh, I know).
Give it at least 1–2 hours so the filling sets. Cutting too early = fruit soup. Still tasty, just messy.
More About Us: Summer Fruit Pies Recipe
Common Mistakes to Avoid
- Skipping the preheat
Seriously. This isn’t optional. Cold oven = sad pie. - Not thickening the filling enough
If you skip cornstarch, congrats—you made fruit juice in a crust. - Overfilling the pie
It’s tempting, but it will bubble over and create chaos in your oven. - Cutting it too soon
I get it, you’re excited. But patience = clean slices instead of a disaster. - Using unripe fruit
Hard fruit = bland pie. Nobody wants that.
Alternatives & Substitutions
Let’s be real—not everyone has the exact ingredients. Here’s how to improvise:
- No cherries? Use all plums or mix with berries
- No plums? Try peaches or nectarines instead
- No fresh fruit? Frozen works—just thaw and drain excess liquid
- Want less sugar? Cut it down slightly or use honey
- Gluten-free? Grab a GF pie crust—easy fix
IMO, adding a pinch of nutmeg or almond extract can take the flavor up a notch. Not necessary, but definitely fun.
FAQ (Frequently Asked Questions)
Can I use frozen fruit instead of fresh?
Yep! Just thaw and drain it first. Otherwise, your pie might turn into a swamp.
Can I make this pie ahead of time?
Absolutely. Bake it a day before and store at room temp or in the fridge. It actually tastes even better the next day.
Can I skip the top crust?
Of course. Go for a crumble topping if you want—less effort, same delicious vibes.
How do I know when the pie is done?
Look for bubbling filling and a golden crust. If it smells amazing, you’re probably close.
Can I reduce the sugar?
Yes, but don’t go too low—fruit can be tart. Balance is key.
What’s the best way to serve it?
Warm, with a scoop of vanilla ice cream. Honestly, anything else feels like a missed opportunity.
Final Thoughts
There you have it—your new go-to Cherry Plum Pie recipe. It’s easy, delicious, and just fancy enough to make people think you’ve got serious baking skills (even if you totally winged it).
So go ahead—grab those fruits and make magic happen. Whether you’re baking for guests or just treating yourself, this pie delivers every single time.
Now go impress someone—or yourself—with your new culinary skills. You’ve earned it! 🍒🥧
Cherry Plum Pie Recipe
Ingredients
Method
- Preheat oven to 190°C (375°F)
- Mix cherries, plums, sugar, cornstarch, lemon juice, vanilla, and cinnamon in a bowl
- Place the pie crust in a pie dish and press gently
- Pour the fruit filling into the crust evenly
- Dot the filling with small butter pieces
- Cover with top crust or lattice design
- Brush the top with beaten egg
- Bake for 45–50 minutes until golden and bubbly
- Cool for 1–2 hours before slicing
Notes
Cover edges with foil if crust browns too quickly
Let the pie cool fully to avoid a runny filling
Serve warm with ice cream for extra indulgence DID YOU MAKE THIS EASY RECIPE? If you have, then share it with us by sending a photo. We’re excited to see what you’ve made:-):