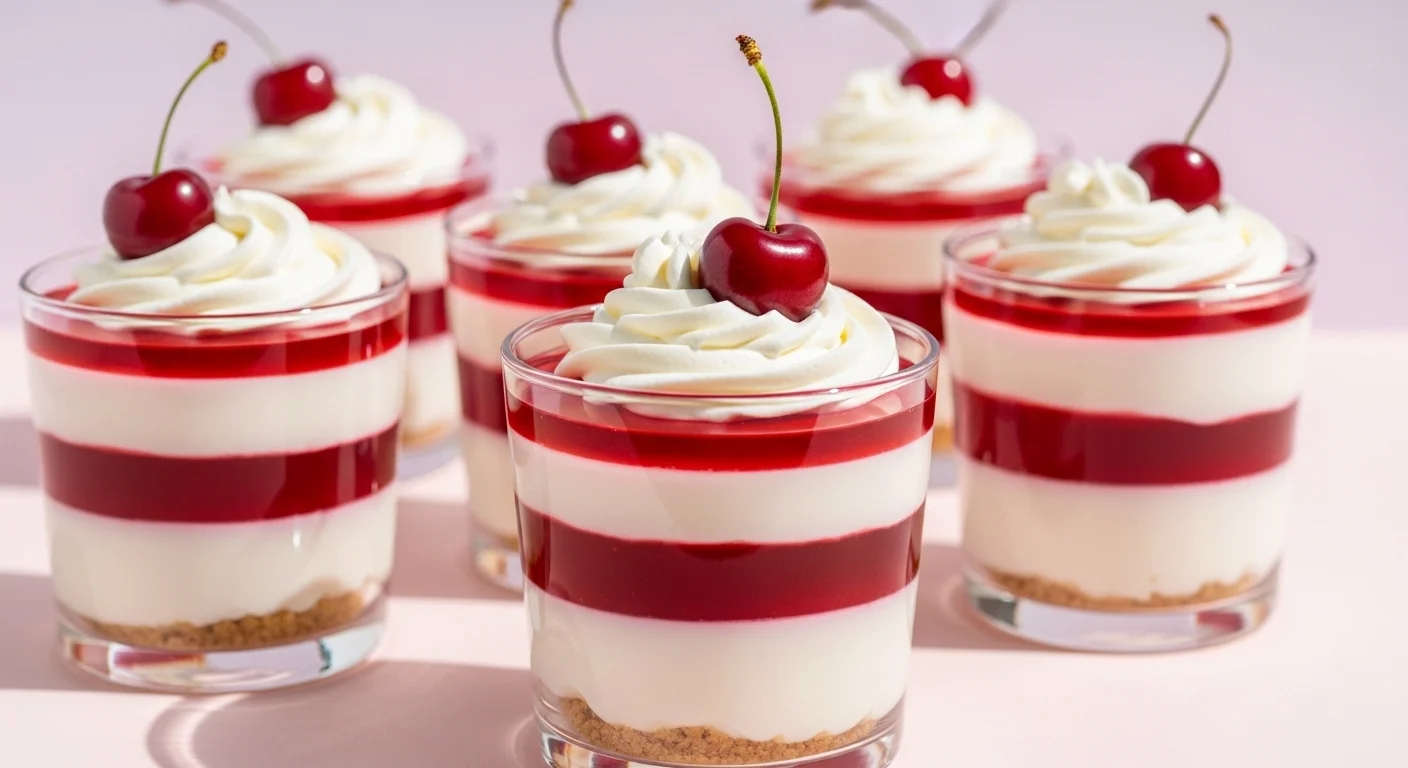
Cherry Jello Cream Cups Recipe
So you want a dessert that looks cute, tastes amazing, and makes people think you actually tried… but secretly takes almost zero effort? Yeah, you’re in the right place. 😄
These Cherry Jello Cream Cups Recipe are creamy, jiggly, sweet little layers of happiness that scream “party dessert” without stressing you out. Bonus? They’re so easy, you could literally make them half-asleep (not recommended, but technically possible).
Why This Recipe is Awesome
Let’s not pretend—this recipe is basically cheating in the dessert world:
No baking required – your oven stays unemployed.
Super pretty layers – looks fancy, zero chef skills needed.
Perfect for parties – individual cups = no slicing drama.
Budget-friendly – simple ingredients, big flavor.
Kid-approved & adult-loved – a rare universal win.
And honestly? It’s almost impossible to mess up. Even if your layers aren’t perfect, it still tastes like a sweet cherry dream.
Ingredients You’ll Need

Here’s your simple, no-stress ingredient list:
- 1 pack cherry Jello (gelatin) – the star of the show
- 1 cup boiling water – to dissolve the magic
- 1/2 cup cold water – balance things out
- 1 cup whipped cream (or whipped topping) – fluffy goodness
- 1/2 cup cream cheese (softened) – for that creamy layer
- 1/4 cup powdered sugar – smooth sweetness
- 1 tsp vanilla extract – because we like flavor
Optional extras (aka level-up mode):
Fresh cherries or berries
Crushed biscuits or graham crackers
Chocolate shavings (because yes, always yes)
Step-by-Step Instructions
- Make the Jello base
In a bowl, dissolve the cherry Jello in boiling water. Stir well until fully dissolved—no grainy bits allowed. Add cold water and mix again. - Let it cool slightly
Don’t rush this step. Let the Jello cool to room temperature. If it’s too hot, it’ll ruin your creamy layer (and your mood). - Prepare the cream layer
In another bowl, beat the cream cheese, powdered sugar, and vanilla until smooth. Fold in the whipped cream gently until fluffy and combined. - Layer time (fun part!)
Pour a small layer of Jello into cups and chill for about 20–30 minutes until slightly set. Then add a layer of cream mixture. - Repeat layers
Add another Jello layer, then cream again if you want that fancy layered look. Or keep it simple—your call. - Final chill
Refrigerate for at least 2–3 hours until fully set. Patience = perfect texture. - Serve and enjoy
Top with fruits or chocolate and serve chilled. Watch people think you’re a dessert genius.
Common Mistakes to Avoid
Let’s save you from dessert disappointment:
- Pouring hot Jello over cream – congrats, you just made a melted mess. Let it cool first.
- Skipping chill time – you’ll end up with a liquid disaster instead of layers.
- Overmixing the cream – keep it light and fluffy, not dense and sad.
- Rushing the layers – if one layer isn’t set, they’ll mix together. Goodbye, pretty look.
- Too much sugar – Jello is already sweet. Don’t turn it into a sugar bomb.
Alternatives & Substitutions
Because flexibility is the real MVP:
- Flavor swap – use strawberry, raspberry, or even orange Jello. Cherry is classic, but variety is fun.
- No cream cheese? Use just whipped cream for a lighter texture. IMO, cream cheese makes it richer, though.
- Dairy-free option – use coconut cream and dairy-free whipped topping. Still delicious.
- Crunch layer – add crushed biscuits or cookies between layers for texture. Highly recommended.
- Low-sugar version – use sugar-free Jello and reduce powdered sugar.
You can also try this lovely Recipe: Keto Almond Flour Brownies Recipe
FAQ (Frequently Asked Questions)
Can I make these ahead of time?
Absolutely! These are perfect make-ahead desserts. Prepare them a day before and relax.
Why are my layers mixing together?
You probably didn’t let one layer set before adding the next. Slow down—it’s not a race.
Can I use store-bought whipped topping?
Yes, and honestly, it works great. No need to overcomplicate things.
How long do they last in the fridge?
About 3–4 days. Just cover them so they don’t dry out or absorb weird fridge smells.
Can I freeze them?
You can, but the texture might change. They’re best enjoyed chilled, not frozen.
Can I skip cream cheese?
Yes! You’ll get a lighter, mousse-like texture. Still tasty, just less rich.
Are these good for parties?
Are you kidding? They’re basically made for parties. Easy, pretty, and no slicing required.
Final Thoughts
And there you have it—your fun, colorful, no-bake Cherry Jello Cream Cups that look impressive but are secretly super easy. They’re perfect for parties, family gatherings, or just treating yourself after a long day (you deserve it, btw).
Pro tip: Make extra. These disappear fast. Like, suspiciously fast.
Now go whip up a batch, show off those layers, and enjoy every creamy, jiggly bite. And hey—if you eat two instead of one, I’m not judging. 😉
Cherry Jello Cream Cups Recipe
Ingredients
Method
- Dissolve cherry gelatin in boiling water, then stir in cold water.
- Pour a small layer into serving cups and refrigerate until slightly set.
- In a bowl, beat cream cheese until smooth, then fold in whipped topping.
- Layer cream mixture over partially set gelatin in cups.
- Repeat layers until cups are full.
- Chill for 2–3 hours until fully set.
- Garnish with maraschino cherries before serving.
Notes
- For best results, let each layer set slightly before adding the next.
- Use full-fat cream cheese for creamier texture.
- Can be prepared a day in advance and stored in the fridge.
DID YOU MAKE THIS EASY RECIPE?
If you have, then share it with us by sending a photo. We’re excited to see what you’ve made 🙂