Crusty Artisan Bread Recipe
So you want that perfect bakery-style bread… You know, the one with the crackly crust, airy inside, and that chef’s kiss aroma? But also… You don’t want to knead dough for hours like you’re starring in a baking documentary. Totally fair.
Good news: this Crusty Artisan Bread Recipe gives you all that rustic, golden, crusty goodness with minimal effort and maximum bragging rights. It’s the kind of bread that makes people go, “Wait… you made this??”
And you just smile and say, “Yeah, it was easy.” (Because it actually was.)
Why This Recipe is Awesome
Let’s hype this bread up properly—it deserves it.
- No kneading required. Yes, you read that right. Lazy bakers, rejoice.
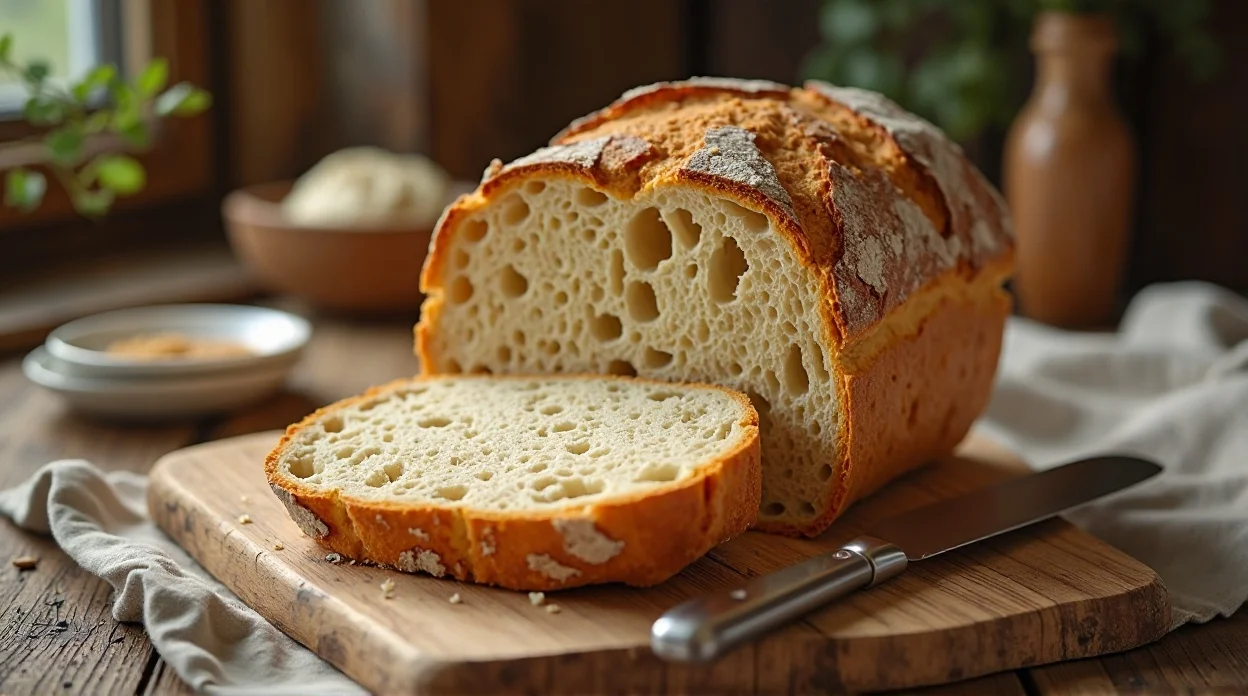
- Crispy crust, soft interior. The ultimate texture combo.
- Simple ingredients. Nothing fancy—just pantry basics doing their thing.
- Beginner-friendly. Even if you’ve never baked bread before, you’ll nail this.
- Looks like it came from a bakery. But costs way less.
And honestly? Breaking into that crust for the first time is weirdly satisfying. Like ASMR… but edible.
Ingredients You’ll Need
This recipe keeps it simple. No weird ingredients, no stress.
🍫 The Ultimate No-Bake Dessert Ebook 🍓
30 mouthwatering no-bake recipes you can whip up in minutes — creamy cheesecakes, fruity parfaits, chocolatey bars, and more!
- ⚡Quick & easy — no oven required
- 📖30 recipes + bonus treat
- 🍓Chocolate, fruit, nutty & refreshing flavors
- ✨Beautifully designed, instant download
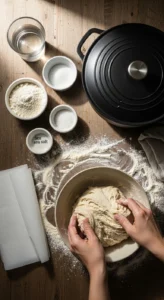
- 3 cups all-purpose flour – The backbone of your bread.
- 1 ½ teaspoons salt – Because bland bread is a crime.
- ½ teaspoon instant yeast – The tiny hero doing all the rising.
- 1 ½ cups warm water – Not hot, not cold—just right (Goldilocks style).
Optional but helpful:
- Extra flour for dusting
- Cornmeal or parchment paper for baking
Pro tip: Use good-quality flour if you can—it actually makes a difference in texture.
Step-by-Step Instructions
1. Mix the Dough
- In a large bowl, combine flour, salt, and yeast.
- Pour in the warm water and stir until everything comes together into a sticky dough. It’ll look messy—perfect. That’s exactly what you want.
2. Let It Rise (Patience Mode)
- Cover the bowl with plastic wrap or a clean towel.
- Let it sit at room temperature for 12–18 hours. Yes, it’s a long nap, but the flavor develops beautifully during this time.
3. Shape the Dough
- Lightly flour your surface and gently turn out the dough.
- Fold it over itself a few times to shape it into a rough ball. Don’t overwork it—this isn’t a gym session.
4. Second Rise
- Place the dough on parchment paper or a floured towel.
- Cover and let it rest for another 1–2 hours until it puffs up slightly.
5. Preheat the Oven
- Place a Dutch oven (or heavy pot with lid) inside your oven and preheat to 450°F (230°C).
- This step is key for that crispy crust. Hot pot = magical bread.
6. Bake the Bread
- Carefully place the dough (with parchment) into the hot pot.
- Cover with the lid and bake for 30 minutes, then remove the lid and bake another 10–15 minutes until golden brown.
7. Cool Before Slicing
- Remove the bread and let it cool on a rack.
- Yes, it smells amazing. Yes, you want to cut it immediately. But wait at least 20–30 minutes or the inside gets gummy.
Common Mistakes to Avoid
Let’s avoid bread heartbreak, shall we?
- Skipping the long rise
That overnight rise isn’t optional—it builds flavor and texture. No shortcuts here. - Using water that’s too hot
Hot water kills yeast. And dead yeast = sad bread. - Overhandling the dough
This isn’t pizza dough. Be gentle or you’ll lose those airy bubbles. - Not preheating the pot
Cold pot = no crispy crust. Don’t skip this step. - Cutting too soon
I know, I know. But slicing early ruins the texture. Patience = better bread.
Alternatives & Substitutions
Want to experiment a little? Go for it.
- Use whole wheat flour
Swap up to 50% for whole wheat flour for a nuttier flavor. - Add herbs or garlic
Mix in dried herbs or roasted garlic for extra flavor. Instant upgrade. - No Dutch oven?
Use a baking tray and place a pan of water in the oven for steam. Not identical, but it works. - Try different flours
Bread flour gives a chewier texture. IMO, it’s worth trying if you want bakery-level results. - Add seeds
Sprinkle sesame, sunflower, or flax seeds on top for crunch.
You can also try this lovely Recipe: Classic Chicken Pot Pie Recipe
FAQ (Frequently Asked Questions)
Do I really have to wait 12–18 hours?
Yes. I mean… You can shorten it, but the flavor won’t be as amazing. Good things take time.
Can I make this without a Dutch oven?
Yep! Use a baking tray and add steam in the oven. It won’t be identical, but still delicious.
Why is my bread dense?
Probably too much flour or not enough rise time. Let the dough do its thing.
Can I use active dry yeast instead of instant?
Yes, just dissolve it in water first before mixing.
How do I store this bread?
Wrap it in a cloth or store it in a bread box. Avoid the fridge—it dries it out.
Can I freeze it?
Absolutely. Slice it first, then freeze for easy grab-and-toast action.
Final Thoughts
There you have it—your very own Crusty Artisan Bread Recipe that delivers bakery-quality results without the stress. It’s simple, satisfying, and honestly kind of addictive once you realize how easy it is. One loaf turns into two… then suddenly you’re “the bread person” in your friend group. So go ahead, bake that golden, crusty masterpiece and enjoy every bite. Maybe with butter. Maybe with soup. Maybe straight from the loaf (no judgment).
Now go impress someone—or just yourself—with your bread-making skills.
Crusty Artisan Bread Recipe
Ingredients
Method
- In a large bowl, mix flour, salt, and yeast.
- Gradually add warm water and stir until a sticky dough forms.
- Cover bowl with plastic wrap and let dough rise at room temperature for 12–18 hours.
- Preheat oven to 450°F (230°C) with a covered Dutch oven inside.
- Turn dough onto a floured surface and shape into a ball.
- Carefully place dough into the preheated Dutch oven.
- Cover and bake for 30 minutes, then remove lid and bake another 10–15 minutes until golden crust forms.
- Cool on a wire rack before slicing.
Notes
- Long fermentation improves flavor and texture.
- Use a Dutch oven or heavy oven-safe pot for the best crust.
- Score the dough before baking for a beautiful artisan look.
DID YOU MAKE THIS EASY RECIPE?
If you have, then share it with us by sending a photo. We’re excited to see what you’ve made 🙂