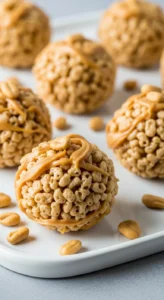
Peanut Butter Rice Krispie Balls Recipe
So you want something sweet, crunchy, and ridiculously easy… but also don’t feel like turning your kitchen into a disaster zone? Yeah, same. 😄 These Peanut Butter Rice Krispie Balls are basically the snack equivalent of “I tried, but not too hard”—and somehow still taste like you spent hours. Win-win, right?
Why This Recipe is Awesome
Let’s be honest—some recipes act like they’re easy, but halfway through you’re Googling “what even is this step?” Not this one.
- No baking required. Your oven can take the day off.
- Minimal ingredients. Like… embarrassingly minimal.
- Ready in under 30 minutes. Faster than deciding what to watch on Netflix.
- Kid-friendly AND adult-approved. Because who doesn’t love peanut butter + chocolate?
Also, it’s basically foolproof. If you can stir and roll things into balls, congratulations—you’re qualified.
Ingredients You’ll Need
Here’s your short and sweet grocery list:
- 3 cups Rice Krispies cereal (the crispy magic)
- 1 cup creamy peanut butter (go big or go home)
- ½ cup honey or corn syrup (sticky = necessary)
- ½ cup powdered sugar (for sweetness and structure)
- 1 teaspoon vanilla extract (optional, but fancy)
- 1 cup chocolate chips (because obviously)
- Pro tip: Use good-quality peanut butter. The cheap stuff works, but better PB = better life.
Step-by-Step Instructions
- Mix the base.
Grab a large bowl and combine peanut butter, honey (or corn syrup), powdered sugar, and vanilla. Stir until smooth. It should look creamy and smell amazing already. - Add the crunch.
Pour in the Rice Krispies and gently fold them in. Don’t go Hulk-mode here—you want them crunchy, not crushed into dust. - Shape into balls.
Scoop small portions and roll them into bite-sized balls. If the mixture sticks to your hands, lightly grease them or chill the mixture for 10 minutes. Easy fix. - Melt the chocolate.
Microwave chocolate chips in 20-second bursts, stirring in between, until smooth. No burning allowed—watch it! - Dip or drizzle.
Dip each ball into melted chocolate or drizzle it on top if you’re feeling artsy. Both methods taste equally awesome. - Let them sit.
Place the balls on parchment paper and let them cool until the chocolate hardens. You can speed things up by popping them in the fridge. - Try not to eat all at once.
Seriously… good luck with that. 😅
More About Us: Coconut Rice Pudding Recipe
Common Mistakes to Avoid
- Overheating the chocolate. Burnt chocolate = sadness. Melt slowly and patiently.
- Crushing the cereal. You want crunch, not crumbs. Be gentle, okay?
- Skipping the chill time (if needed). Sticky mixture? Chill it. Don’t fight it.
- Making giant balls. These are snacks, not baseballs. Keep them bite-sized.
- Big tip: If your mixture feels too dry, add a tiny bit more honey. Too sticky? A little more cereal saves the day.
Alternatives & Substitutions
- Want to mix things up? I respect that.
- Use crunchy peanut butter instead of creamy for extra texture. IMO, it’s elite.
- Swap honey with maple syrup for a slightly different flavor vibe.
- Try white chocolate or dark chocolate instead of regular. Fancy much?
- Add-ins: Mini marshmallows, crushed nuts, or even a pinch of sea salt. Yes, please.
- Not a peanut butter fan (who hurt you?)—you can try almond butter or sunflower seed butter instead.
FAQ (Frequently Asked Questions)
Can I make these ahead of time?
Absolutely. Store them in an airtight container, and they’ll stay fresh for up to a week. If they last that long…
🍫 The Ultimate No-Bake Dessert Ebook 🍓
30 mouthwatering no-bake recipes you can whip up in minutes — creamy cheesecakes, fruity parfaits, chocolatey bars, and more!
- ⚡Quick & easy — no oven required
- 📖30 recipes + bonus treat
- 🍓Chocolate, fruit, nutty & refreshing flavors
- ✨Beautifully designed, instant download
Do I have to use chocolate?
Nope! But also… why wouldn’t you? You can skip it, but chocolate takes these from “good” to “dangerously addictive.”
Can I freeze them?
Yes! Freeze for up to 2 months. Just thaw for a few minutes before eating—if you can wait that long.
What if my mixture is too sticky?
Chill it for 10–15 minutes. Problem solved. No stress needed.
Can I make them vegan?
Totally. Use maple syrup instead of honey and dairy-free chocolate chips. Easy swap.
Why are my balls falling apart?
Sounds dramatic, but it just means the mixture needs more binding. Add a bit more peanut butter or honey and mix again.
Final Thoughts
And there you have it—your new go-to snack that’s equal parts easy, tasty, and slightly addictive. Whether you’re making these for a party, a late-night craving, or just because you deserve something sweet (you do), they never disappoint.
Now go roll those little bites of happiness and try not to eat them all before sharing… or don’t. I’m not judging. 😉

Peanut Butter Rice Krispie Balls Recipe
Ingredients
Method
- In a large bowl, mix peanut butter, honey, powdered sugar, and vanilla until smooth
- Add Rice Krispies and gently fold until evenly coated
- Scoop small portions and roll into bite-sized balls
- Melt chocolate chips in the microwave in short intervals until smooth
- Dip or drizzle melted chocolate over each ball
- Place on parchment paper and let set until firm
- Refrigerate for faster setting if needed
Notes
Use crunchy peanut butter for extra texture
Do not overheat the chocolate to avoid burning
Store in an airtight container for up to 1 week
Freeze for longer storage up to 2 months DID YOU MAKE THIS EASY RECIPE? If you have, then share it with us by sending a photo. We’re excited to see what you’ve made:-):