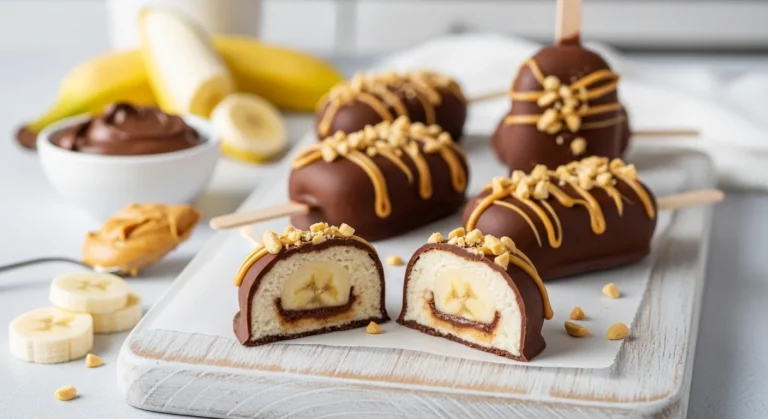
Peanut Butter Yogurt Frozen Bars Recipe
So you want dessert… but you also don’t want to turn your kitchen into a baking war zone? Yeah, same here. That’s exactly where these Peanut Butter Yogurt Frozen Bars come in. No baking, minimal effort, and somehow they still taste like you put in real work (love that for us).
These Peanut Butter Yogurt Frozen Bars are creamy, slightly sweet, and perfectly cold—basically what happens when peanut butter and yogurt decide to become best friends in your freezer. And FYI, they’re the kind of snack you “accidentally” keep eating straight from the tray. No judgment.
Let’s make something ridiculously easy and honestly kind of impressive.
Don’t forget these lovely recipes: No-Bake Peanut Butter Oat Cups Recipe
Why This Recipe is Awesome
First of all, it’s super easy. Like, “I made this while half-awake,” easy. If you can stir ingredients together and wait for a freezer to do its job, you’re qualified.
Here’s why people love these bars:
🍫 The Ultimate No-Bake Dessert Ebook 🍓
30 mouthwatering no-bake recipes you can whip up in minutes — creamy cheesecakes, fruity parfaits, chocolatey bars, and more!
- ⚡Quick & easy — no oven required
- 📖30 recipes + bonus treat
- 🍓Chocolate, fruit, nutty & refreshing flavors
- ✨Beautifully designed, instant download
- No oven required. Your kitchen stays cool and drama-free.
- Protein-packed snack. Thanks to yogurt and peanut butter.
- Perfect for meal prep. Make once, snack all week.
- Kid-approved and adult-approved. Rare combo, honestly.
- Customizable. Add chocolate, fruit, or whatever your snack-loving heart wants.
Also, they taste like a frozen peanut butter cheesecake bar… but lighter. And that’s a win.
Ingredients You’ll Need
Here’s the short and sweet shopping list:

- 2 cups Greek yogurt (plain or vanilla—your vibe, your rules)
- 1/2 cup creamy peanut butter (the good stuff, please)
- 1/4 cup honey or maple syrup
- 1 teaspoon vanilla extract
- 1/4 teaspoon salt (optional but highly recommended)
- 1/3 cup mini chocolate chips (because life is better with chocolate)
- 1/4 cup crushed peanuts or granola (for crunch, if you’re feeling fancy)
Optional toppings if you want to level up:
- Melted chocolate drizzle
- Banana slices
- Strawberry pieces
- Coconut flakes
Pro tip: Use thick Greek yogurt for the best creamy texture.
Step-by-Step Instructions
- Grab a mixing bowl and combine the Greek yogurt, peanut butter, honey (or maple syrup), vanilla extract, and salt. Stir until smooth and creamy.
If your peanut butter is stubborn, warm it slightly so it mixes more easily. - Fold in the chocolate chips and crushed peanuts or granola. Don’t overmix—just enough so everything spreads nicely throughout the mixture.
- Line a baking dish or tray (about 8×8 inches works great) with parchment paper. Trust me, this step saves your sanity later.
- Pour the mixture into the dish and spread it evenly with a spatula. Try to keep the thickness even so the bars freeze properly.
- Add any toppings you want—banana slices, chocolate drizzle, whatever makes you happy.
- Place the tray in the freezer for about 3–4 hours, or until completely firm.
- Once frozen, lift the mixture out using the parchment paper and cut into bars or squares.
- Store them in an airtight container in the freezer. And yes, sneaking one immediately is basically required.
Important tip: Let the bars sit for 2–3 minutes before eating so they soften slightly. Way better texture.
Common Mistakes to Avoid
Let’s save you from a few classic kitchen fails.
- Using runny yogurt.
If your yogurt is watery, the bars won’t freeze well. Go for thick Greek yogurt—it makes all the difference. - Skipping parchment paper.
You think you don’t need it… until the bars refuse to come out of the tray. Rookie move. - Adding too much liquid sweetener.
More honey doesn’t mean better bars. It just means softer, messier bars. - Not freezing long enough.
I get it. Waiting is hard. But if you cut them too early, you’ll get peanut butter yogurt soup. - Cutting huge bars.
They’re rich and satisfying. Smaller bars = smarter snacking.
Alternatives & Substitutions
One of the best things about this recipe? You can tweak it easily.
If you don’t have peanut butter:
- Almond butter works great.
- Cashew butter makes them extra creamy.
- Sunflower seed butter is perfect for nut-free diets.
If you want a healthier twist:
- Use unsweetened yogurt and reduce the honey.
- Add chia seeds or flaxseeds.
If you’re a chocolate lover (no shame):
- Mix in cocoa powder.
- Add dark chocolate chunks.
- Drizzle melted chocolate on top before freezing.
IMO, banana slices inside the bars are a game-changer.
FAQ (Frequently Asked Questions)
Can I use regular yogurt instead of Greek yogurt?
You can… but it’s not ideal. Regular yogurt has more water, which can make the bars icy instead of creamy. Greek yogurt = better texture.
How long do these frozen bars last?
They’ll stay good in the freezer for about 2–3 weeks if stored properly. But realistically? They disappear way faster than that.
Can I make them dairy-free?
Absolutely. Use coconut yogurt or almond milk yogurt and swap honey for maple syrup. Boom—dairy-free dessert.
Do I really need to freeze them for 4 hours?
Short answer: yes. Longer answer: Unless you enjoy messy bars that fall apart, patience is your friend here.
Can I add protein powder?
Yep! Just mix in 1–2 tablespoons of your favorite protein powder. Vanilla flavor works best.
Are these good for meal prep?
Oh, 100%. They’re basically grab-and-go snacks that feel like dessert but secretly have protein.
Can kids help make these?
Definitely. This recipe is so easy that kids can mix everything together. Just supervise the chocolate chip “taste tests.”
Final Thoughts
And there you have it—an easy, creamy, slightly addictive frozen treat that barely requires effort. Honestly, recipes like this make you look like a kitchen genius without actually doing much work.
These Peanut Butter Yogurt Frozen Bars are perfect for hot days, quick snacks, or those moments when you want dessert but also want to pretend you’re making healthy choices.
So go ahead—make a batch, stash them in the freezer, and enjoy your new favorite Peanut Butter Yogurt Frozen Bars. Or impress your friends with them. Or don’t share at all. I support that decision. 😄

Peanut Butter Yogurt Frozen Bars Recipe
Ingredients
Method
- Line an 8×8 inch baking dish with parchment paper.
- In a mixing bowl combine Greek yogurt, peanut butter, honey, vanilla extract, and salt until smooth.
- Fold in mini chocolate chips and crushed peanuts or granola.
- Spread the mixture evenly into the prepared dish.
- Add optional toppings if desired.
- Freeze for 3–4 hours or until fully firm.
- Lift from the dish using parchment paper and cut into bars.
- Store bars in an airtight container in the freezer.