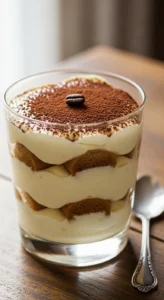
Tiramisu In A Cup Recipe
So you want dessert… but you don’t want to bake, measure like a scientist, or wash 27 dishes afterward? Yeah, same here. 😄
That’s where this Tiramisu In A Cup recipe swoops in like a dessert superhero—no oven, no stress, just layers of creamy, coffee-soaked goodness. And the best part? It looks fancy enough to fool people into thinking you actually tried.
Why This Recipe is Awesome
Let me count the ways (because I’m obsessed):
- No baking required – Your oven gets the day off.
- Ready in minutes – Instant gratification, just how we like it.
- Perfect portions – Individual cups = no sharing drama.
- Looks fancy, tastes amazing – Basically dessert catfishing, but in a good way.
- Beginner-friendly – Honestly, if you can dip biscuits in coffee, you’ve got this.
Also, FYI, this is one of those recipes where people will ask, “Did you make this?” and you’ll casually say, “Yeah,” like it wasn’t ridiculously easy.
Ingredients You’ll Need
Keep it simple—no weird stuff here:
- Ladyfinger biscuits (aka the backbone of tiramisu magic)
- Strong brewed coffee (cooled—please don’t pour lava into your dessert)
- Mascarpone cheese
- Heavy cream
- Sugar
- Vanilla extract
- Cocoa powder (for that classy dusting on top)
- Optional: chocolate shavings (because why not be extra?)
Pro tip: Use strong coffee for that authentic tiramisu flavor—weak coffee = weak dessert, and we don’t do that here.
Step-by-Step Instructions
- Make the creamy layer
In a bowl, whip the heavy cream until soft peaks form. In another bowl, mix mascarpone, sugar, and vanilla. Combine both gently until smooth and fluffy.
Don’t overmix—we’re making dessert, not butter. - Prepare the coffee dip
Pour your cooled coffee into a shallow dish. That’s it. No overthinking needed. - Dip the ladyfingers
Quickly dip each biscuit into the coffee. Like a quick splash—not a swim.
If you soak them too long, they’ll fall apart and ruin your vibe. - Start layering
Place a layer of dipped ladyfingers at the bottom of your cup. Add a layer of cream mixture on top.
Repeat until your cup is full or you run out of self-control. - Finish it off
Dust cocoa powder on top like a dessert artist. Add chocolate shavings if you’re feeling fancy. - Chill (literally)
Pop the cups in the fridge for at least 2–4 hours. Overnight is even better.
Patience = better flavor, trust me.
More About Us: Cookie Dough Energy Balls Recipe
Common Mistakes to Avoid
- Over-soaking the biscuits
You’re dipping, not drowning them. Soggy tiramisu = sad tiramisu. - Using hot coffee
Unless you want melted cream and chaos, let it cool first. - Skipping the chill time
I get it—you’re excited. But eating it immediately is like watching a movie without the ending. Wait it out. - Overmixing the cream
Too much mixing kills the fluffy texture. Be gentle, okay? - Using low-quality ingredients
This is a simple recipe, so every ingredient matters. Cheap mascarpone? You’ll taste it.
Alternatives & Substitutions
Not everything goes as planned, and that’s okay:
- No mascarpone?
Use cream cheese instead. It’s slightly tangier, but still delicious. IMO, mascarpone is better—but we adapt. - Want it egg-free?
Good news—this version already is! - No ladyfingers?
Use sponge cake or even plain biscuits. It’s not traditional, but hey, it works. - Coffee-free version?
Dip biscuits in hot chocolate or milk. Dessert for all ages unlocked. - Make it healthier?
Use low-fat cream and reduce sugar—but let’s be honest, tiramisu isn’t exactly a salad.
🍫 The Ultimate No-Bake Dessert Ebook 🍓
30 mouthwatering no-bake recipes you can whip up in minutes — creamy cheesecakes, fruity parfaits, chocolatey bars, and more!
- ⚡Quick & easy — no oven required
- 📖30 recipes + bonus treat
- 🍓Chocolate, fruit, nutty & refreshing flavors
- ✨Beautifully designed, instant download
FAQ (Frequently Asked Questions)
Can I make tiramisu in advance?
Absolutely! In fact, it tastes better the next day. More time = more flavor.
Can I freeze it?
Technically, yes, but the texture might change. It’s better fresh or chilled—not frozen solid like ice cream.
Can I skip coffee?
Sure, but then it’s basically a layered cream dessert—not classic tiramisu. Still tasty though!
How long does it last in the fridge?
About 2–3 days. After that, it starts losing its charm… and possibly your trust.
Can I add alcohol?
Oh yes! A splash of coffee liqueur or rum takes it to another level. Just don’t overdo it unless you want “tipsy tiramisu.”
Why is my cream runny?
You probably didn’t whip it enough or overmixed it. Aim for soft, fluffy peaks—not soup.
Final Thoughts
And there you have it—your new go-to dessert that looks like it came from a fancy café but actually took minimal effort. Not bad, right?
Whether you’re making this for guests, a date, or just yourself (no judgment here), this Tiramisu In A Cup recipe is a total win.
Now go ahead—grab a spoon, dig in, and enjoy every creamy, coffee-soaked bite. And hey, if someone compliments it… just smile and pretend it was hard work. 😉
Tiramisu In A Cup Recipe
Ingredients
Method
- Whip heavy cream until soft peaks form
- Mix the mascarpone cheese, sugar, and vanilla extract in a separate bowl
- Fold whipped cream into the mascarpone mixture until smooth
- Dip ladyfingers quickly into cooled coffee
- Layer dipped ladyfingers at the bottom of serving cups
- Add a layer of cream mixture over the biscuits
- Repeat layers until cups are filled
- Dust cocoa powder on top
- Add chocolate shavings if desired
- Refrigerate for at least 2–4 hours before serving
Notes
Use strong coffee for a richer flavor
Chilling improves taste and texture significantly
You can add coffee liqueur for an adult version
Best served cold for the perfect creamy consistency DID YOU MAKE THIS EASY RECIPE? If you have, then share it with us by sending a photo. We’re excited to see what you’ve made:-):