White and Dark Chocolate Mousse Recipe
So you’re craving something chocolatey… but you also want it to look like you trained in Paris for six months under a grumpy pastry chef named Claude? Same. 😌
This White & Dark Chocolate Mousse Recipe is your secret weapon. It’s rich, fluffy, dramatic (in a good way), and somehow still ridiculously easy. You’ll whip it up in under 30 minutes, chill it, and boom — you’ve got a dessert that screams “I have my life together,” even if your laundry says otherwise.
Let’s get into it.
Why This Recipe is Awesome?
First of all, it’s mousse. That word alone makes people act fancy.
But here’s why this one actually slaps:
- It’s no-bake. No oven drama.
- It uses simple ingredients you can find anywhere.
- It’s layered, so it looks impressive without extra effort.
- It’s idiot-proof. Even I didn’t mess it up.
- It’s perfect for date night, dinner parties, or “I survived Monday” celebrations.
Plus, you get the best of both worlds: deep, intense dark chocolate AND sweet, creamy white chocolate. Why choose one when you can have both? Life’s too short for chocolate limitations.
🍫 The Ultimate No-Bake Dessert Ebook 🍓
30 mouthwatering no-bake recipes you can whip up in minutes — creamy cheesecakes, fruity parfaits, chocolatey bars, and more!
- ⚡Quick & easy — no oven required
- 📖30 recipes + bonus treat
- 🍓Chocolate, fruit, nutty & refreshing flavors
- ✨Beautifully designed, instant download
Ingredients You’ll Need
Keep it simple. Keep it chocolate.
For the Dark Chocolate Mousse:
- 150g dark chocolate (at least 60% cocoa) – go bold or go home.
- 1 cup heavy whipping cream (cold)
- 2 tbsp powdered sugar
- 1 tsp vanilla extract
- Pinch of salt (yes, it matters)
For the White Chocolate Mousse:
- 150g white chocolate (good quality, please — not the waxy stuff)
- 1 cup heavy whipping cream (cold)
- 1 tsp vanilla extract
Optional but highly recommended:
- Chocolate shavings
- Fresh berries
- Crushed cookies
- A dramatic dusting of cocoa powder
Pro Tip: Always use good-quality chocolate. Cheap chocolate = sad mousse. Just saying.
Step-by-Step Instructions
1. Melt the Chocolate
Chop your dark chocolate and melt it gently using a double boiler or microwave in 20-second bursts. Stir between each round.
Don’t burn it. Burnt chocolate smells like regret.
Let it cool slightly before mixing. Warm is fine. Lava-hot? Not fine.
Repeat the same process for the white chocolate in a separate bowl.
2. Whip the Cream
Pour cold heavy cream into a chilled bowl. Add powdered sugar (for dark mousse) and vanilla.
Whip until soft peaks form. Not stiff peaks. Not butter. Soft peaks.
If you overwhip and it looks grainy… congratulations, you made sweet butter.
3. Fold, Don’t Stir
Take a scoop of whipped cream and mix it into the melted dark chocolate to loosen it up. Then gently fold the rest in using a spatula.
Fold. Do not aggressively stir like you’re mad at it.
You want to keep the air inside so the mousse stays fluffy.
Repeat this process with the white chocolate.
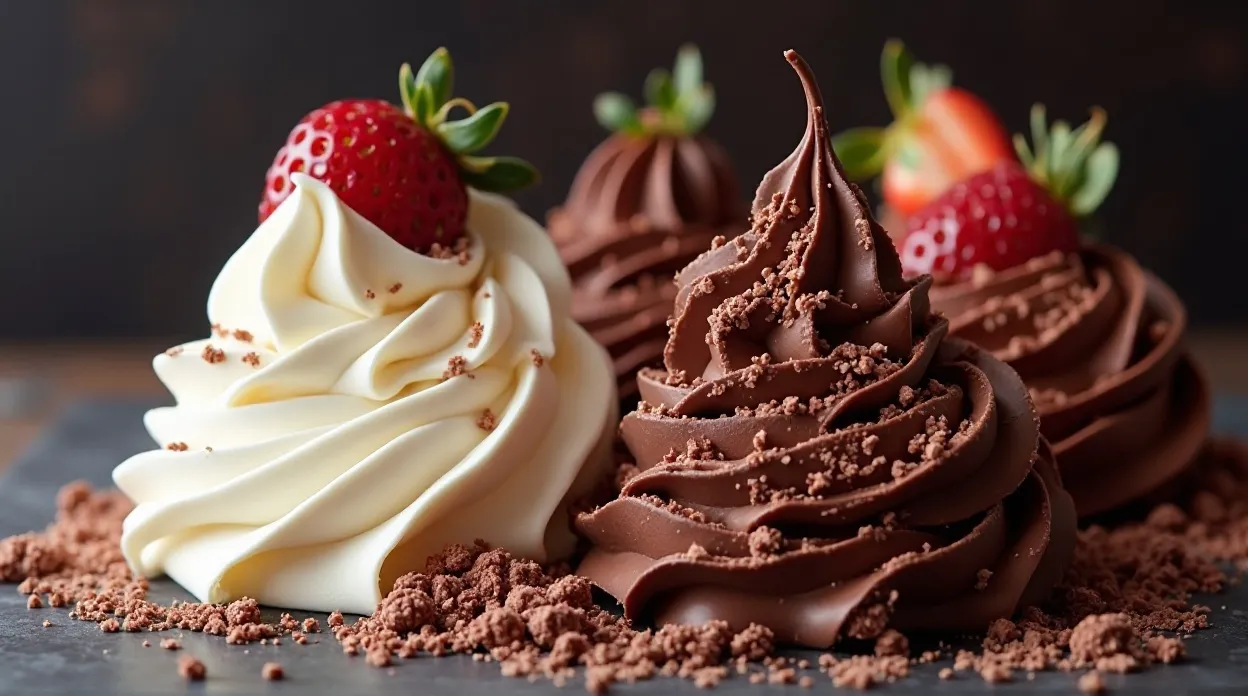
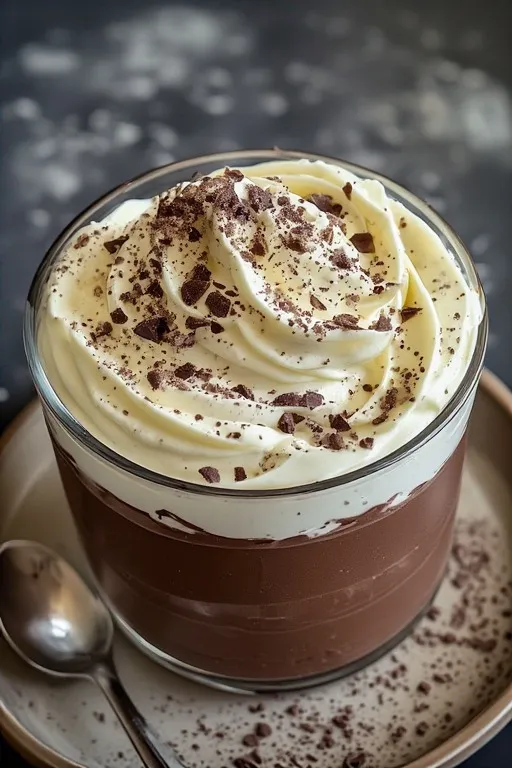
4. Layer Like a Dessert Architect
Grab serving glasses. Spoon dark mousse into the bottom. Add white mousse on top.
Want to get fancy? Pipe it in.
Want to keep it casual? Spoon it in and call it “rustic.”
Tap the glass gently to settle the layers.
5. Chill Out
Refrigerate for at least 2 hours. Overnight works too if you have patience (I rarely do).
The mousse sets beautifully and becomes silky smooth.
6. Garnish & Flex
Top with chocolate shavings, berries, or crushed cookies.
Take photos. Good lighting. Slight angle. Post if you must.
Then dig in.
Common Mistakes to Avoid
Let’s save you from dessert disaster:
- Using warm cream. It won’t whip properly. Cold = fluffy magic.
- Overheating chocolate. Microwave rage is real. Go slow.
- Overwhipping cream. You want mousse, not accidental butter.
- Skipping the chill time. Patience makes perfect texture.
- Using low-quality white chocolate. That waxy flavor ruins everything.
And please… don’t rush the folding step. Air is your friend. Keep it alive.
Alternatives & Substitutions
Want to tweak things? I respect it.
- Swap dark chocolate with semi-sweet if you prefer less bitterness.
- Add espresso powder to the dark mousse for a mocha vibe. IMO, this takes it next level.
- Mix orange zest into the dark chocolate for a subtle citrus kick.
- Add crushed Oreos between layers for texture.
- Use coconut cream instead of heavy cream for a dairy-free option (chill it overnight first).
Feeling adventurous? Add a splash of liqueur like Baileys or Grand Marnier.
Just don’t overdo it unless you want tipsy mousse. 😅
FAQs
Can I make this White & Dark Chocolate Mousse Recipe ahead of time?
Absolutely. In fact, it tastes better after chilling overnight. The flavors deepen, and the texture becomes silky perfection.
Can I freeze chocolate mousse?
Technically yes, but it changes texture slightly. It turns into more of a frozen dessert situation. Not bad — just different.
Why did my mousse turn grainy?
You probably overheated the chocolate or overwhipped the cream. Slow down next time. Mousse rewards patience.
Can I use milk chocolate instead of dark?
Of course. It’ll be sweeter and less intense. If you love sweet desserts, go for it.
How long does mousse last in the fridge?
About 3 days, covered tightly. But let’s be honest — it won’t survive that long.
Can I make this without an electric mixer?
Yes, but prepare for an arm workout. Whisk like you mean it.
Is this recipe kid-friendly?
Definitely. Just skip any alcohol additions. Kids love the layered look — it’s basically edible art.
Final Thoughts
This White & Dark Chocolate Mousse Recipe proves you don’t need complicated techniques to create something that looks and tastes luxurious.
It’s creamy. It’s rich. It’s dramatic. It’s basically the Beyoncé of desserts.
And the best part? You made it. No culinary degree required.
So go ahead. Serve it at your next dinner. Impress your guests. Or eat it straight from the fridge in pajamas at midnight — no judgment here.
Now grab a spoon and dive in. You’ve earned this chocolate moment. 🍫✨