

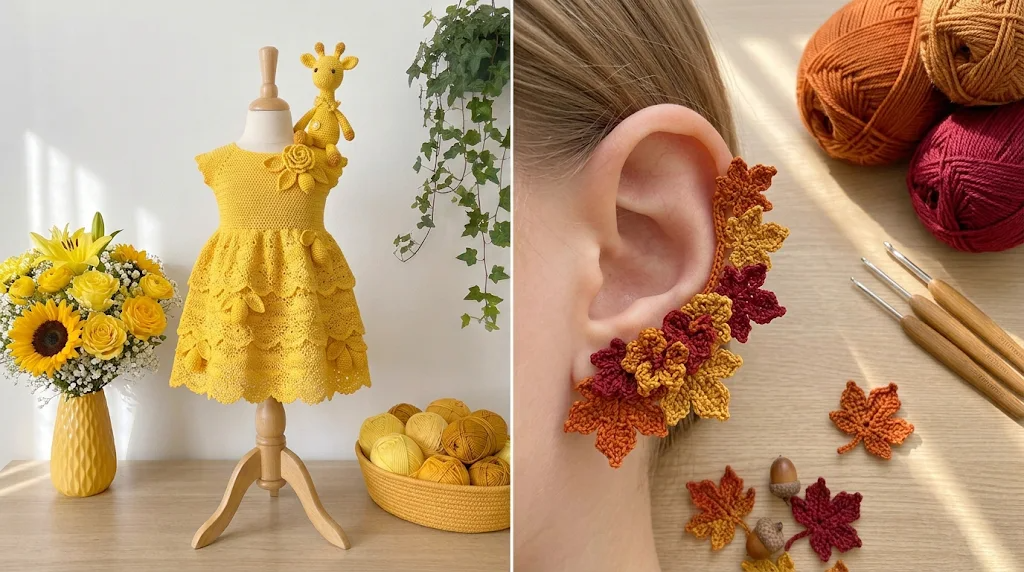
There is something about autumn colors that makes even the smallest accessories feel special. I love the combination of burnt orange, warm mustard, golden brown, and deep rust that appears in nature when the leaves begin to change. Those colors inspired me to create a tiny piece of wearable crochet that captures the beauty of the season.
I wanted to design earrings that were a little different from traditional crochet earrings. Instead of making large dangling pieces, I imagined delicate maple leaves following the natural curve of the ear. The result is a lightweight ear climber with miniature leaves arranged along a graceful vine.
This Autumn Maple Ear Climber Free Crochet Pattern combines fine crochet details, miniature leaf motifs, and simple jewelry-making techniques. Although the finished earrings look intricate, the individual pieces are small and manageable once you understand the stitches.
The finished pair makes a lovely autumn accessory and a thoughtful handmade gift for anyone who enjoys nature-inspired jewelry.
About This Pattern
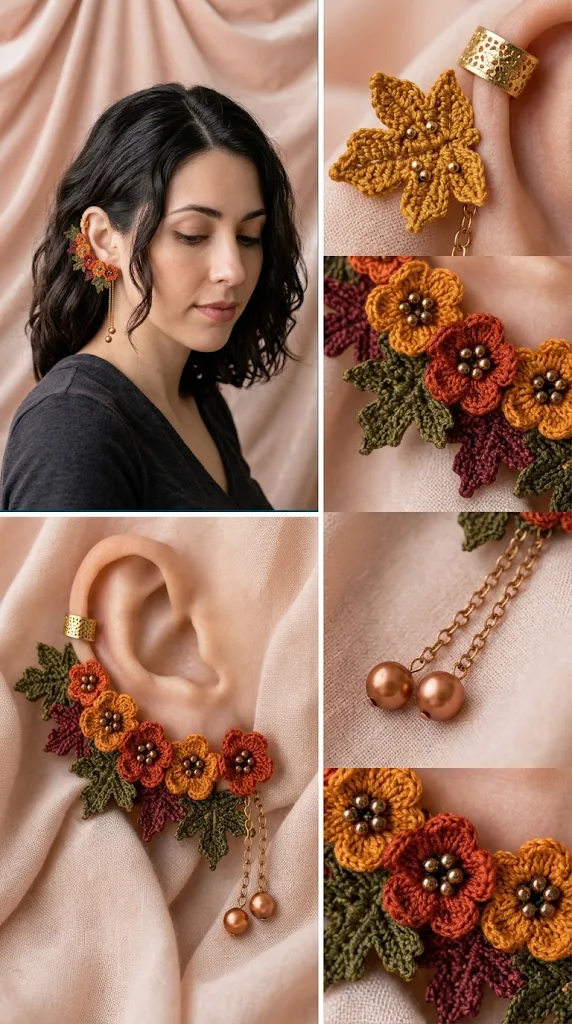
These crochet maple ear climbers are designed around a flexible jewelry-wire foundation decorated with three miniature maple leaves.
Each earring features:
- Three tiny maple leaves in coordinating autumn colors.
- A delicate crocheted vine running along the ear.
- A flexible wire foundation that helps maintain the curved shape.
- A small earring post for comfortable attachment.
- A neat, lightweight finish suitable for everyday wear.
Skill Level: Intermediate
You should be comfortable working with fine crochet thread, small hooks, chain stitches, slip stitches, single crochet, and double crochet.
The maple leaves require a little patience because their pointed edges are formed with combinations of stitches and chains.
Finished Size:
- Length: approximately 2.25–2.5 inches (5.7–6.4 cm).
- Width: approximately 0.5–0.75 inches (1.3–1.9 cm).
- Leaves: approximately 0.4–0.55 inches (1–1.4 cm) each.
The dimensions are approximate and can vary depending on your thread, hook, and tension.
Construction: Each earring is made from a crocheted vine, three separate maple leaf motifs, and a shaped jewelry-wire foundation. The wire provides structure while the crochet creates the decorative surface.
Materials You’ll Need
Yarn and Thread
Use fine crochet cotton thread to keep the leaves crisp and lightweight.
- Color A – Burnt Orange: Approximately 8 meters (9 yards) for the main maple leaves.
- Color B – Mustard Yellow: Approximately 6 meters (6.5 yards) for the second leaf.
- Color C – Rust Brown: Approximately 6 meters (6.5 yards) for the third leaf and small details.
- Color D – Deep Autumn Brown: Approximately 5 meters (5.5 yards) for the vine.
Cotton thread gives the leaves good stitch definition and helps them maintain their shape.
Crochet Hooks
- 1.25 mm steel crochet hook for the leaves.
- 1.5 mm steel crochet hook for the vine.
Jewelry Supplies
- Two nickel-free earring posts with butterfly backs.
- Approximately 30 cm (12 inches) of 26-gauge jewelry wire.
- Four small jewelry jump rings.
- Jewelry pliers.
- Wire cutters.
- Two small jewelry connector loops, if needed.
Other Supplies
- Tapestry needle.
- Small sharp scissors.
- Stitch markers.
- Blocking pins.
- Blocking mat.
- Clear jewelry-safe adhesive (optional, for securing hardware).
Important: Choose skin-friendly, nickel-free earring findings. Keep wire ends completely covered, smooth, and away from the skin. If you have sensitive ears, choose hypoallergenic materials.
Abbreviations and Terminology
This pattern uses US crochet terminology.
| Abbreviation | Meaning |
|---|---|
| ch | Chain |
| sl st | Slip stitch |
| sc | Single crochet |
| hdc | Half double crochet |
| dc | Double crochet |
| tr | Treble crochet |
| st | Stitch |
| sts | Stitches |
| sp | Space |
| MR | Magic ring |
| FO | Fasten off |
| RS | Right side |
| WS | Wrong side |
Stitch Explanations
- Chain (ch): Yarn over and pull through the loop on your hook.
- Slip Stitch (sl st): Insert your hook, yarn over, and pull through both the stitch and the loop on your hook.
- Single Crochet (sc): Insert your hook, yarn over and pull up a loop. Yarn over and pull through both loops.
- Half Double Crochet (hdc): Yarn over, insert your hook, pull up a loop, yarn over, and pull through all three loops.
- Double Crochet (dc): Yarn over, insert your hook, pull up a loop, yarn over and pull through two loops twice.
- Treble Crochet (tr): Yarn over twice, insert your hook, pull up a loop, then yarn over and pull through two loops three times.
- Magic Ring (MR): Make an adjustable loop, work the required stitches into it, and pull the tail to close.
Turning chains do not count as stitches unless a step specifically says otherwise.
Gauge
Gauge is less important for miniature jewelry than for garments, but consistent tension is essential.
Make a small practice swatch using your chosen cotton thread and 1.25 mm hook.
Aim for approximately:
- 10 single crochet stitches measuring 1 inch (2.5 cm).
- 10 rows measuring approximately 1 inch (2.5 cm).
Your stitches should be firm without becoming stiff.
If your fabric looks loose and the leaves have large gaps, try a smaller hook. If you struggle to insert your hook or the motifs curl tightly, move up slightly.
For the best results, keep your tension consistent throughout both earrings.
Main Pattern Instructions
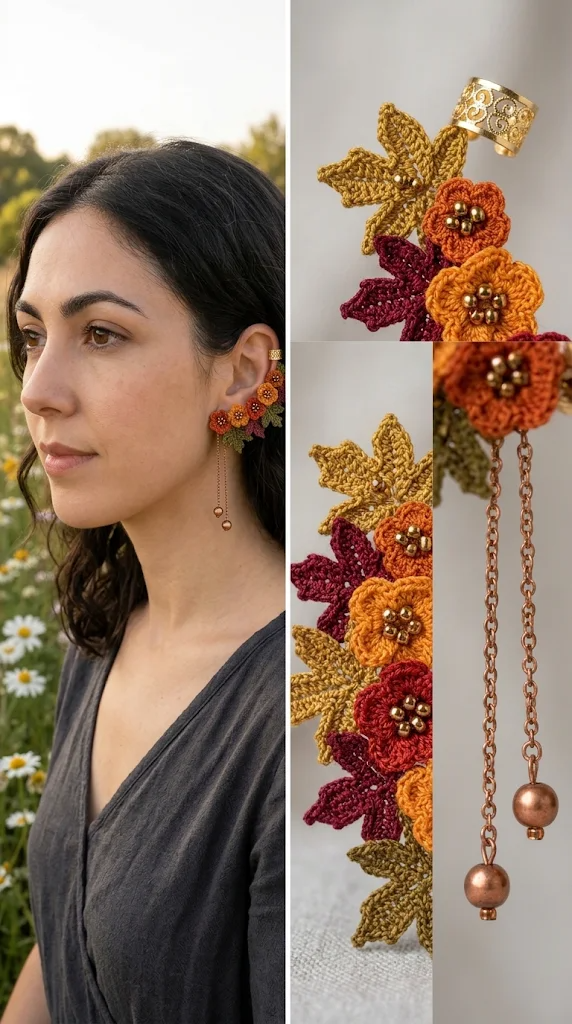
The earrings are worked in three stages:
- Crochet the miniature maple leaves.
- Create the curved crochet vine.
- Attach the leaves and jewelry hardware.
Make two matching earrings, using the same color arrangement. You can reverse the leaf placement on the second earring to create a mirrored pair.
Part 1: Crochet the Miniature Maple Leaves
Each earring has three five-point maple leaves. Make six leaves in total.
The leaves are worked individually using a small magic ring. Each point is crocheted separately around the center ring, creating a delicate star-shaped maple silhouette.
Leaf Pattern
Use the 1.25 mm crochet hook.
Round 1: Make a magic ring. Work 1 sc into the ring and pull the ring slightly closed, leaving enough space to work around it.
Leaf Point 1:
- Ch 5.
- Sl st into the second ch from the hook.
- Sc into the next ch.
- Hdc into the next ch.
- Dc into the final ch.
- Sl st into the center ring.
Leaf Point 2: Repeat the same sequence: ch 5, sl st in second ch, sc, hdc, dc, sl st into the ring.
Leaf Points 3–5: Repeat the same instructions three more times.
You should now have five pointed sections radiating from the center.
Finishing Round: Work 1 sl st into the center ring, gently tighten the magic ring, and FO, leaving a 6-inch tail for sewing.
Count: 5 pointed lobes around one central ring.
The five points create the recognizable maple-inspired shape. The longest stitches form the outer tips, while the slip stitches keep the center compact.
Make the Leaves in Autumn Colors
For each earring, make:
- 1 burnt orange maple leaf.
- 1 mustard yellow maple leaf.
- 1 rust brown maple leaf.
Repeat for the second earring.
Designer tip: Keep the leaves slightly different in tension rather than pulling every stitch extremely tight. A little natural texture makes the miniature motifs look more like real autumn foliage.
Part 2: Create the Crochet Vine
The vine forms the long decorative section that follows the outer curve of the ear.
Use Color D and the 1.5 mm crochet hook.
Foundation: Ch 22.
Row 1: Sc in the second ch from the hook and in each remaining ch across.
Count: 21 sc.
Row 2: Ch 1, turn. Sl st in each stitch across.
Count: 21 sl sts.
FO, leaving a long tail for assembly.
The finished vine should measure approximately 2.25 inches (5.7 cm). If your thread produces a shorter piece, add two or three foundation chains.
The single crochet row creates a narrow, stable foundation, while the slip stitch row gives the vine a neat finished edge.
Part 3: Prepare the Flexible Wire Foundation
The jewelry wire helps the ear climber maintain its curved shape.
Cut one piece of 26-gauge jewelry wire approximately 3.5 inches (9 cm) long for each earring.
- Use jewelry pliers to form a small closed loop at one end.
- Position the wire along the wrong side of the crocheted vine.
- Using the long yarn tail and a tapestry needle, sew the wire securely to the vine.
- Make small securing stitches approximately every 3–4 crochet stitches.
- Fold the opposite wire end inward and form another small closed loop.
The wire should follow the length of the vine without extending beyond the crochet fabric.
Check both ends carefully. No sharp wire should be exposed.
Important: Do not use an exposed wire end as an earring attachment. The loops must be completely closed, smooth, and covered or positioned safely away from the skin.
Part 4: Add the Maple Leaf Details
Arrange the three leaves along the vine.
For each earring:
- Place the burnt orange leaf near the upper section.
- Position the mustard yellow leaf in the middle.
- Attach the rust brown leaf closer to the lower section.
Leave approximately 3–4 crochet stitches between the leaf centers.
The leaves should overlap the vine slightly without covering the entire crochet foundation.
Attaching Each Leaf
- Thread the 6-inch tail onto your tapestry needle.
- Position the leaf with its right side facing outward.
- Sew through the central ring of the leaf and the crochet vine.
- Make several small stitches to secure the motif.
- Bring the yarn tail to the wrong side.
- Weave in the remaining yarn securely.
Repeat for all six leaves.
Try to angle the leaf points slightly outward. This gives the earrings a natural branching appearance instead of making the leaves look like a straight row of stars.
Part 5: Add Small Decorative Veins
To give your leaves extra definition, use a small amount of contrasting cotton thread.
Choose a slightly darker shade than the leaf color.
- Thread a tapestry needle with approximately 8 inches of thread.
- Bring the needle through the back of the leaf near its center.
- Make one small straight stitch toward the tip of each lobe.
- Keep the stitches on the surface and avoid pulling tightly.
- Secure the thread on the wrong side.
The decorative lines imitate the veins found in real maple leaves.
This detail is optional, but I love the extra definition it gives the finished earrings.
Special Techniques and Additional Elements
Creating a Natural Maple Leaf Shape
The five pointed sections are the most important design feature.
When working each point, keep the chain stitches even. If you pull the slip stitch too tightly, the leaf can curl inward.
The combination of slip stitch, single crochet, half double crochet, and double crochet creates a gradual increase in height.
This gives each lobe a tapered appearance.
Shaping the Ear Climber
The wire foundation should be flexible enough to follow the curve of the ear but firm enough to hold its position.
Gently bend the finished vine around a smooth cylindrical object or your fingers to create a soft curve.
Avoid making sharp bends near the leaves because this can distort the crochet stitches.
You can adjust the curve during final fitting.
Adding Tiny Decorative Beads (Optional)
For a little extra sparkle, add one or two tiny gold-colored seed beads near the leaf centers.
Use jewelry thread or a fine sewing needle to attach them securely.
Make sure all beads are firmly attached, especially if the earrings may be worn around young children.
Assembly and Finishing
Once all the leaves and vine pieces are ready, it’s time to turn them into wearable earrings.
Step 1: Arrange the Components
Place the vine on a flat surface with the right side facing upward.
Arrange the three leaves in their planned positions. Check that the colors flow naturally from burnt orange to mustard yellow and rust brown.
The leaves should sit slightly diagonally rather than perfectly straight.
Step 2: Attach the Earring Post
Use a small jewelry jump ring to connect the earring post or a compatible jewelry connector to the lower wire loop.
If your earring posts have a flat pad, you can attach the crochet foundation to a compatible jewelry pad using a small amount of jewelry-safe adhesive.
Allow the adhesive to cure according to its manufacturer’s instructions.
Make sure the post sits in a position that allows the vine to climb comfortably along the ear.
Step 3: Shape the Ear Climber
Gently curve the wire foundation into a shape that follows the outer edge of the ear.
The lower section should sit near the earlobe, while the upper section should follow the natural curve of the ear.
Do not force the wire into a tight curve. A gentle shape looks more natural and is easier to adjust.
Step 4: Finish the Second Earring
Repeat the assembly process for the second earring.
Compare both pieces side by side.
Check that:
- Both vines have approximately the same length.
- The leaves are positioned at similar intervals.
- The colors are arranged consistently.
- The jewelry posts face the correct direction.
- No wire ends or loose threads are exposed.
Step 5: Final Inspection
Before wearing the earrings, gently inspect every connection.
Tug lightly on each leaf to check that it is secure. Check the jump rings and earring backs, and smooth any rough metal edges.
Never wear the earrings if a wire end is exposed or a metal component feels sharp against your skin.
Blocking and Care
Miniature crochet motifs benefit from gentle blocking. It helps the maple leaves open up and gives the points a more defined appearance.
Wet Blocking
- Fill a small bowl with cool water.
- Add a little mild detergent suitable for cotton.
- Place the loose crochet leaves in the water for approximately five minutes.
- Remove them carefully without twisting.
- Press gently between a clean towel.
- Arrange the leaves on a blocking mat.
- Use fine pins to open the five points.
- Allow the pieces to dry completely.
Block the leaves before attaching them to the wire foundation and jewelry hardware.
Avoid soaking assembled earrings because water and cleaning products may damage some jewelry finishes or adhesives.
Care Instructions
To keep your Autumn Maple Ear Climbers looking beautiful:
- Store them in a small jewelry box or fabric pouch.
- Keep them away from perfume, hairspray, and cosmetics.
- Avoid wearing them while swimming or showering.
- Do not pull on the crocheted leaves.
- Keep them away from excessive heat.
- Remove them before sleeping or exercising.
- Clean gently with a dry, soft cloth.
If the leaves become dusty, use a soft makeup brush to clean between the stitches.
Fit and Troubleshooting Tips
Even small crochet accessories can present a few challenges. Here are some solutions to common problems.
1. My Maple Leaves Are Curling
This usually happens when your stitches are too tight or the points are pulled inward.
Solution: Try using a slightly larger hook and relax your tension. Block the leaves while gently opening all five points.
2. My Leaves Look More Like Stars Than Maple Leaves
The five pointed sections create a maple-inspired silhouette, but the center can look too rounded if the points are not clearly defined.
Solution: Make sure each point has the full sequence of slip stitch, single crochet, half double crochet, and double crochet. Add the optional decorative veins to strengthen the leaf appearance.
3. The Crochet Vine Is Too Short
Different thread brands and individual tension can change the finished length.
Solution: Add two or three chains to the foundation before working the single crochet row. Make sure both earrings have matching lengths.
4. The Vine Will Not Hold Its Shape
The wire may be too soft, or it may not be secured evenly.
Solution: Check that the wire is attached every 3–4 stitches. Use a suitable jewelry wire with enough flexibility to curve without collapsing.
5. My Leaves Keep Moving
This usually means the center attachment is not secure enough.
Solution: Add a few extra sewing stitches through the center ring and vine. Keep the stitches small and hide the ends on the wrong side.
6. The Earrings Feel Too Heavy
Heavy jewelry findings, thick thread, or oversized beads can affect comfort.
Solution: Use lightweight cotton thread, small jewelry findings, and fewer decorative beads. The finished earrings should feel delicate rather than bulky.
7. The Two Earrings Look Different
Small differences in tension can change the shape and size of miniature motifs.
Solution: Use the same hook, thread, and stitch tension for both earrings. Compare the leaves before assembly and block them to similar dimensions.
Customization Ideas
One of my favorite things about this pattern is how easily you can change the colors and decorative details.
Here are a few variations worth trying.
Traditional Autumn Leaves: Use burnt orange, golden yellow, and dark rust for a classic fall palette.
Deep Burgundy Collection: Replace the mustard shade with burgundy and use wine red with chocolate brown.
Golden Maple Earrings: Use three shades of yellow and add tiny gold-colored seed beads.
Earthy Neutral Version: Choose cream, caramel, taupe, and warm brown for a softer everyday accessory.
Winter Woodland Version: Try forest green, muted olive, and cream for a nature-inspired winter design.
You can also experiment with different leaf arrangements. Three leaves create a balanced design, while two slightly larger leaves give the earrings a simpler appearance.
Final Thoughts
I absolutely love how these tiny maple leaves transform a simple crochet vine into a delicate seasonal accessory. The combination of warm colors, miniature details, and a graceful curved shape makes these earrings feel special without requiring a large amount of thread or complicated construction.
This Autumn Maple Ear Climber Free Crochet Pattern is a lovely project for anyone who enjoys making handmade jewelry and experimenting with miniature crochet motifs.
Take your time with the leaves, enjoy choosing your autumn color palette, and don’t worry if your first motif isn’t perfectly symmetrical. Handmade details are part of what makes crochet jewelry charming.
I’d love to see the colors you choose for your finished pair! Share your creation in the comments or tag me on Pinterest so other crochet lovers can enjoy your beautiful autumn-inspired earrings.
Happy crocheting, and may your days be filled with warm colors, creative moments, and lovely handmade treasures!



Leave a Reply
You must be logged in to post a comment.