

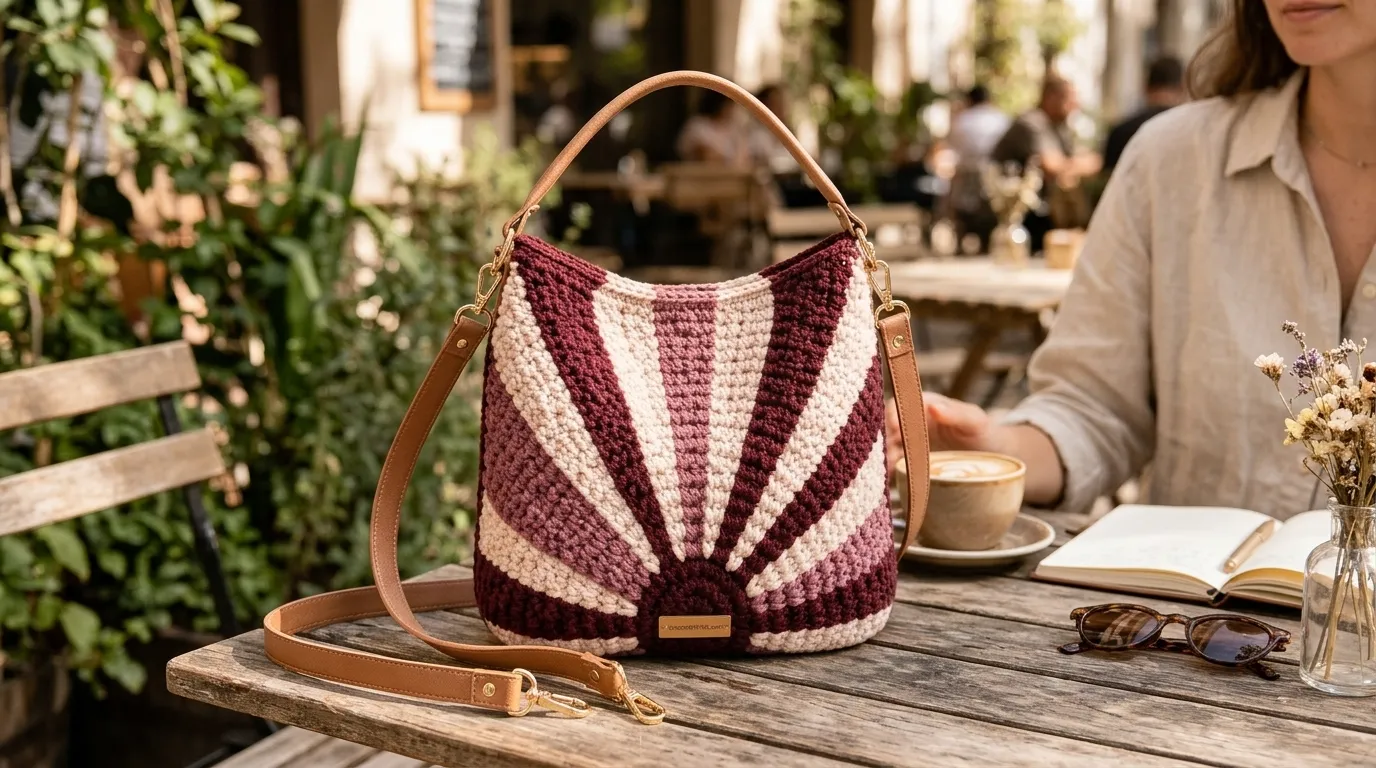
What makes this design special is the combination of traditional crochet squares and a relaxed hobo silhouette. The motifs create a gorgeous floral texture, while the gently curved body gives the bag that casual, comfortable shape we all love.
This Berry Blush Sunburst Hobo Bag Free Crochet Pattern is a fun project for confident beginners and intermediate crocheters who enjoy joining motifs and working with multiple colors.

About This Berry Blush Sunburst Hobo Bag Pattern
This bag is constructed from individual sunburst granny motifs joined together to create a soft, flexible body.
Each motif features a creamy center, blush-colored petals, and a deeper berry-colored outer round. Once the motifs are completed, they are arranged into two matching panels and joined along the sides and bottom.
A simple crochet gusset helps create extra room inside the bag, while the upper edge is shaped with a few decrease rounds to produce a gentle hobo-style curve.
The shoulder strap is crocheted separately and attached securely to both upper sides.
- Skill Level: Intermediate
- Construction: Motif-based, joined panels
- Bag Shape: Soft crescent-style hobo bag
- Finished Width: Approximately 13 inches
- Finished Height: Approximately 11 inches
- Depth: Approximately 3 inches
- Strap Length: Approximately 24 inches
- Terminology: US crochet terms
The finished bag is designed to have a relaxed structure. If you prefer a firmer everyday handbag, you can add a fabric lining before attaching the strap.
Materials You’ll Need
Yarn
Choose a medium-weight cotton or cotton-blend yarn. Cotton provides excellent stitch definition and helps the motifs maintain their shape.
| Color | Purpose | Approximate Amount |
|---|---|---|
| Color A: Warm Cream | Motif centers | 100 yards |
| Color B: Soft Blush Pink | Flower petals | 180 yards |
| Color C: Berry Rose | Motif background | 250 yards |
| Color D: Deep Raspberry | Borders and accents | 100 yards |
| Color E: Dusty Mauve | Strap and finishing | 170 yards |
Allow approximately 15% extra yarn if your tension varies.
Crochet Hooks
- 4.0 mm crochet hook for motifs.
- 4.5 mm crochet hook for the bag body and strap.
- 3.5 mm crochet hook for tighter finishing details.
Notions
- Tapestry needle
- Stitch markers
- Sharp scissors
- Measuring tape
- Blocking mat and pins
- Optional cotton fabric for lining
- Optional magnetic bag closure
Abbreviations and Terminology
All instructions use US crochet terminology.
- ch: Chain. Yarn over and pull through the loop on your hook.
- sl st: Slip stitch. Insert the hook, yarn over, and pull through both loops.
- sc: Single crochet. Insert hook, yarn over, pull up a loop, yarn over, pull through two loops.
- hdc: Half double crochet. Yarn over, insert hook, pull up a loop, yarn over, pull through all three loops.
- dc: Double crochet. Yarn over, insert hook, pull up a loop, yarn over and pull through two loops twice.
- tr: Treble crochet. Yarn over twice, insert hook, pull up a loop, and pull through two loops three times.
- st(s): Stitch(es).
- sp: Space.
- sk: Skip.
- rep: Repeat.
- rnd: Round.
- FO: Fasten off.
- RS: Right side.
- WS: Wrong side.
Special Stitches
- Cluster: Work the specified number of partially completed stitches into the same space, then yarn over and pull through all remaining loops.
- Puff stitch: Yarn over, insert hook, pull up a loop several times in the same space, then yarn over and pull through all loops.
- Shell: Work multiple double crochet stitches into one space.
Turning chains do not count as stitches unless a step explicitly says they do.
Gauge
Gauge is important because the finished bag depends on consistent motif sizing.
Make one practice sunburst square using your 4.0 mm hook.
After blocking, your square should measure approximately 4.5 × 4.5 inches.
If your square is larger than this, try a smaller hook. If it is smaller, move up one hook size.
Keep your tension consistent throughout the project.
Main Pattern Instructions
Part 1: Making the Sunburst Granny Motifs
You will need 12 matching sunburst motifs.
Each motif should measure approximately 4.5 inches after blocking.
Start with Color A (Warm Cream).
Round 1: Center Circle
- Make a magic ring.
- Ch 3 (counts as first dc).
- Work 11 dc into the ring.
- Pull the ring closed.
- Sl st into the top of the beginning ch-3.
Count: 12 dc.
FO Color A.
Round 2: Blush Petals
Join Color B in any stitch.
- Ch 2.
- Work one puff stitch into the same stitch.
- Ch 1.
- Work one puff stitch into the next stitch.
- Continue around, working one puff stitch and ch 1 in each stitch.
- Sl st to the first puff stitch.
Count: 12 puff stitches and 12 chain spaces.
FO Color B.
Round 3: Berry Sunburst
Join Color C in any chain space.
- Ch 3.
- Work 2 dc into the same space.
- Move to the next chain space and work 3 dc.
- Continue around.
- Sl st to the beginning ch-3.
Count: 36 dc.
FO Color C.
Round 4: Square Formation
Join Color D in any space between the 3-dc groups.
- Ch 3.
- Work 2 dc into the same space.
- Ch 2.
- Work 3 dc into the same space to form the first corner.
- Work 3 dc into each of the next two spaces.
- In the following space, work 3 dc, ch 2, 3 dc to create the next corner.
- Continue until all four corners are complete.
- Sl st to the beginning ch-3.
Count: Four corner spaces and four side sections.
FO.
Round 5: Final Border
Join Color E (Dusty Mauve) in any corner space.
- Ch 1.
- Work 3 sc into the corner space.
- Work 1 sc into each stitch along the side.
- Work 3 sc into the next corner space.
- Repeat around.
- Sl st to the first sc.
FO.
Your completed square should have a soft floral center surrounded by a berry-colored sunburst background and a neat mauve border.
Repeat until you have 12 motifs.
Part 2: Arranging the Bag Panels
You will create two matching panels using six motifs for each side.
Arrange the motifs in three rows of two.
Before joining, block all 12 squares to the same measurements.
Lay out six squares for the front panel and six for the back panel.
Keep the colors and flower centers facing the same direction for a coordinated appearance.
Joining the Motifs
Place two squares together with their right sides facing outward.
Using Color D and a tapestry needle, whip stitch the edges together through the outer loops.
You can also use a slip-stitch crochet join if you prefer a slightly raised seam.
Join the three rows vertically first, then join the two columns together.
Repeat for the second panel.
You should now have two rectangular panels measuring approximately 9 × 13.5 inches before final shaping.
Part 3: Creating the Bottom Gusset
The gusset creates depth and makes the bag more practical.
Join Color C at the bottom corner of the front panel.
Round 1
- Ch 1.
- Work sc evenly across the bottom edge.
- Continue along the side edge.
- Work sc across the top edge.
- Continue down the opposite side.
- Join with a sl st.
Round 2
- Ch 1.
- Work 1 sc in each stitch around.
- Place stitch markers at both bottom corners.
- Work 3 sc in each marked corner stitch.
- Join with a sl st.
Rounds 3–5
Repeat Round 2 without increasing at the corners.
The extra rounds create a soft base and a little more room inside the bag.
Part 4: Joining the Front and Back Panels
Place the front and back panels together with the wrong sides facing inward.
The gusset should sit between the two panels.
Using Color D, join the edges with sc stitches.
Work slowly around the sides and bottom, matching the stitches carefully.
Leave the upper edge open.
Check that both panels sit evenly before fastening off.
Weave in all loose ends.
Part 5: Shaping the Hobo Bag Opening
Join Color E at one upper side of the bag.
Round 1: Work sc evenly around the top opening. Join with a sl st.
Round 2: Ch 1 and work 1 hdc in each stitch around.
Round 3: Work sc around, decreasing approximately every 12 stitches.
To make a decrease, insert the hook into the next stitch, pull up a loop, insert into the following stitch, pull up another loop, yarn over, and pull through all three loops.
This slight shaping helps the top opening curve inward.
Round 4: Work one final round of sc without decreases.
FO and weave in the ends.
Part 6: Crocheting the Shoulder Strap
The strap should be comfortable, sturdy, and wide enough to sit nicely on your shoulder.
Using Color E and a 4.5 mm hook:
Foundation: Ch 9.
Row 1: Sc in the second ch from hook and across. (8 sc)
Row 2: Ch 1, turn, sc in each stitch across. (8 sc)
Rows 3–90: Repeat Row 2 until the strap measures approximately 24 inches.
For extra strength, work a final round of sc around the entire strap, placing 3 sc in each corner.
FO, leaving a long tail for sewing.
Part 7: Attaching the Strap
Place one end of the strap at the upper left side seam.
Attach it using a tapestry needle and several rows of reinforced whip stitches.
Repeat on the opposite side.
For extra security, sew a small rectangular reinforcement using matching yarn at each attachment point.
Avoid relying on only one row of stitches. The strap needs to support the weight of the bag and its contents.
Special Techniques and Additional Details
Adding a Decorative Berry Border
For a more finished appearance, add a small decorative border around the upper opening.
Join Color B and work:
- Ch 1.
- Sc in the first stitch.
- Ch 2.
- Sk 1 stitch.
- Sc in the next stitch.
- Repeat around.
This creates delicate little loops that complement the blush flower petals.
Optional Bag Lining
A cotton lining is a lovely addition if you plan to carry keys, cosmetics, or other small items.
- Cut two fabric pieces matching the bag panels, allowing approximately half an inch for seams.
- Sew the pieces together along the sides and bottom.
- Fold the top edge inward and stitch neatly.
- Place the lining inside the crochet bag and hand-sew it beneath the upper crochet border.
Optional Magnetic Closure
Attach a small magnetic snap closure near the center of the upper opening.
Reinforce the fabric or crochet area before attaching the snap so it does not stretch with use.
Assembly and Finishing
Before considering the bag complete, take a few minutes to inspect the construction.
- Check that all motif seams are secure.
- Weave in remaining yarn tails.
- Make sure the strap attachments are reinforced.
- Check that the top opening is even.
- Remove any visible blocking pins or loose fibers.
- Add your optional lining and closure.
I recommend gently shaping the bag with your hands before blocking. Pay particular attention to the bottom gusset and the upper curved edge.
Blocking and Care
Because this design uses cotton yarn, wet blocking works beautifully.
- Fill a basin with cool or lukewarm water.
- Add a small amount of gentle detergent.
- Submerge the bag briefly.
- Rinse carefully.
- Press out excess water using a clean towel.
- Lay the bag flat on a blocking mat.
- Shape the body and smooth the motifs.
- Allow it to dry completely.
Never twist or wring the bag.
For regular care, hand wash when necessary and dry flat. Avoid hanging the bag while wet because the weight of the water may stretch the strap and body.
Fit and Troubleshooting Tips

My motifs are curling at the edges.
Your tension may be too tight. Try using a larger hook and check that you are working the correct number of stitches in each round.
The bag looks too stiff.
Cotton yarn can create a firm fabric. Try a slightly larger hook for the body and avoid pulling your joining stitches too tightly.
The bag opening looks uneven.
Count the stitches around the upper edge and distribute decreases evenly. Use stitch markers to identify both side seams.
The strap stretches too much.
Add a reinforcing round of sc around the strap or sew a narrow cotton webbing strip along its underside.
I want a larger bag.
Make 16 motifs instead of 12 and arrange them in four rows of two for each panel. Remember to increase the gusset length and strap placement accordingly.
I want a smaller bag.
Use a thinner yarn and smaller hook, or make fewer motifs while maintaining a balanced panel arrangement.
Final Thoughts
There is something especially satisfying about turning a collection of little crochet squares into a beautiful everyday accessory. Each sunburst motif adds its own burst of color, and together they create a bag that feels cheerful, handmade, and full of personality.
I love how the warm cream centers soften the berry shades, while the blush petals bring everything together. The relaxed hobo shape makes this bag easy to pair with casual dresses, jeans, summer outfits, and even cozy autumn layers.
I hope you enjoy making this Berry Blush Sunburst Hobo Bag Free Crochet Pattern as much as I enjoyed designing it.
Feel free to experiment with your favorite color combinations, add a lining, or adjust the strap to suit your style. Every handmade version will have its own personality.
Happy crocheting! 💗



Leave a Reply
You must be logged in to post a comment.