


Some crochet projects are special because of their size, while others are memorable because of the little details that make them feel personal. I have always loved delicate handmade jewelry, especially pieces that combine soft colors with tiny decorative motifs. A small crocheted butterfly has a lovely way of making even the simplest accessory feel cheerful.
For this design, I wanted something bright, lightweight, and comfortable enough to wear throughout the day. Sunshine yellow seemed like the perfect choice. It reminds me of warm mornings, blooming flowers, and the first signs of spring. I paired the cheerful color with a simple bracelet band and tiny butterfly charms to create a piece that feels playful without looking overly complicated.
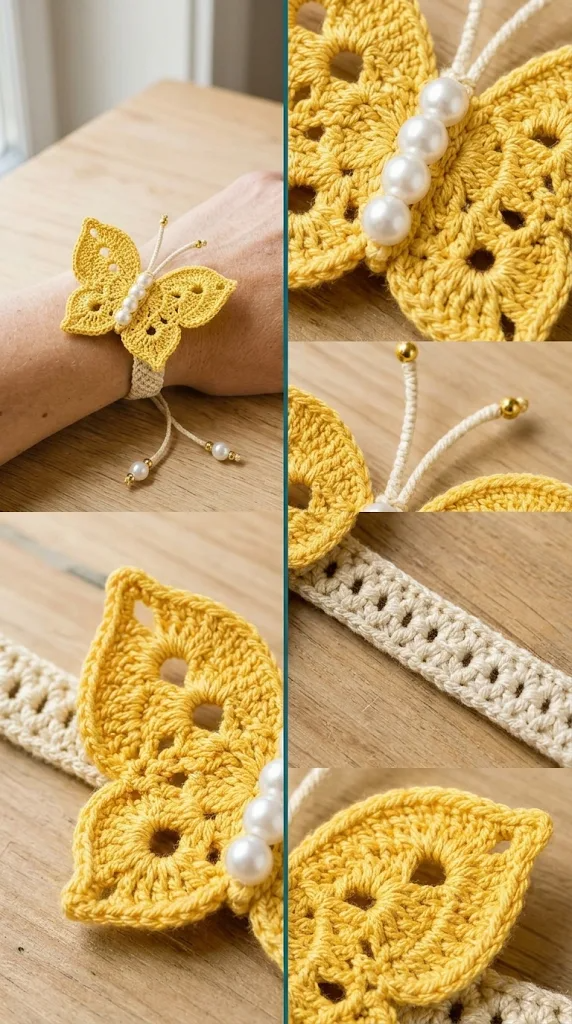
The Sunshine Yellow Butterfly Charm Bracelet Free Crochet Pattern features delicate crocheted butterflies, a neat adjustable band, and small decorative details. It is a lovely project for using leftover cotton yarn and making a thoughtful handmade gift.
About This Pattern
This butterfly charm bracelet is designed as a lightweight crochet jewelry project featuring three small butterfly motifs attached to a narrow bracelet band.
The butterflies are crocheted separately and assembled before being attached to the band. Each motif has two rounded upper wings, two smaller lower wings, and a delicate center body.
The bracelet band is made using simple single crochet stitches. A small adjustable button-loop closure makes it easier to fit different wrist sizes.
Skill Level: Advanced Beginner to Intermediate.
You should already feel comfortable working in small rounds, making increases and decreases, and handling fine cotton yarn. The tiny butterfly motifs require a little patience, particularly when shaping the wings.
Finished Measurements:
- Bracelet length: Approximately 7–8 inches, excluding the adjustable loop.
- Bracelet width: Approximately 0.5 inch.
- Butterfly width: Approximately 1.5 inches each.
- Butterfly height: Approximately 1.25 inches.
- Adjustable fit: Approximately 6.5–8 inches.
The finished bracelet should feel soft and flexible rather than stiff. If you prefer a more structured appearance, you can use a slightly smaller crochet hook.
Materials You’ll Need
Yarn
Choose lightweight cotton yarn because it holds small stitches beautifully and provides enough structure for jewelry.
- Color A – Sunshine Yellow: Approximately 15–20 yards of sport-weight cotton yarn for the butterflies and bracelet band.
- Color B – Soft Cream: Approximately 3–5 yards for optional decorative details.
- Color C – Golden Yellow: Approximately 2–3 yards for butterfly centers and embroidered accents.
Cotton yarn is recommended because it is breathable, durable, and less stretchy than many acrylic yarns.
Crochet Hooks
- 2.25 mm crochet hook for butterfly motifs.
- 2.5 mm crochet hook for the bracelet band.
- 1.75 mm hook for optional tiny decorative details.
Notions
- Tapestry needle.
- Small scissors.
- Stitch markers.
- One small 6–8 mm button.
- Sewing needle and matching thread.
- Measuring tape.
- Optional small jewelry jump rings.
- Optional fabric-safe jewelry glue for securing embellishments.
Allow approximately 15% extra yarn if your tension is loose or you plan to add additional decorative details.
Abbreviations and Terminology
This pattern uses US crochet terminology.
| Abbreviation | Meaning |
|---|---|
| ch | Chain |
| sl st | Slip stitch |
| sc | Single crochet |
| hdc | Half double crochet |
| dc | Double crochet |
| tr | Treble crochet |
| sc2tog | Single crochet two stitches together |
| st | Stitch |
| sts | Stitches |
| sp | Space |
| MR | Magic ring |
| rnd | Round |
| rep | Repeat |
| FO | Fasten off |
Stitch Explanations
- Chain (ch): Yarn over and pull through the loop on your hook.
- Slip Stitch (sl st): Insert your hook, yarn over, and pull through both the stitch and the loop on your hook.
- Single Crochet (sc): Insert your hook, yarn over, pull up a loop, yarn over again, and pull through both loops.
- Half Double Crochet (hdc): Yarn over, insert your hook, pull up a loop, yarn over, and pull through all three loops.
- Double Crochet (dc): Yarn over, insert your hook, pull up a loop, yarn over and pull through two loops twice.
- Treble Crochet (tr): Yarn over twice, insert your hook, pull up a loop, and work through two loops three times.
- Single Crochet Two Together (sc2tog): Insert your hook into the next stitch and pull up a loop. Insert into the following stitch and pull up another loop. Yarn over and pull through all three loops.
Pattern Notes:
- Turning chains do not count as stitches unless specifically stated.
- Work in US crochet terminology.
- Count your stitches after each bracelet row.
- Use a stitch marker to identify the beginning of small rounds.
- Keep your tension consistent when making the butterfly wings.
- The three butterflies are made separately.
Gauge
Gauge is important for this project because the bracelet should fit comfortably without becoming too loose or too stiff.
Work a small single crochet swatch using the 2.5 mm hook.
Target Gauge:
- 10 single crochet stitches = approximately 1 inch.
- 10 rows = approximately 1 inch.
Your swatch does not need to be perfectly square, but it should feel firm and flexible.
If your stitches are too loose, switch to a smaller hook. If the fabric feels too stiff or measures smaller than expected, try a slightly larger hook.
For the butterfly motifs, focus more on consistent tension and matching finished measurements than on the bracelet gauge.
Main Pattern Instructions

Part 1: Crochet the Bracelet Band
The bracelet band is worked in rows using sunshine yellow cotton yarn.
The finished band should be narrow enough to sit comfortably around your wrist while supporting the butterfly decorations.
Using Color A and a 2.5 mm hook:
Foundation: Ch 7.
Row 1: Sc in the second ch from the hook and in each remaining ch. (6 sc)
Row 2: Ch 1, turn. Sc in each st across. (6 sc)
Row 3–70: Repeat Row 2 until the band measures approximately 7 inches.
If you have a smaller wrist, work fewer rows. For a larger wrist, continue until the band reaches your preferred length.
Final Row: Ch 1, turn. Sc across all 6 stitches.
FO, leaving a long tail for sewing if necessary.
Part 2: Create the Button Loop
At one end of the bracelet band, attach Color A with a slip stitch.
Loop Row 1: Ch 8, sl st into the same edge stitch to form a small loop.
Loop Row 2: Work 10 sc around the chain loop, spacing them evenly.
Sl st to secure and FO.
The loop should fit snugly around your chosen button without requiring excessive force.
At the opposite end of the bracelet, sew the small button securely.
Test the closure before attaching the butterflies.
Part 3: Crochet the Butterfly Charms
You will need three matching butterfly motifs.
Each butterfly is worked from the center outward, with the wings created around a small foundation ring.
Use Color A and your 2.25 mm hook.
Butterfly Center
Round 1: Make a magic ring. Ch 1, work 8 sc into the ring. Pull the ring closed and sl st to the first sc. (8 sc)
Round 2: Ch 1. Work 2 sc in each stitch around. Sl st to join. (16 sc)
FO, leaving a short tail for weaving in.
The center should form a small, neat circle.
Upper Butterfly Wings
Join Color A to the center circle.
Wing 1:
- Ch 3.
- Work 2 dc into the same stitch.
- Work 2 tr into the next stitch.
- Work 2 dc into the following stitch.
- Ch 2 and sl st into the next stitch.
This creates the first rounded upper wing.
Wing 2:
Repeat the same sequence on the opposite side of the center circle.
Make sure the two upper wings are approximately equal in size.
Lower Butterfly Wings
The lower wings should be slightly smaller than the upper wings.
Lower Wing 1:
- Ch 2.
- Work 2 hdc into the next stitch.
- Work 1 dc into the following stitch.
- Ch 1.
- Sl st into the next stitch.
Lower Wing 2:
Repeat the same instructions on the opposite side.
You should now have four recognizable butterfly wings.
FO and gently shape the wings with your fingers.
Part 4: Add Butterfly Bodies
Using Color C, make the body of each butterfly.
Body Instructions:
- Attach golden yellow yarn at the center of the butterfly.
- Ch 5.
- Sl st into the second chain from the hook.
- Sl st into each remaining chain.
- Secure the body with a small stitch at the opposite end.
- FO and weave in the ends.
For the antennae, attach a short strand of golden yellow yarn to the upper center.
Ch 3, sl st into the second chain from the hook, and sl st into the next chain.
Repeat on the other side.
Gently adjust the antennae so they point outward.
Special Techniques and Additional Elements
Adding Delicate Wing Details
If you want your butterflies to look more decorative, add small embroidered lines to the wings.
Using Color B:
- Insert the tapestry needle near the center of the upper wing.
- Make one short straight stitch toward the outer edge.
- Repeat on the opposite upper wing.
- Add one smaller stitch to each lower wing.
Keep these embroidered details light.
Too much embroidery can make the tiny motifs look crowded.
Creating a Soft Decorative Border
For a more finished appearance, crochet a small border around each butterfly.
Attach Color B to any outer wing edge.
Work the following stitches evenly around the outer edges:
- 1 sc along each small section.
- 2 sc in wider curved sections.
- 1 sl st at each inner wing valley.
Avoid adding too many stitches around the corners because the wings may become wavy.
FO and weave in the ends.
Optional Tiny Bead Details
You can sew one small yellow or cream-colored bead near the center of each butterfly.
Use a securely attached, washable bead suitable for your intended use.
For a child-friendly bracelet, avoid loose beads and other small detachable decorations.
Assembly and Finishing
Now that all three butterfly charms are complete, it is time to bring the bracelet together.
Step 1: Arrange the Butterflies
Lay the bracelet band flat with the right side facing upward.
Place the first butterfly at the center of the band.
Position the remaining two butterflies approximately 1.5 inches to either side.
The butterflies should face the same direction.
Before sewing, check that they are evenly spaced and that the band remains flexible.
Step 2: Attach the Butterfly Charms
Using a tapestry needle and matching yellow yarn, sew each butterfly to the bracelet.
Secure the center body first.
Next, attach the lower part of each wing with one or two small stitches.
Avoid sewing through every outer wing edge. The wings should remain slightly raised so their shape is visible.
Check the back of the bracelet to make sure no long loose strands remain.
Step 3: Secure the Button
Position the button at the end opposite the button loop.
Sew it firmly using matching sewing thread.
Pass the thread through the button holes several times and secure it with a tight knot.
Test the bracelet closure by gently pulling the band.
Step 4: Final Details
- Trim loose yarn ends.
- Check that every butterfly is securely attached.
- Smooth the wings with your fingers.
- Make sure the button loop is not too tight.
- Check the bracelet length around your wrist.
Your Sunshine Yellow Butterfly Charm Bracelet is now ready to wear!
Blocking and Care
Small crochet jewelry pieces benefit from gentle blocking.
Because this design uses cotton yarn, wet blocking is a good option.
Gentle Wet Blocking
- Fill a small bowl with cool water.
- Add a little gentle detergent.
- Place the crochet bracelet in the water for approximately five minutes.
- Remove it and gently press out excess water.
- Do not twist or wring the bracelet.
- Place it on a clean towel.
- Arrange the butterfly wings into their natural shapes.
- Allow it to dry completely.
Avoid hanging the bracelet while wet because the band may stretch.
If you used beads or other embellishments, check their care instructions before washing.
Storage Tips
- Store the bracelet flat in a small jewelry pouch.
- Keep it away from rough surfaces that could catch the stitches.
- Avoid spraying perfume directly onto the crochet fabric.
- Remove the bracelet before swimming or bathing.
- Hand wash gently when necessary.
Fit and Troubleshooting Tips
The Bracelet Band Looks Too Wide
If the band looks wider than expected, check your stitch tension.
You can also reduce the foundation chain from 7 to 6 chains, working 5 sc across instead of 6.
The Butterfly Wings Curl
Curled wings usually indicate tight tension.
Try using a slightly larger hook for the butterfly motifs.
You can also gently wet-block the wings and pin them into shape while drying.
The Butterflies Look Uneven
Count the stitches carefully and compare the size of each motif as you work.
Use the first completed butterfly as your size reference for the remaining two.
The Bracelet Feels Too Loose
Shorten the band by removing a few rows.
Alternatively, add a second button position to make the closure adjustable.
The Bracelet Feels Too Stiff
Try a larger hook or loosen your tension slightly.
The band should bend comfortably around your wrist without folding sharply.
The Charms Keep Flipping Over
Attach the butterfly bodies and the lower sections of the wings securely.
A few extra stitches near the center will help the motifs remain facing upward.
Final Thoughts
I love how this Sunshine Yellow Butterfly Charm Bracelet brings together a cheerful color, delicate crochet details, and a simple wearable design. The little butterflies give it a playful personality, while the narrow bracelet band keeps the overall look light and comfortable.
This Sunshine Yellow Butterfly Charm Bracelet Free Crochet Pattern is also a lovely way to use small amounts of leftover cotton yarn. You can make all three butterflies in yellow, experiment with pastel shades, or create a colorful collection of butterfly charms.
I would love to see how your bracelet turns out! Share your finished project, experiment with your favorite colors, and save the pattern to Pinterest so you can find it again whenever you feel like making another little crochet accessory.
Happy crocheting! 💛



Leave a Reply
You must be logged in to post a comment.