

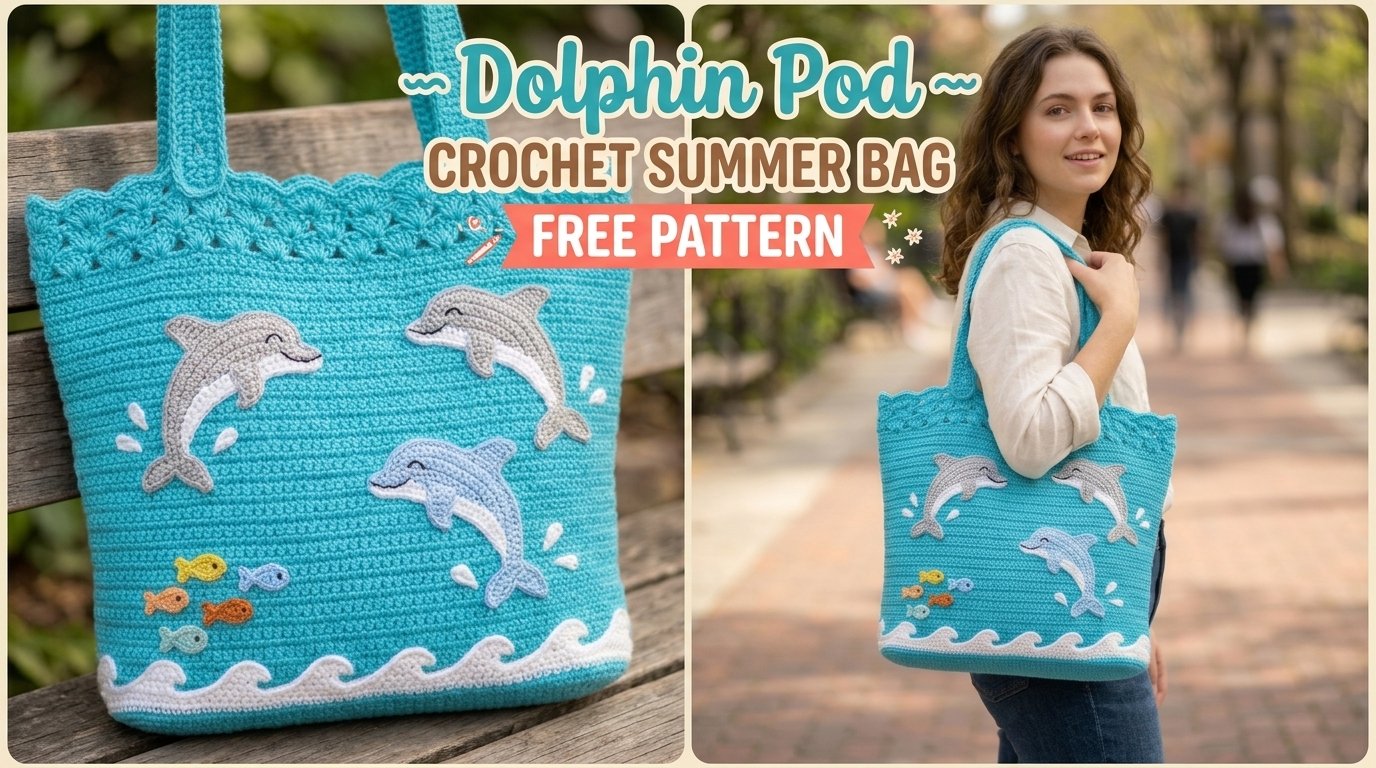
Dig into that yarn stash right now because this Dolphin Pod Crochet Summer Bag is pure beach-day energy. Turquoise cotton, playful ocean appliqués, and a roomy tote that actually holds your towel, sunscreen, and a paperback without collapsing. Simple stitches build the body while the dolphins, fish, and waves bring the personality. Ready to hook something that makes people smile every time you carry it?

Why You Will Love This Crochet Summer Bag Pattern
This tote mixes practical construction with just enough whimsy to keep things fun. You work the body in straightforward rows of single crochet and half double crochet, creating clean horizontal ridges that look intentional rather than boring. The openwork border and scalloped edge at the top add a light, breezy finish, while the sturdy handles carry real weight.
What really sells it? Those three crochet dolphin appliqués swimming across the front, plus tiny fish and white wave details. The bag finishes around 15 inches wide by 13 inches tall (handles add another 9 inches of drop). Plenty of space for beach essentials without turning into a suitcase.

IMO, the best part is how approachable the whole thing stays. No complicated colorwork on the body. All the ocean drama comes from separate appliqués you sew on later. Perfect for summer projects that still feel special.
Materials Needed
Yarn:
- Main Color (MC): 400 yards worsted weight cotton in turquoise or ocean blue
- Color A: 50 yards light gray for dolphin bodies
- Color B: 30 yards white for waves and splash details
- Color C: Small amounts of yellow, orange, and light blue for the little fish
- Color D: Tiny bit of black for eyes
Cotton is non-negotiable here. It holds shape, washes well, and softens with every use. Lily Sugar’n Cream or Paintbox Cotton Aran both perform great.
Hook:
- Size H/8 (5.0 mm) for the bag body and handles
- Size G/6 (4.0 mm) for all the appliqués
Notions:
- Yarn needle
- Stitch markers
- Scissors
- Optional fabric liner plus sewing needle and thread
FYI, a liner keeps sand and keys from poking through the stitches. Worth the extra ten minutes.
Gauge
With the H hook and worsted cotton: 14 stitches and 16 rows = 4 inches in single crochet. Cotton has zero stretch, so gauge actually matters. Check it or your finished bag might surprise you in the wrong way.
Skill Level
Intermediate beginner. If single crochet, half double crochet, and double crochet feel comfortable, you can handle this. The appliqués use basic increases and decreases, and every step gets a clear explanation.
Abbreviations and Stitch Definitions
Here’s the quick reference so you never have to stop mid-row:
- Ch – chain
- Sl st – slip stitch
- Sc – single crochet
- Hdc – half double crochet
- Dc – double crochet
- Inc – increase (2 stitches in one)
- Dec – decrease (sc2tog)
- BLO – back loop only (creates those pretty ridges)
Master these and the rest of the pattern flows smoothly.
Crochet Summer Bag Pattern Instructions
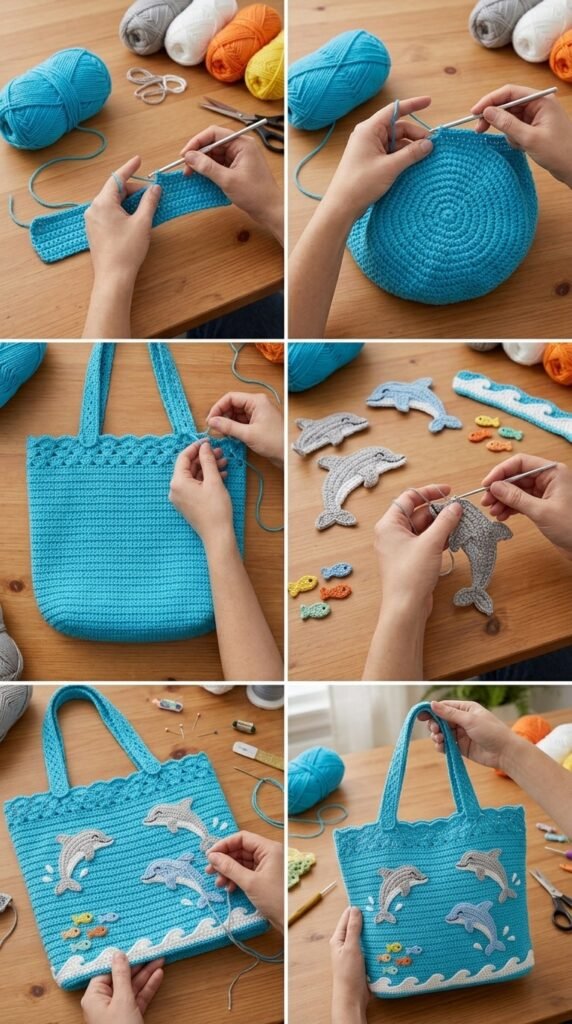
Bag Base
Grab your MC and H hook. Chain 53.
Row 1: Sc in the second chain from the hook and across (52 sc).
Rows 2–12: Chain 1, turn, sc in BLO of every stitch across.
You now have a solid rectangle about 15 by 3.5 inches. That becomes the flat bottom of your tote.
Bag Body
Do not turn. Work a setup round of single crochet all the way around the base: 52 along the top, 3 in the corner, 12 along the short side, 3 in the corner, 52 along the bottom (into the starting chain), 3 in the corner, 12 along the last short side, 3 in the final corner. Place a marker (136 sc total).
Rounds 1–45: Sc in BLO of every stitch around, moving the marker up each round. The back-loop-only work creates those clean horizontal ridges. Your bag body should stand about 11 inches tall at this point.
Openwork Border Section
Round 46: Chain 1, hdc in every stitch around, join.
Round 47: Chain 3 (counts as dc), dc in next stitch, *chain 2, skip 2 stitches, dc in next 2 stitches* repeat around, join.
Round 48: Chain 3, dc in next dc, *2 dc in each chain-2 space, dc in next 2 dc* repeat around, join.
Round 49: Chain 1, sc in every stitch around, join.
Scalloped Edge
Round 50: *Skip 1 stitch, 5 dc in next stitch, skip 1 stitch, slip stitch in next stitch* repeat around. Join and fasten off. Instant wavy top edge that looks far fancier than the effort required.
Crochet Handles (Make 2)
Still with MC and H hook, chain 71.
Row 1: Sc in second chain and across (70 sc).
Row 2: Chain 1, turn, sc across.
Row 3: Chain 3, turn, *dc in next stitch, chain 1, skip 1* repeat across, dc in last stitch.
Row 4: Chain 1, turn, sc in every dc and chain space (70 sc).
Row 5: Chain 1, turn, sc across.
Row 6: Slip stitch across for a clean edge. Fasten off with a long tail.
Attaching Handles
Position each handle about 4 inches in from the side edges. Pin them, then whip stitch securely to the inside of the bag. Go over the attachment points several times. These handles will carry real weight, so reinforce like you mean it.
Crochet Dolphin Appliqué Pattern (Make 3)
Switch to the G hook and Color A. Make two regular dolphins and one slightly smaller for variety.
Dolphin Body
Chain 25.
Row 1: Sc in second chain, sc in next 10, hdc in next 5, dc in next 5, 5 dc in last chain (nose curve). Work back along the opposite side of the chain: dc in next 5, hdc in next 5, sc in next 10, 2 sc in last. Do not join (54 stitches).
Row 2: Chain 1, turn, sc in first 12, hdc in next 4, dc in next 8, 2 dc in next 3 (nose shaping), dc in next 8, hdc in next 4, sc in remaining stitches. Fasten off.
Dorsal Fin
Chain 8. Sc in second chain, sc in next 2, hdc in next 2, dc in next, 3 dc in last. Continue on opposite side: dc, hdc in next 2, sc in next 3. Fasten off.
Tail Flukes
Chain 6. Sc in second, hdc, dc, 2 dc in next, chain 3, slip stitch in same stitch, chain 3, 2 dc in same stitch (split tail), dc, hdc, sc in last. Fasten off.
Flipper (Make 2 per dolphin)
Chain 5. Sc in second, hdc, dc, 5 dc in last. Opposite side: dc, hdc, slip stitch in last. Fasten off.
Sew the fin, tail, and flippers onto the body. Add a small French knot or satin-stitch eye in black and a tiny curved smile. Suddenly you have three cheerful dolphins ready to swim.
Small Fish Appliqués (Make 4-5)
With Color C and G hook, chain 6.
Row 1: Sc in second chain, hdc, dc, hdc, sc in last. Do not fasten off.
Tail: Chain 3, slip stitch in second chain, slip stitch in next, slip stitch into the base of the body. Fasten off. Add a tiny black eye. Make them in different colors for extra playfulness.
Wave Border Appliqué
With Color B and G hook, chain 70 (or measure to fit the bottom of your bag).
Row 1: Sc in second chain, *sc in next 2, hdc, dc, hdc, sc in next 2* repeat across for the wave shape.
Row 2: Chain 1, turn, slip stitch across for a finished edge. Make a second wave if you want layered dimension.
Splash Details
With Color B, chain 5. Slip stitch in second chain, sc, hdc, dc in last. Fasten off. Make 6–8 of these in slightly different lengths so the water looks like it’s moving around the dolphins.
Assembly and Finishing
Block every piece gently. Cotton loves a little steam or wet blocking and the appliqués will sit flatter.
Pin the wave border about 2 inches up from the base and whip stitch it down. Arrange the three dolphins (two higher, one lower) and sew them securely. Scatter the fish around them, then add the splash details for motion. Weave in every last end.
Optional Fabric Liner
Cut two rectangles of cotton fabric to match your bag dimensions plus seam allowance. Sew them together, fold the top edge under, and hand-stitch the liner just below the openwork border. Instant structure and no more items poking through.
Care Instructions
Machine wash cold on gentle or hand wash. Lay flat to dry so the shape stays true. Cotton softens beautifully with each wash. Skip the dryer—heat can shrink it a little.
Tips for Success with This Crochet Tote Pattern
Keep tension even. Cotton shows every variation, so consistent hands make a cleaner bag. If you crochet tightly, bump up a hook size.
Pin and photograph your appliqué layout before you sew a single stitch. Move things around until the composition feels right.
Reinforce those handle attachments. Multiple passes of yarn through the same spots keep everything secure when the bag is full.

Not feeling dolphins? The same bag body works with sea turtles, starfish, or even plain stripes. Make it yours.
You Might Also Like
- Whale and Wave Crochet Ocean Tote Free Pattern
- Blueberry Harvest Tote Free Crochet Pattern
- Mint Cottage Garden Bow Purse Free Crochet Pattern
- Ocean Blue Kitty Tote Bag Free Crochet Pattern
FAQ’s
Can a true beginner finish this bag?
If you already know single crochet, half double, and double crochet, yes. The appliqués add a little shaping, but the instructions walk you through every increase and decrease. Take the first dolphin slow and the rest will click.
What if I only have acrylic yarn?
You can use it, but cotton is stronger and holds its shape better for a tote that sees real use. Acrylic will work in a pinch—just expect a slightly softer, less structured result.
Do I have to add the fabric liner?
No, but it makes a noticeable difference. Without it, smaller items can poke through the stitches and the bag stretches more when loaded. Ten extra minutes of sewing pays off.
How long does the whole project take?
Most people finish the body and handles in a weekend. The appliqués add another focused afternoon. Working on them while watching a show makes the time disappear.
Can I adjust the size?
Absolutely. Add or subtract chains from the base for width and work more or fewer body rounds for height. Just keep the handle length proportional so the bag still sits comfortably on your shoulder.
Will the appliqués stay put after washing?
Yes if you sew them securely with matching yarn and weave the ends well. A gentle wash cycle and flat drying keep everything looking sharp.
Final Thoughts
There you go—your complete roadmap to a cheerful dolphin pod summer tote that actually gets used. The stitches stay simple, the appliqués deliver the fun, and the finished bag turns ordinary beach days into something a little more special. Grab that turquoise cotton and start chaining. Once you finish one, you’ll already be planning the next ocean-inspired version. Happy hooking!


Leave a Reply
You must be logged in to post a comment.