


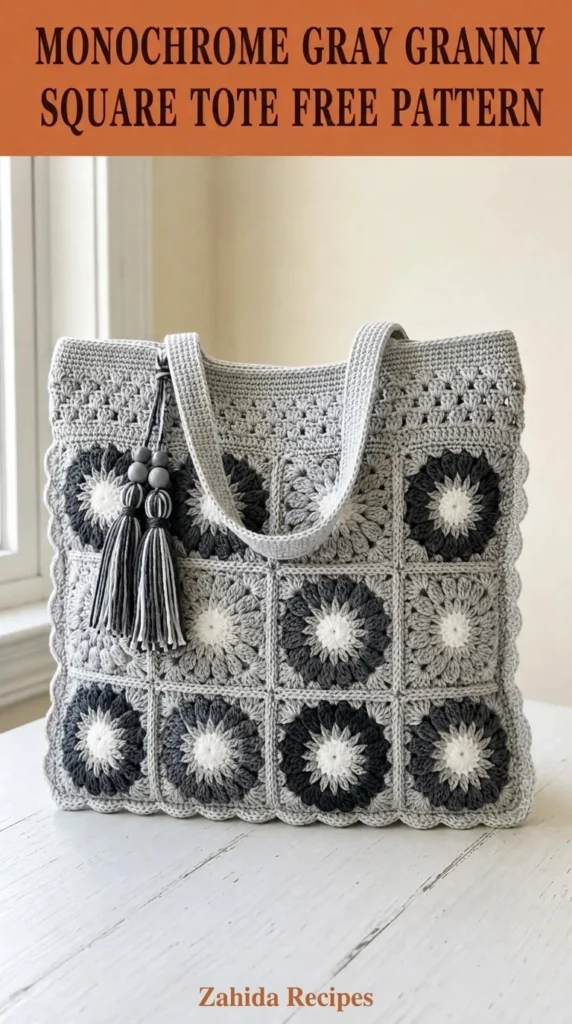
There is something special about a handmade bag that looks just as lovely with your favorite jeans as it does with a simple linen dress. I wanted to create a tote that felt modern and practical without losing the charm of traditional crochet, and that is how this monochrome gray granny square tote came together.
I have always loved granny squares, but I wanted to move away from the bright, multicolored combinations often associated with them. Gray seemed like the perfect choice. Soft silver, medium heather, and deep charcoal create a subtle contrast that highlights the familiar granny square texture while keeping the finished bag easy to style.
This Monochrome Gray Granny Square Tote Free Crochet Pattern combines classic motifs, sturdy construction, and comfortable shoulder straps. The result is a versatile everyday tote that you can use for library visits, shopping, craft supplies, or a relaxed weekend outing.

About This Pattern
This crochet tote is made from individual granny squares joined together to form a rectangular bag body. A simple crocheted base closes the bottom, while reinforced shoulder straps make the finished tote practical for everyday use.
The three gray shades create a tonal design rather than a strong color-blocked effect. Light gray brings out the center of each square, medium gray creates a soft transition, and charcoal adds definition around the motifs.
Pattern Details
- Skill level: Adventurous beginner to intermediate
- Construction: Individual granny squares, joined panels, crocheted base, and integrated straps
- Terminology: US crochet terms
- Finished size: Approximately 14 inches wide × 14 inches tall, excluding straps
- Strap drop: Approximately 10 inches
- Motifs: 13 granny squares
- Main techniques: Double crochet clusters, chain spaces, slip-stitch joining, and single crochet reinforcement
The finished bag has a flexible fabric with enough structure for books, a wallet, a water bottle, and other daily essentials. It is not designed to carry extremely heavy items without additional reinforcement.
Materials You’ll Need
Yarn
Choose a durable, smooth worsted-weight yarn. A cotton or cotton-blend yarn is especially suitable because it generally holds its shape better than a soft, stretchy acrylic yarn.
| Color | Purpose | Approximate Amount |
|---|---|---|
| A — Light gray | Granny square centers | 150 yd (137 m) |
| B — Medium gray | Middle rounds | 250 yd (229 m) |
| C — Charcoal gray | Outer rounds, base, and joining | 350 yd (320 m) |
Total yarn: Approximately 750 yards (686 meters) of worsted-weight yarn.
Allow 15% extra for gauge variation, joining, and individual differences in tension.
Crochet Hooks
- 5.0 mm (US H/8) crochet hook for granny squares.
- 4.5 mm (US 7) crochet hook for the base, joining, and straps, if a firmer fabric is needed.
- Optional 5.5 mm (US I/9) hook for a looser foundation chain.
Notions
- Tapestry needle for weaving in ends
- Stitch markers
- Scissors
- Measuring tape
- Rustproof blocking pins and a blocking mat
- Optional fabric lining and sewing supplies
- Optional removable stitch markers for strap placement
Abbreviations and Terminology
All instructions use US crochet terminology.
- ch — Chain: Yarn over and pull through the loop on the hook.
- sl st — Slip stitch: Insert the hook into the indicated stitch or space, yarn over, and pull through both the fabric and the loop on the hook.
- sc — Single crochet: Insert the hook, yarn over and pull up a loop, yarn over again, and pull through both loops.
- dc — Double crochet: Yarn over, insert the hook, pull up a loop, yarn over and pull through two loops, then yarn over and pull through the remaining two loops.
- sp — Space: The opening created by chain stitches.
- st/sts — Stitch/stitches: Individual crochet stitches.
- rep — Repeat: Work the indicated instructions again.
- rnd — Round: One complete circuit of a motif or bag edge.
- RS — Right side: The intended outside or front of the finished fabric.
- WS — Wrong side: The inside or reverse of the fabric.
- FO — Fasten off: Cut the yarn, pull the tail through the final loop, and tighten gently.
Granny cluster: Three double crochet stitches worked into the same chain space.
Turning chains do not count as a stitch unless a step explicitly says they do. The starting chains in the granny square rounds are used to reach the correct working height, and the first cluster is completed separately.
Special Pattern Notation
- ( ) indicates stitches or counts for one section.
- [ ] indicates a group of instructions to repeat.
- Corner space: A chain-2 space at the corner of a granny square.
- Side space: A chain-1 space between clusters along a straight edge.
Gauge
Gauge matters because all 13 squares need to fit together neatly.
With the 5.0 mm hook and worsted-weight yarn, work a granny square through four rounds. After gently blocking, the square should measure approximately 4.5 inches (11.5 cm) across.
To adjust your gauge:
- If your square measures less than 4.5 inches, try a 5.5 mm hook.
- If your square measures more than 4.5 inches, try a 4.5 mm hook.
- If the fabric feels stiff, loosen your tension or use a slightly larger hook.
- If the square feels floppy and stretched, try a smaller hook.
Measure your swatch after blocking rather than immediately after crocheting. The fibers may relax and the corners may become more defined.
Main Pattern Instructions
1. Make the Granny Squares
Make 13 identical granny squares, using the three gray shades in the following sequence.
- Round 1: Color A, light gray
- Round 2: Color B, medium gray
- Rounds 3–4: Color C, charcoal gray
Each square should measure approximately 4.5 inches after blocking.
Round 1: Light Gray Center
Using Color A, make a slip knot and chain 4. Join with a slip stitch into the first chain to form a ring.
Round 1: Ch 3, work 2 dc into the ring, ch 2. [Work 3 dc into the ring, ch 2] three times. Join with a sl st to the top of the beginning ch-3.
Count: 12 dc total, arranged as four clusters of 3 dc, with four corner spaces.
FO Color A.
Round 2: Medium Gray
Join Color B in any corner ch-2 space.
Round 2: Ch 3, work 2 dc into the same corner space, ch 2, work 3 dc into the same space. Ch 1. In the next corner space, work [3 dc, ch 2, 3 dc], ch 1. Repeat around the remaining two corners. Join with a sl st to the top of the beginning ch-3.
Count: Eight clusters of 3 dc, four corner spaces, and four side ch-1 spaces.
FO Color B.
Round 3: Charcoal Gray
Join Color C in any corner space.
Round 3: Ch 3, work 2 dc into the same corner space, ch 2, work 3 dc into the same space. Ch 1. Work 3 dc into the next side ch-1 space, ch 1. In the next corner space, work [3 dc, ch 2, 3 dc]. Ch 1. Work 3 dc into the next side space, ch 1.
Continue around the square, placing one 3-dc cluster in each side space and two 3-dc clusters separated by ch 2 in every corner space. Join with a sl st to the top of the beginning ch-3.
Count: 12 clusters of 3 dc, four corner spaces, and eight side ch-1 spaces.
Round 4: Final Square Round
Round 4: Ch 3, work 2 dc into the same corner space, ch 2, work 3 dc into the same space. Ch 1. Work 3 dc into each side ch-1 space, separating adjacent clusters with ch 1. At every corner, work [3 dc, ch 2, 3 dc] into the corner space.
Continue around the square and join with a sl st to the top of the beginning ch-3.
Count: 16 clusters of 3 dc, four corner spaces, and 12 side ch-1 spaces.
FO Color C and weave in all ends securely.
Repeat these instructions until you have 13 squares. Block them to the same dimensions before assembly.
2. Arrange the Tote Panels
Lay your squares on a flat surface with the right sides facing up.
You will make a front panel of six squares and a back panel of six squares. The thirteenth square forms the center of the bottom.
Use this layout for both the front and back panels:
- Arrange two squares across the width.
- Arrange three rows vertically.
- Use the same arrangement for the front and back panels.
- Reserve the remaining square for the base.
Arrange the squares so the charcoal edges form a consistent visual grid. Alternate the placement of lighter and darker centers to avoid a heavy-looking patch of charcoal in one area.
The seventh square will be used for the base.
3. Join the Squares
Place two squares with their right sides facing each other and align the edges.
Using Color C and the 4.5 mm hook, join the squares with slip stitches through the corresponding edge stitches and chain spaces. Keep your slip stitches even but not tight.
You can also use a mattress stitch with a tapestry needle if you prefer a nearly invisible seam.
Join each panel as follows:
- Join the two squares in each row.
- Join the three completed rows vertically.
- Repeat for the second panel.
- Set both panels aside.
Count check: Each panel should contain six squares arranged in two columns and three rows.
4. Crochet the Bottom Square
Use the remaining square as the bottom of the tote.
Place it with the right side facing up. With Color C and the 4.5 mm hook, join the yarn in a corner space.
Base Round 1: Ch 1, work 1 sc into each dc stitch and 1 sc into each chain space around the entire square. At each corner, work 3 sc into the corner space. Join with a sl st to the first sc.
The exact stitch count will depend on how you treat the chain spaces during your first round. Aim for an even, flat border without pulling the corners inward.
Base Round 2: Ch 1, work 1 sc in each sc around. At each corner, work 3 sc into the center sc of the previous corner group. Join with a sl st to the first sc.
FO, leaving a long tail for sewing.
The extra border provides a sturdy edge for attaching the bottom to the bag body.
5. Assemble the Bag Body
Place the front and back panels together with their right sides facing each other. Align the bottom edges and side seams carefully.
Using Color C and the 4.5 mm hook, join the side edges with slip stitches or sew them with a tapestry needle and mattress stitch. Work from the top edge down to the lower corner on both sides.
Attach the bordered bottom square to the lower opening.
- Match one side of the bottom square to the lower edge of the front panel.
- Match the opposite side to the back panel.
- Align the remaining two sides with the lower ends of the side seams.
- Pin or mark the corners before sewing.
- Stitch around the entire base, distributing the fabric evenly.
Turn the bag right side out.
Tip: If the base seems slightly wider than the opening, do not force it into place. Check the blocked dimensions and redistribute the seam ease evenly around the corners.
Special Techniques: Reinforced Crochet Straps
The straps are important because a granny square tote can stretch under weight. I recommend making two sturdy straps rather than using a thin chain loop.
Make the First Strap
Using Color C and the 4.5 mm hook, ch 9.
Row 1: Sc in the second ch from the hook and in each remaining ch. (8 sc.) Turn.
Row 2: Ch 1, sc in each st across. (8 sc.) Turn.
Repeat Row 2 until the strap measures approximately 22 inches (56 cm) long. This length provides an approximately 10-inch drop when the strap is attached to the bag.
Do not fasten off until you have checked the length against your preferred shoulder fit. Add or remove rows if needed.
FO, leaving a long sewing tail.
Make a second identical strap.
Optional Strap Reinforcement
For a firmer strap, crochet two rows of slip stitches along each long edge using the smaller hook. Keep the slip stitches loose enough that the strap does not curl.
You can also sew a narrow cotton webbing strip to the inside of each strap. This helps limit stretching, particularly if you plan to carry heavier items.
Attach the Straps
Lay the bag flat with the front panel facing up.
Mark two attachment points along the top edge of the front panel. Position each strap approximately 3 inches (7.5 cm) from the nearest side seam.
Repeat the placement on the back panel.
Before sewing, check that both straps have the same length and that neither is twisted.
Using a tapestry needle and the long yarn tails, sew each strap end securely to the inside of the bag. Stitch around the strap end in a rectangle, then add diagonal stitches across the rectangle to distribute tension.
For extra security, sew each strap end through several stitches of the upper granny square border rather than attaching it only to the topmost row.
Gently tug each strap to check the attachment. It should feel firm, with no visible gaps opening in the stitches.
Add a Neat Top Edge
Join Color C at a side seam along the top opening.
Top Round: Ch 1 and work 1 sc in each stitch around the opening, placing stitches evenly across the granny square edges and strap attachment areas. Join with a sl st to the first sc.
Optional second round: Ch 1, sc in each stitch around, then join with a sl st and FO.
This border gives the tote a cleaner silhouette and helps stabilize the top edge. Avoid working too many stitches along the square edges, as this can cause the opening to ruffle.
Assembly and Finishing Checklist
Before calling your bag complete, check the following:
- All 13 squares are blocked to consistent dimensions.
- Both panels contain six squares in a two-by-three arrangement.
- Side seams are secure and evenly aligned.
- The bottom square is attached without gaps.
- Both straps have matching lengths.
- Strap ends are reinforced with multiple passes of stitching.
- All yarn tails are woven in securely.
- The top border lies flat.
If you want a more polished interior, add a simple fabric lining. Cut two fabric panels slightly smaller than the finished crochet panels, sew them together, and attach the lining just below the top border. A lining is optional, but it helps prevent small objects from slipping through the granny square openings.
Blocking and Care
Blocking helps the squares lie flat and makes the seams easier to align.
For cotton or cotton-blend yarn, gently soak the finished bag in cool or lukewarm water with a small amount of suitable wool wash or mild detergent. Press out excess water without twisting the fabric.
Lay the bag flat on a clean towel, roll it gently, and press to remove moisture. Shape the panels and bottom, straighten the straps, and allow the tote to dry completely on a flat surface.
Avoid hanging the bag while it is wet. The weight of the water can stretch the crochet stitches and distort the straps.
For acrylic yarn, follow the yarn label’s care instructions. Avoid direct high heat or aggressive steaming, which may permanently flatten or damage the fibers.
Care Recommendations:
- Hand wash gently when possible.
- Use cool water and mild detergent.
- Never wring or twist the tote.
- Dry flat and reshape while damp.
- Store the bag empty to preserve its shape.
- Avoid carrying excessive weight, especially if you have not reinforced the straps.
Fit and Troubleshooting Tips
My Granny Squares Are Different Sizes
Check your gauge and tension before joining. Block all squares to the same dimensions. If one square is noticeably smaller, rework it rather than stretching it to fit.
The Squares Curl at the Corners
Your tension may be too tight, or your chain spaces may be too small. Try a slightly larger hook and make sure every corner contains the specified chain-2 space.
The Finished Bag Looks Wavy
Too many stitches along the top border or base can create ruffles. Reduce the number of stitches where necessary and keep the joining tension consistent.
The Straps Stretch Too Much
Use a cotton-blend yarn, reinforce the straps with slip stitches, or add cotton webbing. You can also shorten the straps slightly if you prefer a higher shoulder fit.
The Bag Feels Too Floppy
Try a smaller hook for the joining seams and top border. A fabric lining can add structure without changing the appearance of the granny squares.
I Want a Larger Tote
Make additional granny squares and adjust the panel arrangement, but remember that changing the number of squares also changes the base dimensions and strap placement. Make a small layout first and measure it before joining.
Related Articles:
- Dolphin Pod Crochet Summer Bag Free Pattern
- Classic Black and Gold Luxe Braided Clutch Free Crochet Pattern
- Mint Green Woven Bag on Vanity Free Pattern
Final Thoughts
I love how this monochrome gray granny square tote combines a familiar crochet technique with a simple, modern color palette. The light and charcoal shades give each square definition, while the repeated motifs create a cohesive design that feels timeless rather than overly decorative.
This Monochrome Gray Granny Square Tote Free Crochet Pattern is also a lovely opportunity to practice joining motifs, working neat seams, and reinforcing straps. Take your time with the blocking and assembly, because those finishing details make a noticeable difference in the finished bag.
You can personalize the tote with warmer shades of gray, a lighter border, a fabric lining, or slightly longer straps to suit your daily routine.
Most of all, enjoy the process. Every square brings you closer to a useful handmade piece that you can carry proudly. If you make this tote, share your finished project, leave a comment about the colors you chose, or save the pattern to Pinterest so you can return to it whenever you feel like crocheting something practical and beautiful.



Leave a Reply
You must be logged in to post a comment.