


A handmade bag has a special charm, especially when it combines a timeless crochet stitch with colors that go with almost everything. This Monochrome Gray Granny Square Bag Free Crochet Pattern brings together soft light gray, classic medium gray, and deep charcoal to create a practical tote with a beautiful geometric texture.
I love how granny squares can turn a few simple yarn colors into something that looks carefully designed. The alternating gray shades give each square its own character, while the repeating clusters create a consistent pattern across the bag. The result is a modern accessory that works with casual outfits, neutral wardrobes, and everyday errands.
This project is also a lovely way to practice traditional granny square crochet without making a large blanket. You will crochet individual squares, join them into a bag, and finish the design with a sturdy top edge and comfortable handles.
The pattern uses basic stitches and a straightforward construction method. If you already know how to chain, slip stitch, and work double crochet, you can follow along comfortably. If you are newer to crochet, take your time with the first square and use it as a guide for the remaining motifs.
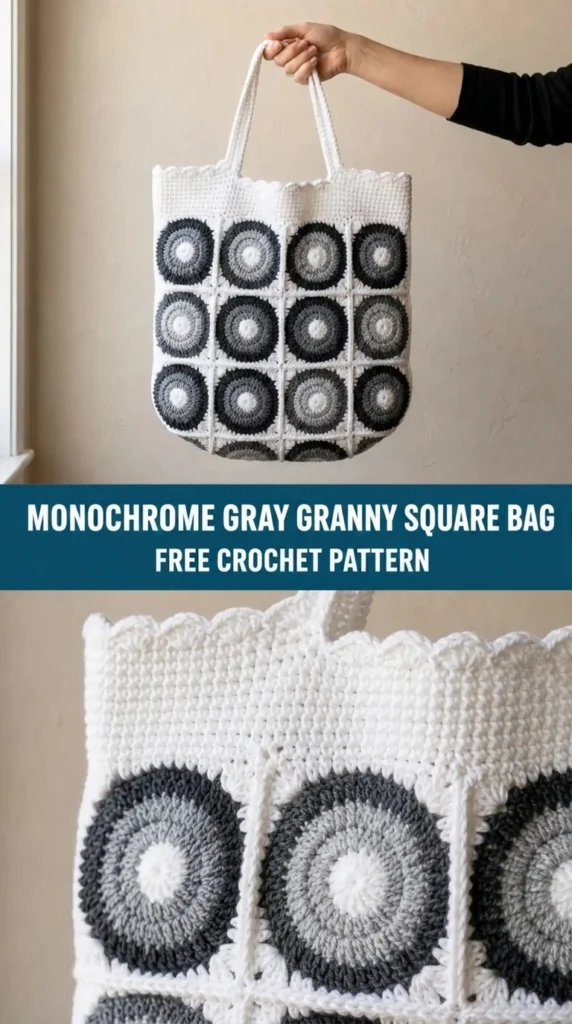
About This Monochrome Gray Granny Square Bag
This crochet tote is constructed from 13 individual granny squares. Each square uses three shades of gray, creating a balanced monochrome design without making the finished bag look flat.
The front and back each contain six squares arranged in two columns and three rows. One additional square forms the bottom of the bag.
After joining the motifs, you will crochet a simple edging around the opening and add two reinforced handles. This construction keeps the pattern manageable because you can complete the squares separately before assembling the bag.
Finished Bag Details
- Finished size: Approximately 12 inches wide × 13 inches tall, excluding handles (30.5 × 33 cm).
- Skill level: Easy to intermediate.
- Construction: 13 granny squares, joined seams, crocheted top edging, and two handles.
- Main colors: Light gray, medium gray, and charcoal.
- Best use: Everyday essentials, a small notebook, wallet, phone, sunglasses, and a light cardigan.
- Pattern style: Classic granny square with a modern monochrome palette.
Your finished measurements may vary slightly depending on your yarn, tension, and joining method.
Materials for the Gray Granny Square Crochet Bag
Choose a smooth, durable yarn so the stitch pattern remains easy to see and the bag holds its shape reasonably well.
Yarn Requirements
Use a medium-weight yarn, such as worsted-weight cotton or a cotton blend, in three coordinating shades.
| Color | Suggested Use | Approximate Amount |
|---|---|---|
| Light gray | First round of each square | 100 yd (91 m) |
| Medium gray | Second round of each square | 150 yd (137 m) |
| Charcoal gray | Third round and details | 200 yd (183 m) |
| Medium gray | Joining, edging, and handles | 150 yd (137 m) |
Total yarn: Approximately 600 yards (549 m), including a small allowance for finishing.
These quantities are planning estimates. Buy a little extra if your yarn is textured, your tension is tight, or you want longer handles.
Additional Supplies
- 5 mm (H-8) crochet hook, or the size needed to achieve the gauge.
- Stitch markers, optional.
- Yarn needle for weaving in ends.
- Scissors.
- Measuring tape.
- Blocking mat and pins, optional.
For a firmer bag, use cotton yarn rather than a very soft acrylic yarn. Cotton generally provides better stitch definition and less stretch, although the bag can still stretch under a heavy load.
Crochet Abbreviations and Stitch Notes
This pattern uses US crochet terminology.
- ch: Chain.
- sl st: Slip stitch.
- sc: Single crochet.
- dc: Double crochet.
- sp: Space.
- ch-sp: Chain space.
- st(s): Stitch(es).
- rep: Repeat.
- RS: Right side.
- WS: Wrong side.
Special Stitch: Granny Cluster
A granny cluster consists of three double crochet stitches worked into the same space.
Cluster: Work 3 dc in the specified chain space.
The clusters create the familiar open, textured fabric associated with granny squares. The chain spaces between clusters form the corners and side openings.
Gauge
Work one three-round granny square using the specified yarn and hook.
- Gauge target: Approximately 5 inches (12.7 cm) across after blocking.
- Gauge method: Measure from one side to the opposite side through the center, keeping the square flat without stretching.
Gauge matters because all 13 squares need to be close to the same size. If your square measures less than 5 inches, try a larger hook. If it measures more than 5 inches, try a smaller hook.
How to Crochet a Monochrome Granny Square
Make 13 squares in total. Each square has three rounds and uses all three gray shades.
Use light gray for Round 1, medium gray for Round 2, and charcoal for Round 3.
Round 1: Create the Center
With light gray yarn, make a magic ring.
Alternatively, ch 4 and join with a sl st to form a ring.
- Ch 3. This counts as the first dc.
- Work 2 dc into the ring.
- Ch 2.
- Work 3 dc into the ring.
- Ch 2.
- Repeat the group of 3 dc followed by ch 2 two more times.
- Join with a sl st to the top of the beginning ch-3.
You now have four clusters separated by four corner spaces.
Count: 12 dc stitches and 4 corner ch-2 spaces.
Fasten off the light gray yarn.
Round 2: Add the Medium Gray
Join medium gray yarn in any corner ch-2 space.
- Ch 3, then work 2 dc in the same corner space.
- Ch 2 and work 3 dc in the same space. This completes the first corner.
- Ch 1.
- In the next corner space, work 3 dc, ch 2, and 3 dc.
- Ch 1.
- Repeat Steps 4–5 around the square.
- Join with a sl st to the top of the beginning ch-3.
Each corner contains two granny clusters, with a chain-2 space between them. A chain-1 space separates the corners along each side.
Count: 24 dc stitches, 4 corner ch-2 spaces, and 4 side ch-1 spaces.
Fasten off the medium gray yarn.
Round 3: Add Charcoal Gray
Join charcoal yarn in any corner ch-2 space.
- Ch 3, then work 2 dc in the same corner space.
- Ch 2 and work 3 dc in the same space.
- Ch 1.
- Work 3 dc into the next side ch-1 space.
- Ch 1.
- In the next corner space, work 3 dc, ch 2, and 3 dc.
- Continue around the square, working one 3-dc cluster into each side ch-1 space and two clusters into every corner.
- Ch 1 between each cluster group.
- Join with a sl st to the top of the beginning ch-3.
Count: 36 dc stitches, 4 corner ch-2 spaces, and 8 side ch-1 spaces.
Fasten off and weave in the ends.
The charcoal border gives each square a defined outline. When the squares are joined, these dark edges help separate the motifs and create a clean, graphic finish.
Repeat for All 13 Squares
Make 13 matching squares using the same color sequence.
As you finish each square, measure it before moving on. Aim for approximately 5 inches across, and gently block the squares if needed to make their edges even.
If one square is noticeably larger than the others, check your tension and stitch placement before making the remaining motifs.
Arrange the Squares for the Bag
Before joining anything, lay all 13 squares on a flat surface.
Arrange them as follows:
- Front panel: 6 squares, arranged in 2 columns and 3 rows.
- Back panel: 6 squares, arranged in 2 columns and 3 rows.
- Bottom panel: 1 square.
You can alternate the light-to-dark color placement if you prefer a more varied appearance, but keep the stitch sequence consistent.
For a balanced monochrome look, orient every square with the light gray center facing the same way. The repeated centers create a subtle pattern that draws the eye across the bag.
How to Join the Granny Squares
Join the squares using medium gray yarn and your 5 mm hook. A slip-stitch join creates a relatively flat seam, while a single-crochet join produces a more raised ridge.
For this design, use a slip-stitch join through the corresponding edge stitches and chain spaces.
Step 1: Join Each Panel
Arrange six squares in a rectangle with two columns and three rows.
With the right sides facing up, place two squares together with their edges aligned.
- Insert your hook through the corresponding edge loops of both squares.
- Join medium gray yarn.
- Work sl sts evenly along the shared edge.
- Keep the yarn relaxed so the seam does not pull the squares inward.
- Repeat until all six squares form one rectangular panel.
Make a second identical panel for the back.
Step 2: Attach the Bottom Square
Place the bottom square beneath the lower edge of the front panel and align it with the base.
Join one edge of the bottom square to the bottom edge of the front panel. Repeat with the back panel along the opposite edge.
The bottom square should connect the front and back panels, forming a shallow bag shape.
Step 3: Close the Side Seams
Fold the panels into position with their right sides facing inward.
Join the left and right side edges using the same slip-stitch method. Begin at the top edge and work down toward the bottom.
Keep the corners aligned. If necessary, use stitch markers to hold the edges together before joining.
Turn the bag right side out when the seams are complete.
Assembly check: You should have a rectangular tote body with six squares visible on the front, six on the back, and one square forming the base.
Crochet the Top Edge
A neat top border strengthens the opening and gives the handles a stable place to attach.
Join medium gray yarn at one side seam with the right side facing you.
Top Edging Round
- Ch 1.
- Work 1 sc into each available stitch along the top edge.
- At each seam, work an extra sc if needed to close a small gap.
- Join with a sl st to the first sc.
Distribute the stitches evenly. Avoid adding so many stitches that the opening flares outward, or so few that it puckers.
Optional Second Round
For a slightly firmer edge:
- Ch 1.
- Work 1 sc in each stitch around.
- Join with a sl st to the first sc.
- Fasten off and weave in the end.
The extra round creates a simple, understated finish that complements the square pattern without competing with it.
How to Crochet the Bag Handles

This pattern uses two crocheted handles made from dense single-crochet fabric. They are designed to be comfortable for hand carrying or wearing over the forearm.
Make both handles the same length.
Handle Instructions
With charcoal gray yarn, ch 7.
Row 1: Sc in the second ch from the hook and in each remaining ch. (6 sc)
Row 2: Ch 1, turn, and sc in each st across. (6 sc)
Repeat Row 2 until the handle measures approximately 18 inches (46 cm) long.
Fasten off, leaving a long tail for sewing.
Make a second handle of the same length.
Attach the Handles
Lay the bag flat and identify the center of each top edge.
Position one handle on the front panel and the other on the back panel.
For each handle:
- Place one end approximately 2 inches (5 cm) from the left side seam.
- Place the other end approximately 2 inches (5 cm) from the right side seam.
- Make sure the handle lies flat without twisting.
- Use the yarn tail and a yarn needle to sew each end securely to the inside of the top edging.
- Sew around the attachment area several times, keeping your stitches neat and close together.
For extra strength, reinforce the handle attachment points with additional sewing passes through the handle and top edging.
Important: Crocheted handles can stretch over time. Avoid carrying heavy objects, and test the bag with a light load before using it regularly.
Finishing Your Monochrome Gray Granny Square Bag
The finishing touches make a noticeable difference in the appearance of a handmade bag.
Weave in the Ends
Use a yarn needle to weave every loose end through several stitches on the wrong side. Change direction once or twice so the ends are less likely to work loose.
Trim the excess yarn only after securing each end.
Shape the Bag
If the squares look slightly uneven, gently wet-block the finished bag according to the yarn manufacturer’s care instructions.
Shape the panels and corners with your hands, then allow the bag to dry completely.
Do not stretch the fabric aggressively. The goal is to even out the squares and seams, not to enlarge the bag.
Add Optional Details
You can personalize the bag without changing its basic construction.
- Add a small charcoal tassel to one side.
- Sew in a lightweight fabric lining to help prevent small items from slipping through the granny square openings.
- Add a discreet magnetic snap, ensuring it does not pull on the crocheted fabric.
- Use a small fabric pocket inside for keys or cards.
A lining is especially helpful if you plan to carry small items. The open spaces between granny clusters are part of the design, so the bag is not completely closed like a solid-fabric tote.
Troubleshooting Common Crochet Bag Problems
My Granny Squares Are Different Sizes
Uneven squares usually result from changes in tension, hook size, or stitch placement.
Check that every round contains the same number of clusters and that each corner has a chain-2 space. Block the squares gently before joining them.
The Bag Looks Wavy Along the Top
Too many stitches in the edging can make the opening flare.
Work the single crochet stitches evenly, adding extra stitches only where the fabric needs them. If the edge still waves, undo the round and try again with fewer increases.
The Seams Look Too Bulky
A tight single-crochet join can create a thick ridge.
Use a relaxed slip-stitch join through corresponding edge stitches. Keep the yarn tension consistent and avoid pulling the stitches too tightly.
The Handles Stretch
Soft yarn and loose stitches can cause the handles to lengthen under weight.
Use firm single crochet stitches, reinforce the attachment points, and keep the bag’s contents relatively light. A fabric lining or a stronger yarn blend can improve everyday durability.
The Bag Does Not Stand Upright
A granny square tote made from flexible yarn will naturally soften when empty.
Cotton yarn, consistent tension, and a firm base help the bag retain its shape. You can also add a removable, lightweight base insert, provided it fits securely and does not distort the bottom square.
Care Instructions for Your Handmade Bag
Care depends on the yarn you choose, so check the yarn label before washing.
- Spot-clean small marks with a damp cloth and mild detergent.
- If the yarn is machine-washable, place the bag in a laundry bag and use the recommended gentle cycle.
- Avoid twisting or wringing the bag.
- Reshape it while damp and dry it flat.
- Store it empty to reduce stretching around the handles.
If you add a fabric lining or metal fasteners, follow the care requirements for those materials as well.
Frequently Asked Questions
Is This Gray Granny Square Bag Suitable for Beginners?
Yes, if you know the basic crochet stitches. The pattern uses chain stitches, slip stitches, single crochet, and double crochet. Joining and handle placement require some care, but the individual squares are repetitive and manageable.
How Many Granny Squares Do I Need?
You need 13 squares: six for the front, six for the back, and one for the bottom.
Can I Use Different Shades of Gray?
Absolutely. You can substitute silver, heather gray, slate, or nearly black yarn while keeping the three-color sequence. Try to use yarns of similar weight and fiber content so the squares behave consistently.
Can I Make the Bag Larger?
Yes. The simplest option is to make larger granny squares by adding more rounds, then adjust the yarn quantity accordingly. However, larger squares will change the finished dimensions and may require a wider bottom or different handle placement.
For a wider bag, you can also add more squares to each panel, but you will need to recalculate the panel layout and bottom dimensions.
Does the Bag Need a Lining?
No. The bag works without one, but the spaces between granny clusters allow small items to slip through. A lining is useful if you want to carry keys, coins, pens, or other small belongings.
How Much Yarn Should I Buy?
Plan for approximately 600 yards (549 m) of medium-weight yarn across the three shades. Your actual usage will depend on tension, handle length, joining technique, and whether you add a lining or extra edging.
Related Articles:
- Whale and Wave Crochet Ocean Tote Free Pattern
- Cherry Blossom Pink Spring Braided Bag Free Crochet Pattern
- Mint Cottage Garden Bow Purse Free Crochet Pattern
Final Thoughts
This Monochrome Gray Granny Square Bag Free Crochet Pattern is a satisfying project when you want to make something practical without losing the charm of traditional crochet. The light gray centers, medium gray rounds, and charcoal borders create a clean, coordinated look, while the individual squares make the construction easy to organize.
Take your time with the gauge, keep the squares consistent, and reinforce the handles carefully. Those small details help the finished bag look neat and hold up better during everyday use.
Once you finish your first monochrome tote, you can experiment with different gray combinations, add a lining, or adjust the handle length to suit your style. The classic granny square remains the heart of the design, giving you a handmade bag that feels personal, useful, and timeless.


Leave a Reply
You must be logged in to post a comment.