


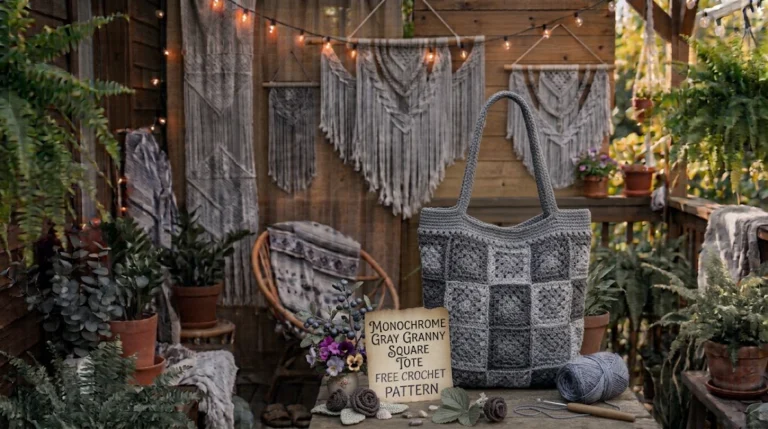
There is something special about a handmade tote bag that looks effortlessly stylish. I love crochet accessories that feel practical enough for everyday use but still have that beautiful boutique-inspired appearance. That’s exactly what inspired this Monochrome Neutral Granny Tote Bag Crochet Pattern.
I wanted to create a bag that would work with almost anything in your wardrobe. Instead of bright colors or complicated motifs, this design uses a soft combination of ivory, oatmeal, beige, and warm taupe. The traditional granny square construction gives it a nostalgic handmade feeling, while the monochrome palette keeps everything modern and elegant.
The finished bag is roomy, comfortable to carry, and surprisingly versatile. You can use it for grocery shopping, library visits, beach essentials, or your everyday errands.
If you love timeless accessories and classic granny square projects, this free crochet pattern is a lovely addition to your handmade collection.

About This Monochrome Neutral Granny Tote Bag Pattern
This tote bag is made from 14 individual granny squares, joined together to create a spacious rectangular bag.
The design uses four coordinating neutral shades. Each square features traditional granny clusters arranged in alternating color rounds, creating a subtle geometric pattern without looking overly busy.
The front and back panels each use six squares arranged in two columns and three rows. Two additional squares form the bottom of the bag.
The handles are crocheted separately using sturdy single crochet stitches. A reinforced top border helps the bag maintain its shape and makes the finished accessory more durable.
- Skill Level: Easy to Intermediate
- Construction: Individual granny squares joined together
- Terminology: US crochet terms
- Finished Size: Approximately 14 inches wide × 15 inches tall, excluding handles
- Handle Drop: Approximately 10 inches
- Shape: Rectangular everyday tote
- Stretch: Moderate, depending on yarn and tension
This is a flexible design. You can make the bag slightly wider or taller by adding more granny squares.
Materials You’ll Need
Yarn
Choose a durable worsted-weight cotton yarn. Cotton is particularly suitable for tote bags because it offers structure and is less stretchy than many acrylic yarns.
| Color | Purpose | Approximate Amount |
|---|---|---|
| Color A – Warm Ivory | Main granny square rounds | 180 yards |
| Color B – Oatmeal | Second color | 150 yards |
| Color C – Soft Beige | Accent rounds | 140 yards |
| Color D – Warm Taupe | Borders and details | 130 yards |
| Color A – Warm Ivory | Handles and finishing | 120 yards |
Total: Approximately 720 yards (660 meters).
Allow 15% extra yarn if your tension is loose or you want longer handles.
Hooks
- 4.0 mm crochet hook for granny squares.
- 3.5 mm crochet hook for joining and reinforced handles.
Notions
- Tapestry needle
- Scissors
- Stitch markers
- Measuring tape
- Blocking mats and pins
- Optional cotton fabric for a lining
- Optional sewing needle and matching thread
Abbreviations and Terminology
This pattern uses US crochet terminology.
- ch: Chain stitch. Yarn over and pull through the loop on your hook.
- sl st: Slip stitch. Insert the hook, yarn over, and pull through both loops.
- sc: Single crochet. Insert hook, yarn over, pull up a loop, yarn over, and pull through both loops.
- dc: Double crochet. Yarn over, insert hook, pull up a loop, yarn over and pull through two loops twice.
- sp: Space between stitches or groups.
- ch-sp: Chain space.
- st: Stitch.
- sts: Stitches.
- rep: Repeat.
- RS: Right side.
- WS: Wrong side.
- FO: Fasten off.
Important: Turning chains do not count as stitches unless a step explicitly says they do.
Gauge
Gauge is important because all 14 squares need to be approximately the same size.
Using a 4.0 mm hook and worsted-weight cotton yarn:
- 4 rounds of granny clusters should measure approximately 4 inches across.
- Each finished square should measure approximately 5 inches × 5 inches.
Your tension may vary depending on the cotton yarn you choose.
If your squares are larger than the measurements above, try a smaller hook. If they are too small, move up to a 4.5 mm hook.
Make one complete square before starting the remaining motifs.
Main Pattern Instructions
Step 1: Make the Granny Squares
You will need 14 granny squares in total:
- 6 squares for the front panel.
- 6 squares for the back panel.
- 2 squares for the bottom panel.
Each square should measure approximately 5 × 5 inches.
Use Color A to begin.
Round 1
- Make a magic ring.
- Ch 3 (counts as first dc).
- Work 2 dc into the ring.
- Ch 2.
- Work 3 dc into the ring.
- Ch 2.
- Repeat the 3-dc cluster and ch-2 corner two more times.
- Sl st into the top of the beginning ch-3.
You should have four granny clusters and four corner spaces.
Pull the magic ring closed securely.
Round 2
Join Color B in any corner ch-2 space.
- Ch 3, 2 dc, ch 2, 3 dc in the same corner.
- Ch 1.
- Work 3 dc, ch 2, 3 dc in the next corner.
- Ch 1.
Repeat around and join with a sl st.
Count: 8 granny clusters and 4 corner spaces.
Round 3
Join Color C in any corner space.
- Ch 3, 2 dc, ch 2, 3 dc in the same corner.
- Ch 1.
- Work 3 dc in the next side ch-1 space.
- Ch 1.
- Work 3 dc, ch 2, 3 dc in the next corner.
Repeat around.
You should now have two clusters along each side and two clusters in each corner.
Round 4
Join Color A in any corner space.
- Ch 3, 2 dc, ch 2, 3 dc in the same corner.
- Ch 1.
- Work 3 dc in each side ch-1 space, separated by ch 1.
- Work 3 dc, ch 2, 3 dc in each corner.
Repeat around and join with a sl st.
Fasten off and weave in your ends.
Count check: Each completed square has 4 corner spaces and 12 granny clusters around its four sides, including the corner clusters.
Repeat until you have 14 squares.
Step 2: Arrange the Color Pattern
Before joining anything, arrange your squares on a flat surface.
I recommend alternating the color placement so that the bag looks balanced rather than having all the same shades in one area.
Front Panel
| Row | Square 1 | Square 2 |
|---|---|---|
| 1 | Ivory | Beige |
| 2 | Taupe | Oatmeal |
| 3 | Beige | Ivory |
Back Panel
| Row | Square 1 | Square 2 |
|---|---|---|
| 1 | Oatmeal | Taupe |
| 2 | Ivory | Beige |
| 3 | Taupe | Oatmeal |
For the bottom, use two matching squares or two complementary color combinations.
You can experiment with the arrangement until you find a combination you love.
Step 3: Join the Granny Squares
There are several ways to join crochet squares, but I recommend the mattress-style whipstitch for a neat, flexible finish.
Place two squares together with their right sides facing outward and edges aligned.
Using Color D and a tapestry needle:
- Insert your needle through the corresponding loops along the edges.
- Pull the yarn through gently.
- Continue stitching evenly along the entire edge.
- Avoid pulling too tightly, as this can make the seam pucker.
Join the squares into two separate rectangular panels, each measuring approximately 10 × 15 inches.
Next, join the two remaining squares along their short edges to create the bottom panel, approximately 10 × 5 inches.
You now have three main pieces:
- Front panel: 10 × 15 inches.
- Back panel: 10 × 15 inches.
- Bottom panel: 10 × 5 inches.
Step 4: Join the Bag Body
Place the front panel and bottom panel together with their edges aligned.
Using Color D, sew along the 10-inch bottom edge.
Attach the back panel to the opposite long edge of the bottom panel.
You now have a long connected piece that forms the front, bottom, and back of the tote.
Fold it into a U shape.
Bring the side edges together and sew each side seam from the bottom corners to the top edges.
Use small, even stitches for a secure finish.
Tip: Keep the seams neat and avoid pulling too tightly. A little flexibility helps the bag retain its shape when filled.
Step 5: Create the Top Border
The top border gives the tote a polished appearance and reinforces the opening.
Using Color D and a 3.5 mm hook:
Round 1
- Join yarn at one top corner.
- Ch 1.
- Work 1 sc into each stitch or available edge space around the entire opening.
- At the square joins, place stitches evenly so the border lies flat.
- Sl st into the first sc.
Round 2
- Ch 1.
- Work 1 sc in each stitch around.
- Sl st to join.
Round 3
- Ch 1.
- Work 1 sc in each stitch around.
- Sl st to join.
Fasten off and weave in all ends.
The three rows of single crochet create a firmer upper edge that helps prevent excessive stretching.
Special Techniques: Crochet Tote Bag Handles
The handles are one of the most important parts of this project. You want them to look attractive, but they also need to support the weight of your everyday belongings.
I recommend making two sturdy, flat handles using tightly worked single crochet stitches.
Step 6: Make the Handles
Make two identical handles using Color A.
Foundation: Ch 9.
Row 1
Sc in the second ch from the hook and in each remaining ch.
Count: 8 sc.
Row 2
Ch 1, turn.
Sc in every stitch across.
Count: 8 sc.
Repeat Row 2 until the handle measures approximately 20 inches.
Fasten off, leaving a long tail for sewing.
Make the second handle in exactly the same way.
Step 7: Reinforce the Handles
For extra durability, you can make the handles thicker by folding each strip lengthwise and sewing the long edges together.
This creates a more substantial strap that feels comfortable over your shoulder.
You can also work a row of slip stitches along both long edges for a cleaner finish.
Step 8: Attach the Handles
Lay the bag flat and mark the handle placement.
For each handle:
- Place one end approximately 2 inches from the left side seam.
- Place the opposite end approximately 2 inches from the right side seam.
- Keep the handle centered over the front or back panel.
- Allow approximately 10 inches of handle drop.
Use stitch markers to hold the handles in place.
With a tapestry needle and matching yarn, sew each handle securely to the inside of the top border.
Sew around the entire handle attachment area, then reinforce it with additional stitches across the base.
Repeat for the second handle.
Give each handle a gentle tug to check that it is firmly attached.
Important: Cotton crochet can stretch under heavy loads. Keep the bag’s contents reasonably light, especially if you are not adding a fabric lining.
Assembly and Finishing
Your Monochrome Neutral Granny Tote Bag is almost finished!
Before calling the project complete, take a few minutes to check the details.
Weave in Loose Ends
Use a tapestry needle to weave every remaining yarn tail through several stitches on the wrong side.
Change direction once or twice to help prevent the ends from coming loose.
Trim excess yarn carefully.
Check the Seams
Inspect the bottom corners and side seams.
These areas experience the most tension when you carry items.
Add a few extra reinforcing stitches if any section looks weak.
Optional Fabric Lining
If you want a more structured tote, adding a cotton lining is a wonderful option.
Cut two fabric rectangles to match the inside dimensions of the bag, allowing approximately ½ inch for seam allowances.
Sew the fabric pieces together along the sides and bottom.
Fold the upper edge inward and hem it neatly.
Place the lining inside the crochet bag and hand-sew it to the inside of the top border.
A lining helps prevent small objects from slipping through the granny square openings.
You can also add a small interior pocket for keys, cards, or other essentials.
Blocking and Care
Blocking helps your granny squares look more even and gives the finished bag a cleaner shape.
Wet Blocking
If you used cotton yarn:
- Fill a basin with cool or lukewarm water.
- Add a small amount of gentle detergent.
- Submerge the finished bag briefly.
- Rinse carefully if needed.
- Press out excess water without twisting or wringing.
- Lay the bag flat on a clean towel.
- Shape the sides and corners.
- Allow it to dry completely.
Avoid hanging the bag while wet because its own weight can stretch the stitches.
If your yarn label recommends a different care method, follow the manufacturer’s instructions.
Everyday Care
- Hand wash when necessary.
- Avoid harsh detergents and bleach.
- Dry flat whenever possible.
- Store in a clean, dry place.
- Avoid carrying excessively heavy items.
- Reshape the bag occasionally to maintain its appearance.
Fit and Troubleshooting Tips

Even a straightforward granny square project can have a few surprises. Here are some common problems and how to fix them.
1. My Granny Squares Are Different Sizes
This usually happens because of changes in tension.
Make sure you use the same hook and yarn weight for every square.
If one square is slightly larger, gently block it to match the others.
2. My Squares Are Curling
Curling usually means your tension is too tight or your corner spaces are too small.
Try loosening your stitches or using a slightly larger hook.
Check that you are placing 2 chains in every corner.
3. My Bag Looks Too Soft
Cotton yarn is a good choice, but some cotton blends can still produce a flexible fabric.
You can improve the structure by:
- Using a smaller hook.
- Adding a fabric lining.
- Reinforcing the bottom with an additional fabric panel.
- Working the top border with tighter stitches.
4. My Handles Are Stretching
Handles can stretch when they are carrying too much weight.
Use tightly worked single crochet stitches and reinforce the attachment points.
A cotton lining or additional reinforcing stitches can also help.
5. My Side Seams Look Uneven
Make sure the edges are aligned before sewing.
Use stitch markers at the corners and intermediate points to prevent one side from becoming longer than the other.
6. I Want a Larger Tote Bag
You can easily customize the dimensions.
For a wider bag, add another column of granny squares to both the front and back panels.
For a taller bag, add another row to each panel and adjust the bottom panel accordingly.
Remember to make the bottom panel match the width of the front and back panels.
Final Thoughts
I absolutely love how this Monochrome Neutral Granny Tote Bag combines traditional crochet techniques with a clean, modern color palette.
The granny squares give it that familiar handmade charm, while the ivory, oatmeal, beige, and taupe shades make it feel timeless and easy to style.
One of my favorite things about this pattern is how customizable it is. You can change the colors, experiment with different granny square arrangements, add a fabric lining, or make the handles longer to suit your everyday needs.
It’s also a wonderful project for using leftover cotton yarn from previous crochet projects.
Take your time with the squares, enjoy the joining process, and don’t worry if your first attempt isn’t absolutely perfect. Handmade pieces are special because of the little details that make them yours.
When your tote is finished, I’d love to see how you styled your colors and handles. Share your creation with fellow crocheters, save the pattern to Pinterest, and enjoy carrying something you made with your own hands!
Happy crocheting! ❤️



Leave a Reply
You must be logged in to post a comment.