

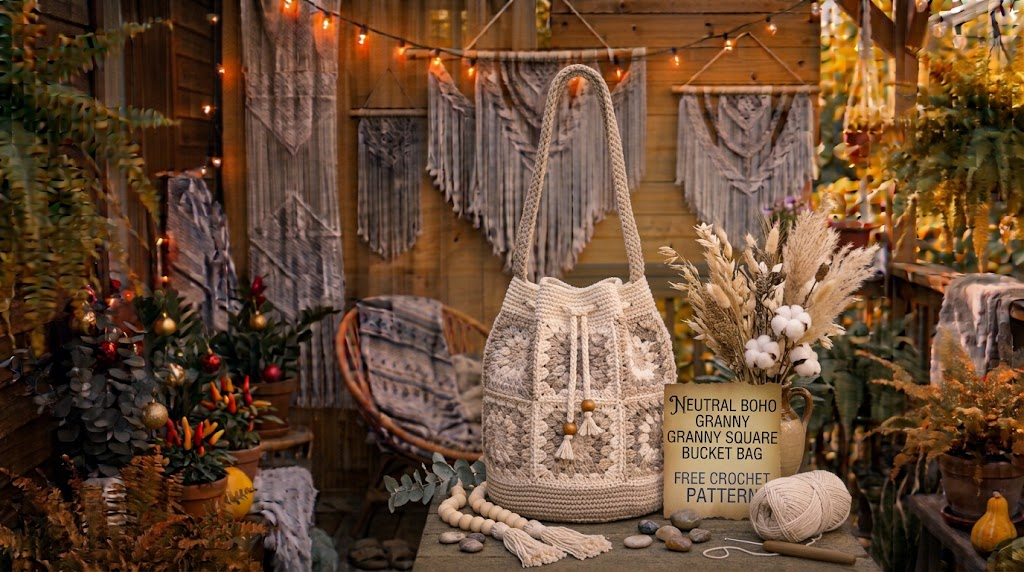
Some crochet projects catch my attention because of their beautiful colors, while others win me over with their practicality. This Neutral Boho Granny Square Bucket Bag Free Crochet Pattern combines both qualities in a simple, timeless design that is easy to style throughout the year.
I love the way neutral yarn shades work together. Cream, oatmeal, sand, and warm taupe create a soft, natural palette that feels relaxed without looking plain. When you arrange these colors into traditional granny squares, the familiar crochet texture becomes something fresh and modern.
The bucket shape gives this bag plenty of room for everyday essentials, while the drawstring closure adds a charming handmade detail. It looks lovely with jeans, summer dresses, linen outfits, and other relaxed bohemian styles.
This free crochet pattern uses four granny squares, a circular base, a simple drawstring, and a comfortable strap. You can follow the color plan below or substitute your favorite neutral shades to make the bag your own.
About This Neutral Boho Granny Square Bucket Bag
This project combines traditional granny-square motifs with the rounded shape of a bucket bag. Four square panels form the body, and a crocheted circular base gives the bag its depth.
The finished bag measures approximately 8 inches (20 cm) in diameter and 6.5 inches (16.5 cm) tall, excluding the strap. Its approximate circumference is 26 inches (66 cm).
The pattern is best suited to confident beginners and intermediate crocheters. You should know how to make chain stitches, slip stitches, single crochet, double crochet, and basic granny-square corners.
The project is worked in separate pieces and joined near the end. This construction makes it easier to manage the color changes and gives you an opportunity to arrange your squares before sewing them together.
Because cotton yarn has less stretch than many acrylic yarns, it helps the bag maintain its shape. However, this is still a soft crochet bag rather than a rigid structured handbag. If you plan to carry heavier items, add a lightweight fabric lining.

Materials You’ll Need
Yarn
Choose a durable, smooth medium-weight cotton yarn (category 4).
- Color A – Warm cream: Approximately 110 yards (100 m), for the first round of each square and selected accents.
- Color B – Oatmeal: Approximately 175 yards (160 m), for the main granny-square rounds.
- Color C – Sand beige: Approximately 175 yards (160 m), for contrast rounds and the bag base.
- Color D – Warm taupe: Approximately 110 yards (100 m), for edging, joining, and finishing.
Total estimated yarn: 570 yards (520 m).
Allow 15% extra for gauge variation, a longer strap, or a lining-free reinforced base. The exact amount depends on your yarn, hook, and tension.
Crochet Hooks
- 5 mm (H/8) hook: Main granny squares and bag body.
- 4.5 mm (7) hook: Base, top edging, and drawstring for a slightly firmer finish.
Other Supplies
- Tapestry needle
- Stitch markers
- Scissors
- Measuring tape
- Blocking mats and rust-resistant pins
- Optional cotton fabric for lining
- Optional removable stitch marker to identify the beginning of each round
Abbreviations and Terminology
This pattern uses US crochet terminology.
- ch – Chain: Yarn over and pull through the loop on your hook.
- sl st – Slip stitch: Insert the hook, yarn over, and pull through both the stitch and the loop on your hook.
- sc – Single crochet: Insert the hook, yarn over and pull up a loop, yarn over, and pull through both loops.
- dc – Double crochet: Yarn over, insert the hook, pull up a loop, yarn over and pull through two loops twice.
- st/sts – Stitch/stitches: The individual loops or spaces worked into.
- sp/sps – Space/spaces: Open gaps created by chain stitches.
- rnd – Round: A complete circuit worked around a motif or bag.
- rep – Repeat: Work the stated instructions again.
- sk – Skip: Leave a stitch or space unworked.
- FO – Fasten off: Cut the yarn, pull the tail through the final loop, and tighten.
- RS – Right side: The intended outward-facing side of the fabric.
- WS – Wrong side: The inside-facing side.
Pattern Notes
- Turning chains do not count as stitches unless a step explicitly says otherwise.
- Join each closed round with a slip stitch unless instructed differently.
- A corner group is written as (3 dc, ch 2, 3 dc) worked into the same corner space.
- The ch-1 spaces between clusters create the characteristic open texture of granny squares.
- The beginning ch-3 of a granny-square round counts as the first dc of its cluster.
Gauge
Gauge matters because the four square panels and circular base must fit together without puckering.
Work a four-round granny square using your chosen yarn and 5 mm hook. After lightly blocking it, aim for a square measuring approximately 6.5 inches (16.5 cm) per side.
If your square is smaller than the target, try a 5.5 mm hook. If it is too large or floppy, try a 4.5 mm hook.
Also crochet a small circular swatch for the base. Your finished circle should be approximately 8 inches (20 cm) across after seven rounds. If the base is significantly smaller or larger, adjust your tension or hook before making the full piece.
Neutral Boho Granny Square Bucket Bag Pattern
Part 1: Make the Four Granny Squares
Make four identical squares using the following color sequence:
- Round 1: Color A
- Round 2: Color B
- Round 3: Color C
- Round 4: Color B
You can change the placement of the shades, but using the same sequence for all four squares creates a coordinated appearance.
Round 1 – Center
With Color A, make a magic ring. Alternatively, ch 4 and join with a sl st to form a ring.
Ch 3 (counts as dc), work 2 dc into the ring, ch 2.
Repeat the following sequence three times: Work 3 dc into the ring, ch 2.
Join with a sl st to the top of the beginning ch-3. FO.
Count: Four clusters of 3 dc, separated by four ch-2 corner spaces.
Round 2 – First Corners
Join Color B in any corner space.
Ch 3, 2 dc in the same corner space, ch 2, 3 dc in the same space. Ch 1.
In the next corner space, work (3 dc, ch 2, 3 dc). Ch 1.
Repeat around the remaining two corners. Join with a sl st to the top of the beginning ch-3. FO.
Count: Four corner groups and four ch-1 side spaces.
Round 3 – Expanding the Square
Join Color C in any corner space.
Ch 3, 2 dc, ch 2, 3 dc in the same corner space. Ch 1.
Work 3 dc in the next ch-1 side space. Ch 1.
In the next corner space, work (3 dc, ch 2, 3 dc). Ch 1.
Continue around, working one 3-dc cluster into each side space and one corner group into each corner. Place ch 1 between consecutive clusters.
Join with a sl st to the beginning ch-3. FO.
Count check: Each side now has two 3-dc clusters between its corner groups.
Round 4 – Final Square Round
Join Color B in any corner space.
Ch 3, 2 dc, ch 2, 3 dc in the same corner space. Ch 1.
Work 3 dc into the next side space, ch 1, and 3 dc into the following side space, ch 1.
Work (3 dc, ch 2, 3 dc) in the next corner space.
Repeat this arrangement around all four sides. Join with a sl st and FO.
Each square should measure approximately 6.5 inches (16.5 cm) per side. Make four squares and block them to the same dimensions.
Part 2: Join the Four Square Panels
Lay the squares in a row, with their right sides facing up. Arrange the colors so that the bag looks balanced rather than having all the darkest sections in one place.
Join the squares along their side edges using Color D.
You may use a mattress stitch with a tapestry needle for a nearly invisible seam, or slip stitch the edges together through corresponding stitches. Keep the tension relaxed enough that the seams do not pull inward.
Join Square 1 to Square 2, Square 2 to Square 3, and Square 3 to Square 4.
Bring the two outer edges together to form a tube, then join them with the same method. You should now have a four-panel cylindrical body.
Tip: Check that all four lower edges line up before moving on to the base. Uneven panel heights can make the finished bag tilt.
Part 3: Crochet the Circular Base
Use Color C and the 4.5 mm hook for a firm base.
Round 1: Make a magic ring. Ch 3, then work 11 dc into the ring. Join with a sl st to the top of the beginning ch-3. Pull the ring closed.
Count: 12 dc.
Round 2: Ch 3. Work 1 dc into the same stitch, then work 2 dc into every stitch around. Join.
Count: 24 dc.
Round 3: Ch 3. Work 2 dc into the next stitch, then repeat 1 dc in the next stitch, 2 dc in the following stitch around. Join.
Count: 36 dc.
Round 4: Ch 3. Work 1 dc into the next stitch, then 2 dc into the following stitch. Repeat 1 dc in each of the next 2 stitches, 2 dc in the following stitch around. Join.
Count: 48 dc.
Round 5: Ch 3. Work 1 dc into each of the next 2 stitches, then 2 dc into the following stitch. Repeat 1 dc in each of the next 3 stitches, 2 dc in the following stitch around. Join.
Count: 60 dc.
Round 6: Ch 3. Work 1 dc into each of the next 3 stitches, then 2 dc into the following stitch. Repeat 1 dc in each of the next 4 stitches, 2 dc in the following stitch around. Join.
Count: 72 dc.
Round 7: Ch 3. Work 1 dc into each of the next 4 stitches, then 2 dc into the following stitch. Repeat 1 dc in each of the next 5 stitches, 2 dc in the following stitch around. Join.
Count: 84 dc.
FO, leaving a long tail for joining.
The base should measure close to 8 inches (20 cm) across. If it is smaller than your bag opening, block it gently or add another increase round. If you add a round, make the corresponding adjustment when attaching it to the body.
Part 4: Attach the Base to the Bag
Turn the body inside out and place the circular base against its lower opening. Match the base evenly to the four panel edges.
Use stitch markers to divide the base into four equal sections of 21 stitches. Mark the midpoint of each panel as well.
With Color D, join the base to the body using a tapestry needle or slip stitches. Distribute the fabric evenly rather than pulling one section tighter than another.
If your square edges do not line up exactly with the 21-stitch sections, ease the difference across each panel. A small difference is normal, but substantial puckering usually means the gauge or base size needs adjustment.
Turn the bag right side out and check that the base sits flat.
Part 5: Finish the Top Edge
Join Color D at the upper edge of the bag and use the 5 mm hook.
Round 1: Work approximately 84 sc evenly around the top, aiming for 21 sc along each square panel. Adjust the placement as needed so the stitches are distributed evenly.
Join with a sl st to the first sc.
Round 2 – Drawstring Eyelets: Ch 1. Work 1 sc into each of the next 2 stitches, ch 1, sk the next stitch. Repeat this sequence around. Join with a sl st to the first sc.
The round creates small eyelets through which the drawstring can pass.
Round 3: Ch 1 and work 1 sc into every sc and ch-1 space around. Join and FO.
This final round reinforces the top edge while keeping the opening flexible.
Special Techniques: Drawstring and Shoulder Strap

Crochet the Drawstring
With Color D, ch 110–120, or enough chains to make a cord approximately 30–34 inches (76–86 cm) long.
Sl st into the second chain from the hook and into each chain across. FO, leaving a short tail.
Using a tapestry needle, weave the cord through the eyelets around the top edge, alternating over and under the fabric. Bring both ends to the front and tie a loose knot.
Pull the cord gently to close the bag. If the opening feels too tight, loosen the drawstring or make a slightly longer cord.
Make the Shoulder Strap
With Color D and the 5 mm hook, ch 7.
Row 1: Sc in the second chain from the hook and in each remaining chain. (6 sc)
Rows 2–80: Ch 1, turn, sc in each stitch across. (6 sc)
This produces a narrow, dense strap approximately 30–34 inches (76–86 cm) long, depending on your row gauge. Adjust the number of rows to suit your preferred strap length.
For a sturdier strap, crochet two identical strips and sew them together along their edges. This reduces stretching under the weight of the bag.
Attach one end to the inside of the bag near a side seam. Attach the other end directly opposite it. Sew securely through several stitches and reinforce the attachment points with additional passes of the tapestry needle.
For a short shoulder strap or longer crossbody strap, adjust the length before attaching it permanently.
Assembly and Finishing
Before weaving in the remaining ends, place the bag on a flat surface and inspect the seams.
- Check that the four granny squares face outward and that the color arrangement looks balanced.
- Reinforce the vertical side seam, especially near the top opening.
- Secure the circular base seam with a second pass if you expect to carry a water bottle or other heavier essentials.
- Make sure the drawstring slides freely through the eyelets.
- Check that both strap attachments are level and secure.
- Weave yarn ends into the backs of stitches, changing direction a few times to prevent them from working loose.
For a more polished boho finish, you can add a small tassel made from leftover cream or taupe yarn. Attach it to the drawstring ends or to one side of the bag. Keep it lightweight so it does not pull on the closure.
A fabric lining is optional but useful. Cut a fabric cylinder and circular base to match the bag’s dimensions, allowing extra fabric for seams. Sew the lining pieces together, fold the top edge inward, and hand-sew the lining just below the crochet top edge. Avoid stitching through the drawstring channel.
Blocking and Care
Cotton granny squares often look much neater after blocking. Pin each square to the target measurement before assembly, making sure the corners are square and the edges are straight.
If the bag is already assembled, dampen it lightly and reshape the body and base on a clean towel. Allow it to dry completely before using it.
Follow the care instructions on your yarn label. For washable cotton yarn, gentle hand washing in cool or lukewarm water is usually a safe choice. Press out excess water with a towel instead of wringing the bag.
Dry the bag flat and reshape it while damp. Never hang it while wet, as the weight of the cotton can stretch the strap and body. Avoid aggressive heat or steam unless the yarn manufacturer specifically recommends it.
Fit and Troubleshooting Tips
My granny squares are different sizes. Check your gauge and block each square to the same dimensions before joining. Consistent square sizes help the body hang evenly.
The circular base puckers. The base may be too small or the stitches may be too tight. Try a larger hook or add an increase round, then distribute the stitches evenly around the body.
The top edge flares outward. Your single crochet edging may be too loose or may contain too many stitches. Check that you have approximately 84 stitches and reduce any accidental extra stitches.
The bag stretches when I put things inside. Use firm cotton yarn, reinforce the strap, and consider a fabric lining. Avoid carrying heavy items without additional support.
The drawstring does not close smoothly. Check that the eyelets are evenly spaced and that the cord is not twisted. A smooth, rounded cord generally slides more easily than a thick, bulky one.
I want a larger bucket bag. Increase the size of all four squares by adding another granny-square round. Make the circular base larger as well, increasing evenly until its circumference matches the joined panel body.
Related Articles:
- Watermelon Baby Hat and Shorts Free Crochet Pattern
- Christmas Poinsettia Granny Square Tote Free Crochet Pattern
- Honeybee Garden Butterfly Charm Free Crochet Pattern
Final Thoughts
I love how this Neutral Boho Granny Square Bucket Bag Free Crochet Pattern brings a traditional crochet motif into an everyday accessory. The neutral palette feels calm and versatile, the bucket shape is practical, and the granny squares give the finished bag that unmistakable handmade charm.
You can keep the design simple with cream and oatmeal, introduce deeper earthy shades, or use leftover cotton yarn to create a subtle color variation. Small changes in the palette can make the same pattern feel completely different.
Take your time with the gauge, keep your seams even, and reinforce the strap before using the bag regularly. Those little finishing details make a real difference.
If you make this Neutral Boho Granny Square Bucket Bag Free Crochet Pattern, I hope you enjoy every stage of the project. Share your finished bag, save the pattern to your crochet inspiration board, and enjoy carrying something you made with your own hands.



Leave a Reply
You must be logged in to post a comment.