


I wanted to create a bag that looked charming without being too delicate to use. Granny squares were the obvious choice because they’re fun to make, easy to customize, and wonderfully practical for using up leftover yarn.
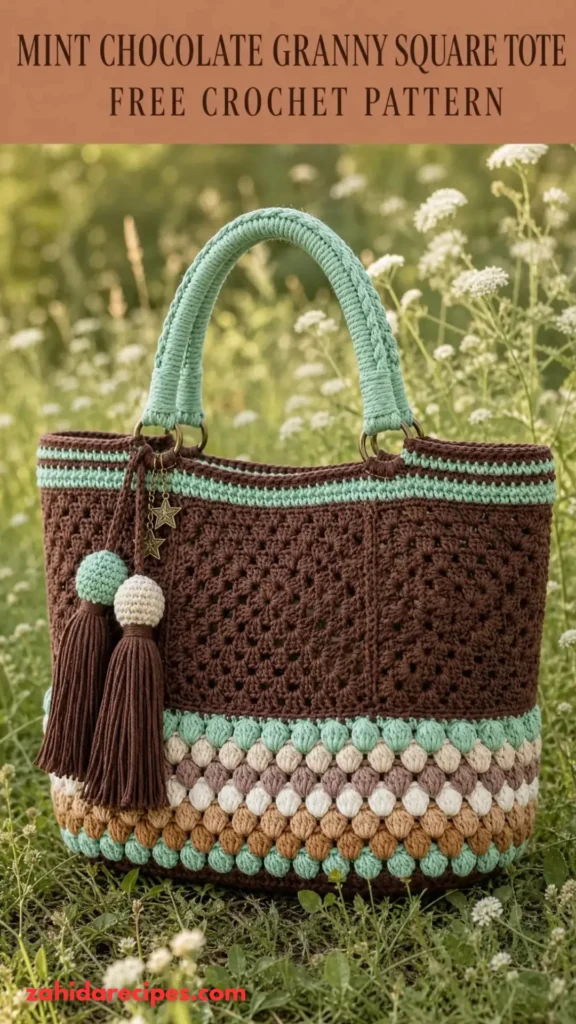
This Mint Chocolate Granny Square Tote Free Crochet Pattern combines traditional granny square construction with a sturdy rectangular base, comfortable handles, and a neat finished edge. It’s a lovely weekend project that gives you a useful handmade accessory you’ll enjoy carrying everywhere.

About This Mint Chocolate Granny Square Tote Pattern
This tote is made from individual granny squares joined together to create two large rectangular panels. Each square features a traditional granny stitch arrangement with alternating mint and chocolate shades.
The finished bag has:
- Twelve colorful granny squares.
- Two rectangular crochet panels.
- A sturdy crocheted base.
- Two narrow side gussets for extra room.
- Comfortable, reinforced crochet handles.
- A clean top border for a polished finish.
Skill Level: Advanced beginner to intermediate.
You should be comfortable with chain stitches, double crochet, slip stitches, joining granny squares, and basic sewing with a tapestry needle.
Finished Size
- Width: approximately 16.5 inches (42 cm).
- Height: approximately 11 inches (28 cm).
- Depth: approximately 3 inches (7.5 cm).
- Handle drop: approximately 9 inches (23 cm).
The cotton yarn gives the bag structure while keeping it flexible enough for everyday use. Because granny squares naturally have small openings, I recommend adding a fabric lining if you plan to carry small items.
Materials You’ll Need
Yarn
Choose medium-weight worsted cotton yarn for a sturdy, attractive finish.
| Color | Purpose | Approximate Amount |
|---|---|---|
| Mint green (A) | Main granny square color | 350 yards |
| Chocolate brown (B) | Contrasting square color | 300 yards |
| Cream (C) | Square borders and joining | 150 yards |
Allow approximately 15% extra yarn for gauge variations and joining.
Crochet Hooks
- 4.5 mm crochet hook: Granny squares and panels.
- 4 mm crochet hook: Handles and top edging.
Additional Supplies
- Tapestry needle.
- Stitch markers.
- Scissors.
- Measuring tape.
- Blocking mats and pins.
- Optional cotton fabric for lining.
- Sewing needle and matching thread.
Abbreviations and Terminology
This pattern uses US crochet terminology.
| Abbreviation | Meaning |
|---|---|
| ch | Chain |
| sl st | Slip stitch |
| sc | Single crochet |
| hdc | Half double crochet |
| dc | Double crochet |
| st | Stitch |
| sp | Space |
| rnd | Round |
| rep | Repeat |
| sk | Skip |
| RS | Right side |
| WS | Wrong side |
Basic Stitch Explanations
- Chain (ch): Yarn over and pull through the loop on your hook.
- Slip stitch (sl st): Insert hook, yarn over, and pull through both the stitch and the loop on your hook.
- Single crochet (sc): Insert hook, yarn over, pull up a loop, yarn over, and pull through both loops.
- Half double crochet (hdc): Yarn over, insert hook, pull up a loop, yarn over, and pull through all three loops.
- Double crochet (dc): Yarn over, insert hook, pull up a loop, yarn over and pull through two loops twice.
Important Notes:
- Turning chains do not count as stitches unless specifically stated.
- A group of three double crochet stitches is called a granny cluster.
- Join rounds with a slip stitch.
- Change colors in the final yarn-over of the stitch before the new color begins.
Gauge
Gauge matters because all twelve squares need to be approximately the same size.
Using your 4.5 mm hook and worsted cotton yarn:
- 4 granny clusters across should measure approximately 4 inches.
- Five granny square rounds should measure approximately 5.5 inches across.
Make one practice square before beginning the full project.
If your square is too large, try a smaller hook. If it is too small or feels stiff, move up one hook size.
Block your practice square before measuring because cotton yarn can relax slightly after blocking.
Main Pattern Instructions
Step 1: Crochet the Mint Chocolate Granny Squares
You will need 12 granny squares in total. Each square should measure approximately 5.5 inches.
For a balanced color arrangement, make:
- 4 squares beginning with mint green.
- 4 squares beginning with chocolate brown.
- 4 squares beginning with cream.
You can change the color arrangement if you prefer a more dominant mint or chocolate appearance.
Granny Square Foundation
Using your 4.5 mm hook and Color A:
Round 1: Make a magic ring. Ch 3 (counts as first dc), work 2 dc into the ring, ch 1, ch 2, then repeat the following sequence three times: 3 dc into the ring, ch 1, ch 2. Join with a sl st to the top of the beginning ch-3. Pull the magic ring closed.
Round 2: Sl st across to the first corner ch-2 space. Ch 3, work 2 dc, ch 2, and 3 dc into the same corner space. Ch 1. Work 3 dc into the next corner space, ch 2, 3 dc into that same space, ch 1. Repeat around. Join with a sl st.
Round 3: Sl st into the corner space. Ch 3, 2 dc, ch 2, 3 dc in the same corner. Ch 1. Work 3 dc into each side ch-1 space, with ch 1 between clusters. At each corner, work (3 dc, ch 2, 3 dc). Join.
Round 4: Continue the granny square construction. Work (3 dc, ch 2, 3 dc) into each corner space. Work 3 dc into every side ch-1 space, separating clusters with ch 1.
Round 5: Repeat Round 4, maintaining the corner increases and side clusters.
Fasten off and weave in the ends.
Count check: The square should have four corner spaces and five rounds of granny square texture.
Color Changes
To create the mint chocolate appearance, alternate colors between rounds.
- Round 1: Mint green.
- Round 2: Chocolate brown.
- Round 3: Cream.
- Round 4: Mint green.
- Round 5: Chocolate brown.
For the remaining squares, reverse or vary the color sequence to create a playful patchwork effect.
Step 2: Block All Twelve Squares
Before joining, gently block every square.
Wet the squares with cool water, remove excess moisture using a towel, and pin them into 5.5-inch squares. Allow them to dry completely.
This step makes joining much easier and helps prevent wavy or uneven panels.
Step 3: Assemble the Front and Back Panels
Arrange six squares for the front panel in a 3-by-2 layout. Repeat for the back panel.
You should now have:
- Front panel: 3 squares wide and 2 squares tall.
- Back panel: 3 squares wide and 2 squares tall.
Use cream yarn to join the squares.
Joining Method:
- Place two squares with their right sides facing outward.
- Insert your hook through corresponding stitches along the edges.
- Join using slip stitches through both loops.
- Keep your tension even.
- Continue until all squares are connected.
Join the three squares across each row first. Then join the two rows together. Repeat for the second panel.
Your finished panels should measure approximately 16.5 inches wide and 11 inches tall.
Step 4: Crochet the Tote Base
The base gives the bag its depth and helps it hold everyday essentials.
Using chocolate brown yarn and your 4.5 mm hook:
Foundation: Ch 49.
Row 1: Work 1 sc in the second ch from hook and in each remaining ch. Turn. (48 sc)
Row 2: Ch 1, work 1 sc in each stitch across. Turn. (48 sc)
Rows 3–18: Repeat Row 2.
Fasten off, leaving a long tail for sewing.
The finished base should measure approximately 16.5 inches long and 3 inches wide. Adjust the foundation chain or number of rows if your gauge differs.
Step 5: Make the Side Gussets
Make two identical side pieces using chocolate brown yarn.
Foundation: Ch 10.
Row 1: Sc in the second ch from hook and across. Turn. (9 sc)
Row 2: Ch 1, sc in each stitch across. Turn. (9 sc)
Rows 3–55: Repeat Row 2.
Fasten off, leaving a long sewing tail.
Each gusset should measure approximately 3 inches wide and 11 inches long.
These narrow pieces create a useful side depth without making the tote bulky.
Step 6: Attach the Base and Side Gussets
Lay the front panel flat with the right side facing you.
Place the long edge of the base against the bottom edge of the front panel.
Using a tapestry needle and chocolate brown yarn, sew the two pieces together with neat whip stitches.
Repeat with the back panel along the opposite long edge of the base.
Now attach one gusset to each side. Work slowly and check that the corners line up evenly.
The bag should begin taking its familiar tote shape.
Step 7: Crochet the Handles
I prefer crocheted handles that are firm rather than overly stretchy. A simple dense single crochet strap works beautifully.
Make two handles.
Using chocolate brown yarn and a 4 mm hook:
Foundation: Ch 9.
Row 1: Sc in the second ch from hook and across. Turn. (8 sc)
Row 2: Ch 1, sc in each stitch across. Turn. (8 sc)
Rows 3–80: Repeat Row 2.
Fasten off, leaving a long sewing tail.
Each handle should measure approximately 20 inches long and 1.25 inches wide. Adjust the number of rows to achieve your preferred handle length.
Fold each handle lengthwise only if you want a thicker strap; otherwise, keep it flat.
For extra strength, sew a second line of stitching along both long edges.
Step 8: Add the Top Border
Attach chocolate brown yarn to the upper edge of the assembled tote.
Round 1: Ch 1. Work sc evenly around the entire opening, placing approximately one stitch in each stitch along the square edges. At the corners, work 2 sc where needed to maintain a flat edge. Join with a sl st.
Round 2: Ch 1, sc in each stitch around. Join.
Round 3: Repeat Round 2.
Fasten off and weave in all loose ends.
This dark chocolate border frames the mint-colored squares beautifully and gives the opening a more finished appearance.
Step 9: Attach the Handles
Place one handle on the front panel and the other on the back panel.
Position each handle approximately 3 inches inward from the side seams.
The handle ends should overlap the top border by approximately 1.5 inches.
Use the long yarn tails and a tapestry needle to sew each handle securely.
Sew around each handle end using a reinforced square or rectangular stitch pattern. Add diagonal stitches inside the rectangle for extra stability.
Check that both handles are positioned at equal distances from the center.
Special Techniques and Additional Details
Creating a Neat Granny Square Join
A tidy join makes a huge difference to the final appearance.
I recommend using the same cream yarn for all square joins. This creates a soft outline between the mint and chocolate colors.
Keep your joining stitches consistent. Pulling too tightly can make the panels shrink, while loose joins may leave visible gaps.
Optional Fabric Lining
If you want your tote to carry a phone, keys, or smaller belongings without them slipping through the granny square openings, add a fabric lining.
- Cut two fabric rectangles slightly smaller than the finished front and back panels.
- Sew the rectangles together along the sides and bottom.
- Fold and press the upper edge.
- Place the lining inside the tote.
- Hand-sew it to the inside of the top border.
Choose cream, beige, or pale mint cotton fabric to complement the crochet colors.
Assembly and Finishing
Once everything is attached, inspect the entire bag carefully.
- Check all four bottom corners.
- Reinforce the handle attachments.
- Secure loose yarn ends inside the seams.
- Make sure the top border is even.
- Check that the base sits flat when the bag is placed on a table.
If you notice any loose joining stitches, secure them before using the tote.
Blocking and Care
Cotton yarn responds well to gentle wet blocking.
For the finished bag:
- Lightly dampen the crochet panels with cool water.
- Gently squeeze out excess moisture using a clean towel.
- Shape the bag into its intended rectangular form.
- Pin the panels and base into position.
- Allow everything to dry completely.
Avoid stretching the handles while blocking.
Care Instructions
- Hand wash in cool water with mild detergent.
- Do not twist or wring the bag.
- Lay flat to dry.
- Avoid hanging the bag while wet.
- Store it flat or lightly stuffed to maintain its shape.
If you use cotton fabric for the lining, follow the fabric’s care instructions as well.
Fit and Troubleshooting Tips
My Granny Squares Are Different Sizes
This usually happens because of inconsistent tension. Make a practice square before crocheting all twelve. Block each square to the same measurements before joining.
The Tote Looks Wavy
Your joining stitches may be too loose, or the squares may have different dimensions. Check the measurements and adjust the joining tension. Blocking can also help smooth minor unevenness.
The Base Is Curling
If the base curls upward, your foundation chain may be too tight. Try using a slightly larger hook for the foundation chain or remake the base with more relaxed tension.
The Handles Stretch Too Much
Cotton handles can stretch with regular use, especially when carrying heavier belongings. Use dense single crochet stitches and reinforce the handle attachments. You can also insert cotton webbing inside the straps for additional support.
I Want a Larger Tote
You can easily customize the dimensions.
- Add another granny square to the width of each panel.
- Add another row of squares for extra height.
- Increase the gusset width for more storage space.
- Make longer handles if you prefer carrying the tote over your shoulder.
Remember to adjust the base dimensions to match the new panels.
Final Thoughts
I absolutely love how the mint green and chocolate brown colors work together in this granny square tote. The combination feels fresh, cozy, and a little vintage without looking old-fashioned.
This Mint Chocolate Granny Square Tote Free Crochet Pattern is a lovely opportunity to practice granny square construction while creating something genuinely useful.
You can take it to the farmers’ market, carry your crochet supplies, use it for library visits, or simply make it your everyday handbag.
Don’t be afraid to experiment with the colors, either. A little cream, extra chocolate brown, or even a soft pastel accent can give your bag a completely different personality.
Most importantly, enjoy the process. Every square, every stitch, and every little finishing detail makes your tote uniquely yours.
If you make this bag, I’d love to see your color combinations. Share your finished project, leave a comment, or save the pattern to your Pinterest crochet inspiration board.
Happy crocheting! 💚


Leave a Reply
You must be logged in to post a comment.