


The result is a practical crochet bag with a sweet vintage-inspired appearance. Carry it to the farmers’ market, pack it for a picnic, or use it to keep your yarn and hooks together. This Strawberry Patch Granny Square Tote Free Crochet Pattern includes the square construction, strawberry decorations, joining instructions, and comfortable crocheted handles.
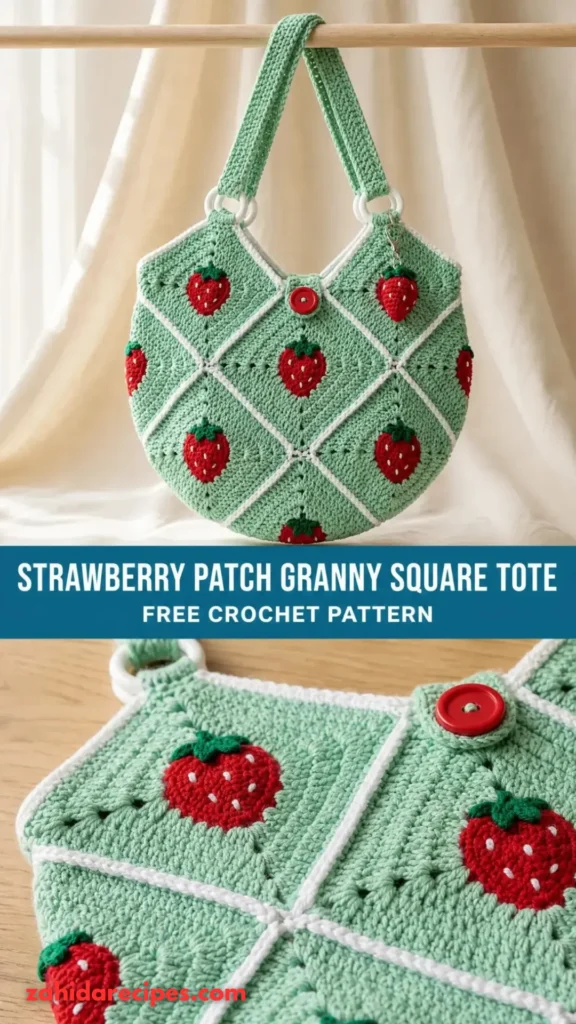
About the Strawberry Patch Granny Square Tote
This design combines traditional granny square construction with small three-dimensional strawberry appliqués. Each square is worked separately before being decorated and joined to create the main body of the bag.
The bag features two large rectangular panels, narrow side sections, and a reinforced bottom. A simple single crochet border finishes the opening, while long crocheted handles make it comfortable to carry.
Pattern information:
- Project type: Crochet tote bag
- Skill level: Intermediate
- Terminology: US crochet terms
- Construction: Motif-based granny square construction
- Finished width: Approximately 14 inches
- Finished height: Approximately 13 inches
- Bag depth: Approximately 4 inches
- Handle length: Approximately 19 inches
- Main motif: Crocheted strawberries with green leaves
The measurements are approximate and may change depending on your yarn, hook, and personal tension. I recommend measuring your finished squares before joining everything together.
Yarn and Supplies for Your Strawberry Crochet Bag
For this project, I recommend a medium-weight cotton yarn. Cotton provides a firm stitch definition, which is especially helpful for granny squares and bags that need to hold their shape.
Yarn Requirements
- Color A – Natural Cream: Approximately 350 yards for the square backgrounds, seams, and top border.
- Color B – Strawberry Red: Approximately 120 yards for the strawberry decorations.
- Color C – Garden Green: Approximately 90 yards for leaves and stems.
- Color D – White or Pale Pink: Approximately 40 yards for decorative flowers and details.
These quantities are estimates. Allow 15% extra yarn if you crochet tightly, make larger motifs, or add additional decorations.
Hooks and Notions
- 4.0 mm crochet hook for the main granny squares.
- 3.5 mm crochet hook for the strawberry appliqués.
- 4.0 mm crochet hook for the handles and joining.
- Tapestry needle for sewing and weaving ends.
- Scissors.
- Stitch markers.
- Measuring tape.
- Blocking mat and rust-resistant pins.
- Optional cotton lining fabric.
US Crochet Abbreviations
| Abbreviation | Meaning |
|---|---|
| ch | Chain |
| sl st | Slip stitch |
| sc | Single crochet |
| hdc | Half double crochet |
| dc | Double crochet |
| tr | Treble crochet |
| sc2tog | Single crochet two stitches together |
| st | Stitch |
| sts | Stitches |
| sp | Space |
| rep | Repeat |
| rnd | Round |
| RS | Right side |
| WS | Wrong side |
Basic stitch reminders:
- Chain: Yarn over and pull through the loop on the hook.
- Slip stitch: Insert the hook into a stitch, yarn over, and pull through both loops.
- Single crochet: Insert the hook, pull up a loop, yarn over, and pull through both loops.
- Half double crochet: Yarn over, insert the hook, pull up a loop, then yarn over and pull through all three loops.
- Double crochet: Yarn over, insert the hook, pull up a loop, then work through two loops twice.
- Treble crochet: Yarn over twice, insert the hook, pull up a loop, and work through two loops three times.
- Single crochet two together: Insert the hook into the next stitch and pull up a loop. Insert into the following stitch and pull up another loop. Yarn over and pull through all three loops.
Unless otherwise stated, turning chains do not count as stitches. Join joined rounds with a slip stitch.
Gauge and Finished Measurements
Gauge matters because all the granny squares must fit together without pulling or stretching.
Using the 4.0 mm hook and Color A, make a four-round granny square.
Target measurement: Approximately 5 inches square.
Measure your square after gently blocking it. If it is too small, try a larger hook. If it is too large, use a smaller hook.
Keep the same hook size and tension for all 12 squares.
How to Crochet the Strawberry Patch Granny Squares
The main body uses 12 granny squares. Each square has a cream background and a strawberry decoration in the center.
Round 1: Starting the Granny Square
With Color A, create a magic ring.
- Ch 3 (counts as the first dc).
- Work 2 dc into the ring.
- Ch 2.
- Work 3 dc into the ring.
- Ch 2.
- Repeat the cluster and corner sequence twice more.
- Join with a sl st to the beginning chain.
- Pull the ring closed.
Count: Four groups of 3 dc and four corner spaces.
Round 2: Forming the Corners
Sl st into the nearest corner space.
- Ch 3, work 2 dc into the same space.
- Ch 2.
- Work 3 dc into that corner space.
- Ch 1.
- Repeat this corner sequence in each remaining corner.
Join with a slip stitch to the beginning chain.
Round 3: Adding the Side Clusters
Move into the next corner space with slip stitches.
- Ch 3 and work 2 dc into the corner.
- Ch 2 and work 3 dc into the same corner.
- Ch 1.
- Work 3 dc into the next side space.
- Ch 1.
- Continue to the next corner and work the corner cluster.
Repeat around the square and join.
Round 4: Final Granny Square Round
Continue the established granny-square pattern.
- Work a 3-dc, ch-2, 3-dc group in every corner.
- Work 3 dc into each side space.
- Separate side clusters with ch 1.
Join and fasten off.
Your square should measure approximately 5 inches. Repeat the complete process until you have 12 squares.
Making the Little Crochet Strawberry Appliqués
The strawberry decorations are the highlight of this bag. They are worked separately in red yarn and finished with small green leaves.
Strawberry Shape
Using Color B and the 3.5 mm hook, make a magic ring.
Round 1: Ch 1 and work 6 sc into the ring. Pull the ring closed and join. (6 sts)
Round 2: Ch 1 and work 2 sc in every stitch around. Join. (12 sts)
Round 3: Ch 1. Work 1 sc in the first stitch and 2 sc in the next stitch. Repeat around. Join. (18 sts)
Round 4: Ch 1. Work 1 sc in each of the next 4 stitches, then sc2tog over the next 2 stitches. Repeat the shaping sequence around, adjusting the final decrease to maintain the intended rounded lower shape.
Fasten off, leaving a long tail for attaching the strawberry.
Gently shape the bottom of the motif into a rounded point. Avoid pulling it too tightly, as the strawberry should remain soft rather than becoming narrow and stiff.
Adding the Green Strawberry Leaves
Switch to Color C.
- Attach green yarn at the top of the strawberry.
- Ch 3.
- Sl st into the second chain from the hook.
- Sc into the next chain.
- Sl st into the strawberry body.
- Repeat twice to form three leaves.
Fasten off and weave in the yarn ends.
Embroidering the Strawberry Seeds
Use a small amount of white, cream, or pale pink yarn to create the seed details.
Make 5–7 short diagonal stitches across the red surface. Distribute them evenly without making the stitches too long.
These tiny details help the strawberry motif look recognizable and give the bag a finished appearance.
Decorating the Granny Squares
Lay each granny square flat with the right side facing upward. Position one strawberry in the center, with its leaves pointing toward the upper edge.
Use a tapestry needle and matching yarn to sew around the strawberry’s outer edge. Work small stitches through the motif and the granny square without pulling the background fabric.
Check the placement before fastening off.
Repeat this process for all 12 squares.
For a slightly raised effect, avoid flattening the strawberry completely while sewing. The gentle texture makes each motif stand out beautifully against the granny stitch background.
Joining the Granny Squares into Bag Panels
Divide your squares into two groups of six. Each group forms one rectangular panel with two squares across and three rows vertically.
Arrange the squares on a flat surface before joining them. Make sure the strawberries face the same direction.
Single Crochet Joining Method
Place two squares with their wrong sides together.
- Attach Color A at the corner of the first pair.
- Insert the hook through the corresponding edge stitches of both squares.
- Yarn over and pull up a loop.
- Complete one single crochet.
- Continue along the entire edge.
- Repeat for the remaining seams.
Join all six squares into one rectangular panel. Repeat for the second panel.
Keep your joining tension consistent. Tight seams can cause the panels to curl, while loose seams may leave visible gaps.
Creating the Side and Bottom Sections
The side and bottom sections give the bag its depth. They also help prevent the main panels from folding inward when the tote is filled.
Side Panels
Using Color A, ch 15.
Row 1: Sc into the second chain from the hook and across. (14 sc)
Rows 2–28: Ch 1, turn, and sc across. (14 sc)
Make two matching panels. Their width should be approximately 4 inches, and their length should match the height of the main bag panels.
Bottom Panel
Ch 15 using Color A.
Row 1: Sc in the second chain from the hook and across. (14 sc)
Rows 2–28: Ch 1, turn, and sc across.
Work until the bottom panel measures approximately 14 inches long and 4 inches wide.
Compare its length with the assembled front and back panels before joining.
Connecting the Bag Pieces
Place the front panel flat with the right side facing upward.
Attach the bottom panel along its lower edge using single crochet stitches. Connect the back panel to the opposite edge of the bottom section.
Next, attach the two side panels. Work around the corners carefully, making sure that the edges line up.
Turn the bag right side out after completing the seams.
Finishing the Top Opening
A clean upper edge gives the tote a more structured appearance.
Attach Color A at one of the side seams.
Round 1: Ch 1 and work sc evenly around the entire opening. Join with a sl st.
Rounds 2–3: Ch 1, work 1 sc in each stitch around, and join.
Fasten off and weave in the end.
Check that the top edge is not too tight. It should remain wide enough for comfortable access to the inside of the bag.
Making Strong Crochet Tote Handles
Handles are important because they carry the weight of everything inside your bag. For this design, we’ll make two long, narrow straps and reinforce them before attaching them.
Using Color A, ch 9.
Row 1: Sc in the second chain from the hook and across. (8 sc)
Rows 2–75: Ch 1, turn, and sc across. (8 sc)
Continue until the handle measures approximately 19 inches.
Fasten off, leaving a long sewing tail. Make a second handle using the same instructions.
Reinforcing Each Handle
Fold each strap lengthwise and sew along its long edges using a tapestry needle and matching yarn.
This creates a thicker handle with additional stability.
For extra reinforcement, you can add a narrow strip of cotton webbing inside each strap before sewing the edges together.
Attaching the Handles to the Bag
Place the first handle on the front panel.
- Position one end approximately 3 inches from the left side seam.
- Position the other end approximately 3 inches from the right side seam.
- Make sure the handle is centered.
- Sew both ends securely to the bag using backstitching.
Attach the second handle to the back panel in the same way.
Before finishing, check that both handles have the same length and sit evenly.
Optional Strawberry Garden Decorations
If you enjoy decorative details, you can add small flowers between some of the strawberry motifs.
Mini Crochet Flowers
Using Color D, make a magic ring.
- Ch 1.
- Work 5 sc into the ring.
- Join with a slip stitch.
- For each petal, ch 3 and sl st into the next stitch.
- Repeat around.
Fasten off and sew the flower onto a selected granny square.
Use three or four flowers for a balanced design. Too many decorations can make the bag look crowded, so leave some cream space visible.
Optional Fabric Lining
A fabric lining is useful if you plan to carry keys, coins, or other small belongings.
Measure the inside of the completed bag and cut cotton fabric to fit, adding approximately half an inch for seam allowances.
Sew the side and bottom seams, fold the upper edge inward, and press it flat.
Place the lining inside the tote and hand-sew it to the inside of the top border. Make sure the lining sits smoothly without pulling the crochet fabric.
Final Assembly and Finishing Checklist
Before using your new bag, take a little time to inspect every section.
- Secure all strawberry appliqués.
- Check that the granny square seams are strong.
- Weave in all remaining yarn ends.
- Inspect the side and bottom joins.
- Reinforce both handle attachment points.
- Check the top border for loose stitches.
- Make sure the bag sits evenly on a flat surface.
A careful finishing process makes a noticeable difference in the final result.
Blocking and Washing Your Finished Tote
Cotton yarn responds well to gentle wet blocking. Blocking helps even out the granny squares and improves the overall shape of the bag.
Wet Blocking Steps
- Fill a basin with cool water.
- Add a small amount of gentle fabric wash.
- Place the tote in the water and allow it to become completely damp.
- Remove it carefully without twisting.
- Press excess water out using a clean towel.
- Arrange the bag on blocking mats.
- Straighten the edges and shape the corners.
- Allow the tote to dry completely.
Never hang the bag while it is wet. The extra weight can stretch the straps and distort the body.
Care Instructions
- Hand wash gently with mild detergent.
- Avoid bleach and harsh cleaning products.
- Do not wring or twist the fabric.
- Dry flat away from direct heat.
- Store in a dry place when not in use.
Common Crochet Problems and Easy Solutions
Why are my granny squares uneven?
Uneven squares usually come from inconsistent tension or changes in hook size. Use the same hook throughout and block all squares before assembling the tote.
Why is my bag curling?
Your stitches may be too tight, especially around the joins. Try a slightly larger hook or loosen your tension. Check that the side panels are not shorter than the main panels.
How can I make the strawberries stand out?
Use a slightly smaller hook for the appliqués so the stitches remain firm. Keep the seed embroidery neat and avoid sewing the strawberry completely flat.
How do I stop the handles from stretching?
Reinforce the straps with an additional layer of stitching or cotton webbing. Make sure the attachment points have several secure rows of sewing.
Can I make this tote bigger?

Yes! You can increase the number of granny square rounds, use larger squares, or add extra width to the side panels. Adjust the handle length to suit your preferred bag size.
Final Thoughts
This strawberry-inspired tote is a lovely way to turn traditional granny squares into something useful and full of personality. The combination of cream crochet fabric, bright red fruit motifs, and little green leaves creates a cheerful accessory that feels especially lovely during spring and summer.
One of my favorite things about this project is how easily you can make it your own. Try a pale pink background, add more flowers, or experiment with different shades of red. You could even make smaller matching accessories from your leftover yarn.
Take your time with the little details, enjoy watching the strawberry motifs come together, and don’t worry if every square isn’t absolutely identical. Handmade pieces have their own charm.
I hope this Strawberry Patch Granny Square Tote Free Crochet Pattern inspires you to pick up your hook and make something lovely. Once your bag is finished, share your creation with other crochet lovers and enjoy carrying a little handmade strawberry garden wherever you go!


Leave a Reply
You must be logged in to post a comment.