


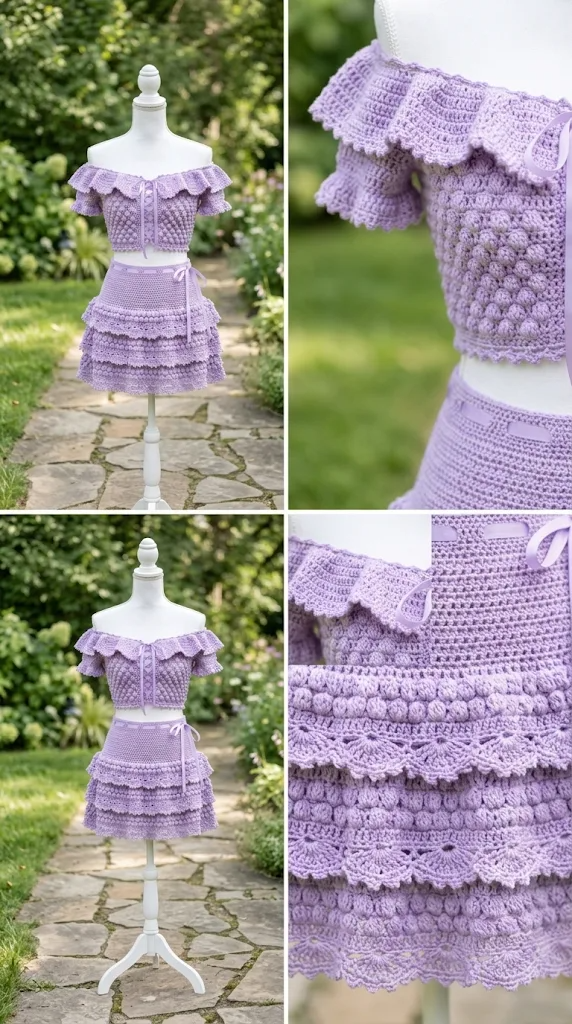
There is something especially lovely about lavender yarn. It has a soft, romantic quality that makes even simple crochet stitches look delicate and feminine. When I started planning this Lavender Romantic Ruffle Crochet Set, I wanted to create something that felt graceful without becoming overly complicated or uncomfortable to wear.
My favorite part of this design is the combination of a fitted crochet top and a flowing matching skirt. Small shell details add texture, while layered ruffles bring movement and a playful finish. The lavender shade ties everything together beautifully.
This Lavender Romantic Ruffle Crochet Set Free Pattern includes instructions for both pieces, decorative edging, adjustable sizing, and finishing techniques. You can wear the pieces together for a coordinated outfit or style them separately with other wardrobe favorites.

About This Lavender Romantic Ruffle Crochet Set Pattern
This crochet set consists of two matching garments:
- A fitted sleeveless crochet top with adjustable shoulder straps.
- A high-waisted skirt featuring a comfortable waistband and three decorative ruffle sections.
The top is worked in separate front and back panels before being joined at the shoulders and sides. The skirt is worked from the waistband downward in joined rounds.
The main fabric uses double crochet stitches with small shell-stitch details. The ruffles are created with increases worked into selected rounds, producing a soft gathered appearance.
Skill Level: Intermediate
You should be comfortable with basic stitches, working in rows and rounds, increasing, decreasing, and joining crochet panels.
Finished Measurements:
| Measurement | Small | Medium | Large |
| Bust | 32 in | 36 in | 40 in |
| Top length | 15 in | 16 in | 17 in |
| Waist | 26 in | 30 in | 34 in |
| Skirt length | 25 in | 26 in | 27 in |
The measurements are intended for a comfortable fitted style. Check your actual measurements before beginning, and adjust the foundation chains when necessary.
Materials You’ll Need
Yarn
Choose a soft cotton or cotton-blend yarn for comfortable wear and good stitch definition.
- Color A – Soft Lavender: Approximately 900–1,050 yards (825–960 meters), DK weight yarn. Used for the top, skirt, and waistband.
- Color B – Light Lilac: Approximately 120–160 yards (110–146 meters), DK weight yarn. Used for decorative shell details and ruffles.
Allow 15% extra yarn if your gauge varies or you plan to lengthen the skirt.
Crochet Hooks
- 3.5 mm crochet hook for the main fabric.
- 3.0 mm crochet hook for the waistband and finishing edges.
Additional Supplies
- Tapestry needle
- Stitch markers
- Measuring tape
- Scissors
- Blocking mat and rustproof pins
- Optional soft elastic for the waistband
- Optional removable bra cups for the top
Abbreviations and Terminology
All instructions use US crochet terminology.
| Abbreviation | Meaning |
| ch | Chain |
| sl st | Slip stitch |
| sc | Single crochet |
| hdc | Half double crochet |
| dc | Double crochet |
| tr | Treble crochet |
| st | Stitch |
| sts | Stitches |
| sk | Skip |
| sp | Space |
| rep | Repeat |
| RS | Right side |
| WS | Wrong side |
| BLO | Back loop only |
| FO | Fasten off |
Chain (ch): Yarn over and pull through the loop on your hook.
Slip Stitch (sl st): Insert hook into the stitch, yarn over, and pull through both loops.
Single Crochet (sc): Insert hook, yarn over and pull up a loop, yarn over and pull through both loops.
Half Double Crochet (hdc): Yarn over, insert hook, pull up a loop, yarn over and pull through all three loops.
Double Crochet (dc): Yarn over, insert hook, pull up a loop, yarn over and pull through two loops twice.
Treble Crochet (tr): Yarn over twice, insert hook, pull up a loop, then work through two loops three times.
Shell: Work 5 dc into the same stitch or space.
Increase: Work two stitches into the same stitch.
Decrease: Work two stitches together to reduce the stitch count.
Turning chains do not count as stitches unless specifically stated.
Gauge
Gauge is important because both garments need to fit comfortably while maintaining their shape.
Using the 3.5 mm hook and DK yarn, make a small swatch using double crochet stitches.
Gauge target:
- 18 dc = 4 inches (10 cm).
- 10 rows = 4 inches (10 cm).
To make your swatch:
- Chain 20.
- Work dc in the fourth chain from the hook and in each remaining chain.
- Chain 3 and turn.
- Work dc across each row.
- Repeat until you have approximately 10 rows.
- Measure the center portion of your swatch.
If you have more than 18 stitches in 4 inches, change to a larger hook. If you have fewer stitches, try a smaller hook.
Wash and dry your swatch before measuring if you are using cotton yarn. This helps you understand how the finished fabric will behave.
Main Pattern Instructions
Part 1: Crochet Top
The top is made using two rectangular panels. Gentle shaping around the upper edges creates a flattering neckline, while the decorative lower border adds a romantic finish.
Front Panel
Use Color A and the 3.5 mm hook.
Foundation Chain:
- Small: Ch 73.
- Medium: Ch 82.
- Large: Ch 91.
These chains create approximately 16, 18, and 20 inches of panel width respectively at the stated gauge.
Row 1: Dc in the fourth chain from the hook and in every chain across. Turn.
- Small: 71 dc.
- Medium: 80 dc.
- Large: 89 dc.
Row 2: Ch 3, dc in each stitch across. Turn.
Row 3: Ch 3, dc in the next 3 sts, ch 1, sk 1 st, dc in the next 4 sts. Repeat the sequence across, adjusting the final stitches so the row ends evenly. Turn.
Row 4: Ch 3, dc in every dc and work 1 dc into each ch-1 space. Turn.
Rows 5–12: Repeat Rows 2–4, ending after a plain dc row.
The open spaces in Row 3 create a subtle decorative texture without making the fabric too transparent.
Upper Neckline Shaping
For a simple square neckline, mark the center 25 stitches for Small, 30 stitches for Medium, or 35 stitches for Large.
Work the left and right shoulder sections separately.
For each shoulder:
- Next Row: Ch 3, dc across the shoulder section, leaving the marked center stitches unworked. Turn.
- Following Rows: Work dc evenly across until the panel measures approximately 15, 16, or 17 inches from the foundation edge.
Fasten off.
Repeat for the other shoulder, reversing the shaping if necessary to keep both sides symmetrical.
Back Panel
The back panel is worked in the same way as the front panel, but without the center neckline opening.
Foundation Chain: Use the same size-specific foundation chain as the front.
Rows 1–12: Repeat the front panel instructions.
Continue working dc rows until the panel reaches the same finished length as the front panel.
Fasten off, leaving a long yarn tail for joining.
Joining the Top
Place the front and back panels together with their right sides facing inward.
- Join the shoulder edges using a tapestry needle and mattress stitch.
- Leave approximately 7–8 inches open on each side for armholes.
- Sew the side seams from the bottom upward.
- Check that both armholes are equal in size.
- Turn the top right side out.
Try the top on before adding decorative edging. This is the best time to make small adjustments to the side seams.
Part 2: Adjustable Shoulder Straps
The straps give the top a delicate summer-inspired appearance.
Using Color A:
- Small: Ch 42.
- Medium: Ch 46.
- Large: Ch 50.
Row 1: Sc in the second chain from the hook and across. Turn.
Row 2: Ch 1, sc across. Fasten off, leaving a long tail.
Make two straps.
Attach one end of each strap to the front neckline corners and the other end to the corresponding back shoulder positions.
Try the top on to check strap placement. If you prefer a more adjustable fit, make longer straps and add small button loops at the back.
Part 3: Crochet Skirt
The skirt is worked from the waist downward in joined rounds. Its fitted upper section gradually opens into a flowing silhouette.
Use Color A and the 3.5 mm hook.
Waistband Foundation
Make a foundation chain that fits your waist comfortably without stretching excessively.
- Small: Ch 117.
- Medium: Ch 135.
- Large: Ch 153.
Join with a sl st, making sure the chain is not twisted.
Round 1: Ch 2, hdc in each chain around. Join with a sl st to the first hdc.
Round 2: Ch 2, hdc BLO around. Join.
Round 3: Repeat Round 2.
The back-loop stitches create a flexible ribbed waistband.
Main Skirt Section
Round 4: Ch 3, dc in every stitch around. Join.
Round 5: Ch 3, dc in each stitch around. Join.
Round 6: Ch 3, *dc in the next 5 sts, 2 dc in the next st*. Repeat around. Join.
Round 7: Ch 3, dc in every stitch around. Join.
Round 8: Ch 3, *dc in the next 6 sts, 2 dc in the next st*. Repeat around. Join.
Rounds 9–14: Work dc in every stitch around.
At this stage, the skirt should begin to fall smoothly from the waist.
For additional length, continue plain dc rounds before beginning the ruffles.
Ruffle Placement
The three ruffle sections are worked directly onto selected skirt rounds.
To create a gathered appearance, use a larger number of stitches in each ruffle round.
First Ruffle – Soft Upper Ruffle
Join Color B at the marked ruffle round.
Round 1: Ch 3, work 2 dc into each stitch around. Join.
Round 2: Ch 3, dc in each stitch around. Join.
Fasten off.
Second Ruffle – Romantic Middle Ruffle
Count approximately 5–6 inches below the first ruffle.
Join Color B.
Round 1: Ch 3, *dc in the next stitch, 2 dc in the following stitch*. Repeat around. Join.
Round 2: Ch 3, dc around. Join.
Fasten off.
Third Ruffle – Full Bottom Ruffle
Work approximately 5–6 inches below the second ruffle.
Join Color B.
Round 1: Ch 3, work 2 dc into each stitch around. Join.
Round 2: Ch 3, dc in each stitch around. Join.
Round 3: Ch 1, sc around. Join and fasten off.
The bottom ruffle should have the fullest appearance. If you want a more subtle finish, replace the double increase with alternating 1 dc and 2 dc stitches.
Construction note: The skirt ruffle rounds are worked into designated base rounds, not into the top edge of the preceding ruffle. This keeps the main skirt fabric continuous.
Special Techniques and Decorative Elements
Lavender Shell-Stitch Edging
A shell border gives the set a soft, feminine finish.
Join Color B at the lower edge of the top.
Round 1: Ch 1, sc evenly around the edge. Join.
Round 2: Ch 1, *sk 2 sts, work 5 dc in the next st, sk 2 sts, sl st in the next st*. Repeat around, adjusting the spacing at corners if necessary.
Fasten off.
The small fans create a delicate scalloped edge that complements the larger skirt ruffles.
Decorative Waistband Border
For a matching finish, attach Color B to the lower edge of the waistband.
Round 1: Ch 1, sc evenly around.
Round 2: Ch 1, *sc in the next 2 sts, ch 2, sk 1 st*. Repeat around.
Join and fasten off.
Optional Lavender Flower Motif
If you want to add a small decorative detail, make a flower using Color B.
Round 1: Make a magic ring, ch 1, work 10 sc into the ring. Join.
Round 2: *Ch 3, sk 1 st, sl st in the next st.* Repeat five times to create five small loops.
Round 3: In each loop, work 1 sc, 3 dc, 1 sc.
Join and fasten off.
Make one or two flowers and attach them near a top corner or at the waistband. Keep embellishments lightweight so they do not pull the fabric out of shape.
Assembly and Finishing
Now that both pieces are complete, take a little time to check the fit and finish.
- Check the Top
Try on the top and check the neckline, straps, and side seams. The top should sit comfortably without pulling under the arms.
- Check the Skirt
Try the skirt on and make sure the waistband sits securely at your natural waist. Check that the ruffles fall evenly around the body.
- Add Elastic if Needed
If the waistband feels loose, thread a soft piece of elastic through the inside of the ribbed waistband.
Measure the elastic around your waist, allowing a comfortable fit. Join its ends securely and close the small opening.
- Weave in Loose Ends
Use a tapestry needle to weave yarn tails through several stitches on the wrong side. Change direction once or twice to secure them.
- Check the Ruffles
Spread each ruffle gently with your hands. Make sure the increases are distributed evenly rather than concentrated in one area.
- Final Inspection
Check for missed stitches, uneven seams, loose joins, and rough edges. A careful finishing stage makes a noticeable difference in handmade clothing.
Blocking and Care Instructions
Blocking helps the crochet fabric settle into its intended shape and gives the ruffles a more polished appearance.
Because cotton yarn can become heavy when wet, handle the garments carefully.
Wet Blocking
- Fill a basin with cool or lukewarm water.
- Add a small amount of gentle wool or fabric wash.
- Submerge the top and skirt separately.
- Allow them to soak for approximately 10–15 minutes.
- Remove the garments without twisting or wringing.
- Press out excess water using a clean towel.
- Lay each piece flat on a blocking mat.
- Shape the neckline, straps, waistband, and ruffles gently.
- Allow everything to dry completely.
Avoid stretching the ruffles excessively. Their natural fullness is an important part of the design.
Washing and Storage
- Hand wash in cool water whenever possible.
- Use a mild detergent.
- Avoid bleach and harsh fabric softeners.
- Dry flat rather than hanging the garments.
- Store folded in a clean, dry drawer.
- Keep the pieces away from sharp jewelry that could catch the crochet stitches.
Fit and Troubleshooting Tips
Even experienced crocheters sometimes need to make small adjustments. Here are a few issues you might encounter while making this set.
- The Top Feels Too Tight
If the front panel feels restrictive, check your gauge first. You may need a larger hook or additional foundation stitches.
For future projects, remember that one additional stitch adds approximately 0.22 inches at the recommended gauge.
- The Skirt Waistband Slides Down
A loose waistband can make the entire outfit uncomfortable. Add soft elastic inside the waistband or reduce the foundation circumference slightly.
Do not make it so tight that it becomes difficult to sit or move comfortably.
- The Ruffles Curl Upward
If the ruffles curl excessively, check whether your increases are evenly distributed. Blocking can help, but uneven stitch placement may require unraveling and repeating the affected round.
- The Ruffles Look Too Heavy
Cotton yarn can create substantial weight when several layers are combined. Try using fewer increases or a lighter cotton-blend yarn.
- The Skirt Looks Uneven
Count your stitches after every increase round. Place a marker at the beginning of each round to prevent accidentally adding or losing stitches.
- The Top Straps Stretch
Crochet straps can stretch with repeated wear. Make them slightly shorter initially, or reinforce the underside with a narrow row of slip stitches.
- The Shell Border Looks Uneven
Check that you are spacing the shells consistently. If the border does not fit evenly around the edge, adjust the skipped stitches before completing the final round.
Customization Ideas
One of the nicest things about making your own crochet clothing is the freedom to change small details.
Here are a few ways to personalize your lavender set:
- Pastel Romance: Combine lavender with pale pink ruffles for a soft, dreamy appearance.
- Classic Lavender: Use one shade throughout for a simple, coordinated look.
- Floral Details: Add small crochet flowers around the neckline or waistband.
- Longer Skirt: Add plain double crochet rounds before beginning the ruffle sections.
- Extra Volume: Increase the number of stitches in the bottom ruffle.
- Scalloped Top: Add an additional shell border around the neckline.
- Adjustable Waist: Include a crochet drawstring with small decorative ends.
You can also make the top separately and pair it with jeans, linen trousers, or a simple skirt. The ruffled skirt looks lovely with a plain fitted top.
Final Thoughts
I love how this Lavender Romantic Ruffle Crochet Set combines delicate stitch details with beautiful flowing ruffles. The lavender color gives it a gentle romantic appearance, while the matching top and skirt make the finished outfit feel thoughtfully coordinated.
Although this project requires some patience, especially when shaping the top and creating the three ruffle sections, the results are worth the effort. Take your time with the measurements, check your stitch counts, and remember that small adjustments can make a big difference in the final fit.
Most importantly, make the set your own. Experiment with different lavender shades, add your favorite floral details, or adjust the skirt length to suit your personal style.
If you make this Lavender Romantic Ruffle Crochet Set Free Pattern, I would love to see your finished creation. Share your version in the comments, save the pattern to Pinterest, or tag your crochet project when you post it.
Happy crocheting! 💜



Leave a Reply
You must be logged in to post a comment.