

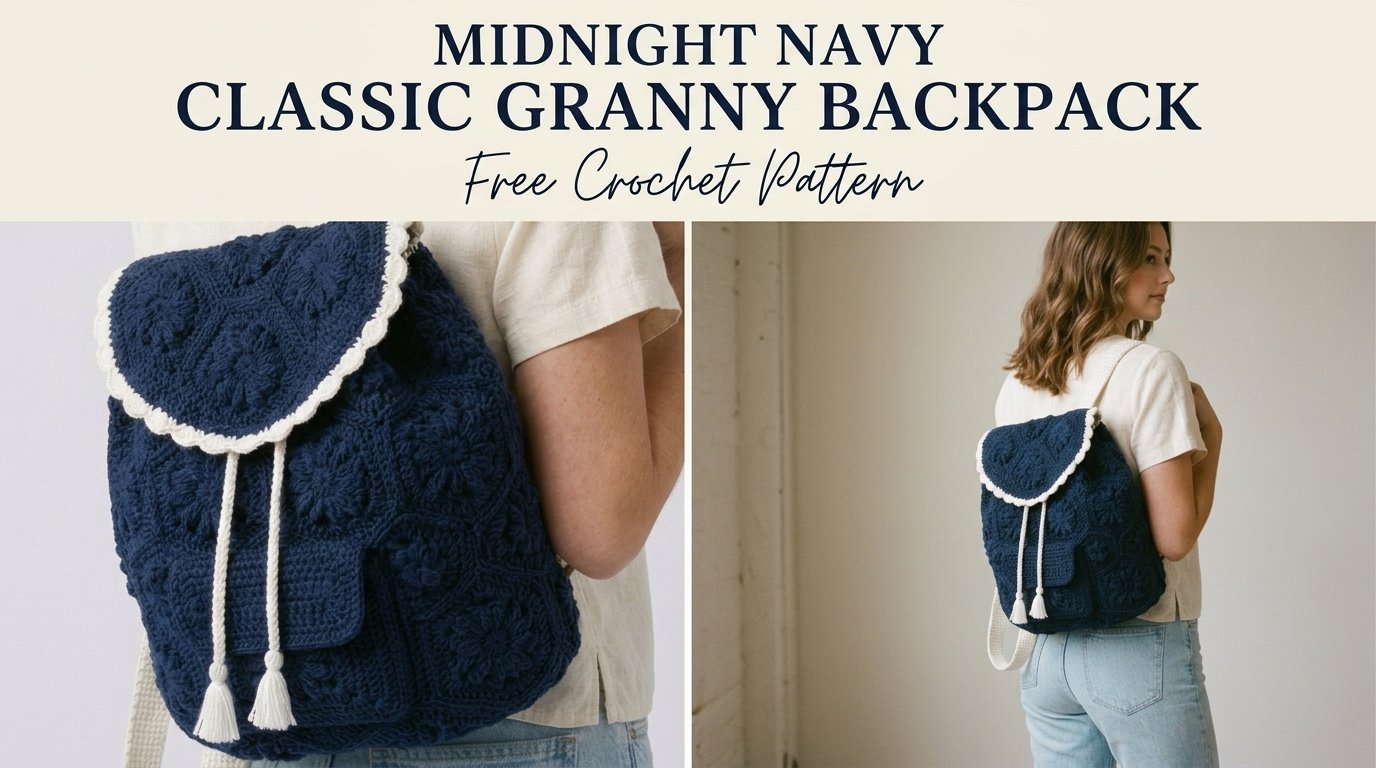
That overpriced handmade backpack at the craft fair? Yeah, you can make a better one yourself. This Midnight Navy Classic Granny Backpack brings classic granny-square charm into a sturdy, everyday bag that actually holds your stuff. Deep navy, crisp cream accents, and those raised puff-flower centers give it serious style without the boutique price tag. Let’s get those hooks moving.

Why You’ll Love This Crochet Backpack Pattern
This design marries vintage granny-square love with real-world function. The body builds from textured puff-flower motifs that add dimension instead of flat boring squares. Navy and cream create that timeless contrast that works with jeans, dresses, or market-day outfits.
You get a drawstring top with tassels, a scalloped flap for extra security, a front pocket for your phone, and adjustable straps. Intermediate skill level keeps it challenging but doable if granny squares already feel comfortable in your hands.

IMO, the best part is how the raised flowers catch the light. One finished bag and people will ask where you bought it.
Materials Needed for Your Crochet Backpack
Gather everything before you start so momentum stays high.
Yarn:
- Main Color (MC): about 600 g worsted weight in midnight navy
- Contrast Color (CC): about 150 g worsted weight in cream or off-white
Cotton or a sturdy cotton blend holds shape best under real weight. Acrylic works too if that is what lives in your stash.
Hook:
- 5.0 mm (H/8) for the main work
- 4.5 mm (G/6) for tighter edging and seaming
Notions:
- Yarn needle
- Stitch markers
- Scissors
- Optional fabric lining and sewing supplies for extra structure
FYI, a little plastic canvas in the bottom later makes a world of difference for heavier loads.
Finished Dimensions
Height sits around 14 inches without the flap. Width lands near 12 inches and depth about 5 inches. Straps adjust between 28 and 32 inches so the fit stays comfortable whether you wear it high or low.
Gauge
One finished puff-flower granny square measures roughly 4 by 4 inches with the 5.0 mm hook. Gauge matters here. Loose squares mean a floppy bag. Tight squares shrink the final size and eat more yarn. Make one test square first. Five minutes now saves frustration later.
Abbreviations and Stitch Definitions
Quick refresher so nothing slows you down:
- ch – chain
- sl st – slip stitch
- sc – single crochet
- dc – double crochet
- hdc – half double crochet
- puff st – (yarn over, insert hook, yarn over, pull up loop) three times in the same stitch (7 loops), yarn over and pull through all seven
- ch-sp – chain space
The puff stitch creates those raised flower centers that make the whole design pop.
Step by Step Crochet Pattern Instructions

Part 1: Puff Flower Granny Squares (Make 24)
These squares form the entire body. The puff centers give the texture that sets this backpack apart.
Round 1: With MC, magic ring. Chain 3 (counts as dc), 2 dc into ring, chain 2. *3 dc into ring, chain 2* three times. Join. (12 dc, 4 corners)
Round 2: Slip stitch into the corner space. Chain 3, 2 dc, chain 1, puff stitch, chain 1, 3 dc, chain 1 in the same space. Repeat the corner sequence in every remaining corner. Join.
Round 3: Chain 3, dc in next 2 dc. *Chain 1, skip next space, dc in puff, chain 2, dc in same puff, chain 1, skip next space, dc in next 3 dc, chain 1, dc in next 3 dc.* Repeat around and join.
Round 4: Chain 3, dc in every dc and chain-1 space, working (2 dc, chain 2, 2 dc) in each corner. Join.
Round 5: Chain 3, dc in every stitch, working (3 dc, chain 2, 3 dc) in each corner. Join and fasten off.
Weave ends as you finish each square. Trust me on this one.
Part 2: Square Assembly for Body
Layout matters. Arrange:
- Back panel: 6 squares, 2 wide by 3 tall
- Front panel: 6 squares, 2 wide by 3 tall
- Two side panels: 6 squares each, 2 wide by 3 tall
Hold squares wrong sides together. With MC and the smaller hook, single crochet through both layers along the edges. This creates a raised outer seam that adds extra texture. Join squares into vertical strips first, then join the strips into panels. Finally join the panels, leaving the top open.
Part 3: Bottom of Backpack
Chain 25 with MC. Double crochet in the fourth chain from the hook and across (22 dc). Work 7 more rows of double crochet. Fasten off with a long tail.
Pin the rectangle to the bottom of the assembled body and sew it securely with whip stitch or mattress stitch. A solid bottom keeps the bag from sagging when loaded.
Part 4: Drawstring Channel
Join MC at the top edge. Single crochet evenly around the opening (aim for a multiple of 3). Join.
Next round: Chain 4 (counts as dc + chain 1), skip one stitch, *dc, chain 1, skip one* around. Join.
Final round: Single crochet in every stitch and space. Fasten off. Those little eyelets now wait for the drawstring.
Part 5: Flap
Make two more puff-flower squares and join them side by side. With CC, single crochet evenly around the joined piece, putting 3 sc in each corner.
Next round: Single crochet, *skip 2 stitches, 5 dc in next stitch, skip 2 stitches, single crochet* around for the scalloped edge. Sew the finished flap to the back panel about one inch below the drawstring channel.
Part 6: Front Pocket
Make one more puff-flower square. Work two rounds of single crochet around it for a clean border. Sew it centered on the front panel at a comfortable height for your hand.
Part 7: Drawstring Cord
With CC, chain 150. Slip stitch back along the chain. Make two cords. Thread them through the channel from opposite sides so pulling both ends closes the top evenly.
For tassels, cut 20 strands of CC about 8 inches long, fold in half, wrap tightly near the fold, and trim. Attach one tassel to each cord end.
Part 8: Shoulder Straps
With CC, chain 12. Single crochet in the second chain and across (11 sc). Work 139 more rows of single crochet. Make two straps.
Sew one end of each strap to the top corners of the back panel just below the channel. Sew the lower ends to the bottom corners of the back. Adjust placement until the fit feels right on your shoulders.
Finishing Touches
Lightly steam-block the finished backpack so the stitches settle and the shape firms up. Keep the iron away from the puff centers.
Add a fabric lining if you want extra durability and zero poked-through pens. A plastic canvas insert in the bottom turns this into a true workhorse bag.
Tips for Success with This Beginner Friendly Crochet Tutorial
Count every stitch. Granny squares forgive a little, but lost stitches add up fast across 24 squares.
Park stitch markers at the start of every round, especially around the drawstring channel.
Weave ends as you finish each square. Saving them all for the end is a special kind of torture.
Play with colors. Sage and cream, dusty rose and white, or a full scrap rainbow all look fantastic with this construction.
Why This Crochet Backpack Pattern Works
You are basically making a pile of pretty squares and assembling them with intention. One square equals progress. Twenty-four squares equal a backpack that looks complicated but never feels overwhelming.

The puff flowers deliver texture without complicated stitches. The cream contrast pulls everything together into a polished finished piece. Whether this bag is for you or a gift, it earns the “wait, you made that?” reaction every time.
You Might Also Like
- Warm Mustard Yellow Crochet Backpack Free Pattern
- Lavender Fields Purple Granny Backpack Crochet Pattern
- Cream Strawberry Cottagecore Backpack Free Crochet Pattern
- Navy Blue Anchor Nautical Backpack Free Crochet Pattern
FAQ
Is this pattern really intermediate or can a confident beginner handle it?
If granny squares and basic seaming already feel familiar, you can do this. The puff stitch takes a couple of tries to get even, but after the first square it becomes muscle memory.
Can I use acrylic instead of cotton?
Yes. Acrylic works fine and often costs less. Cotton simply holds its shape better under weight and washes up sturdier for everyday use.
How long does the whole backpack take?
Most people finish the squares in a few evenings and assemble everything over a weekend. Working on squares while watching shows makes the time disappear.
Do I need the fabric lining?
Not strictly, but it prevents small items from poking through and adds structure. If you plan to carry books or groceries, the lining earns its keep.
Can I make the straps longer or shorter?
Absolutely. Just adjust the number of rows. Try the straps on before you sew the lower ends so the final length feels right on your body.
Will the puff flowers flatten with use?
They soften a little but keep most of their dimension, especially if you block gently and avoid heavy pressing. The raised texture is one of the best features of the finished bag.
Final Thoughts
There you have it—your complete guide to a midnight navy granny backpack that looks store-bought and feels handmade with pride. The squares are satisfying, the assembly is logical, and the finished piece earns compliments for years. Grab that navy yarn, make the first square, and keep going. Once you wear this bag out the door, you will already be planning the next color combo. Happy crocheting!


Leave a Reply
You must be logged in to post a comment.