


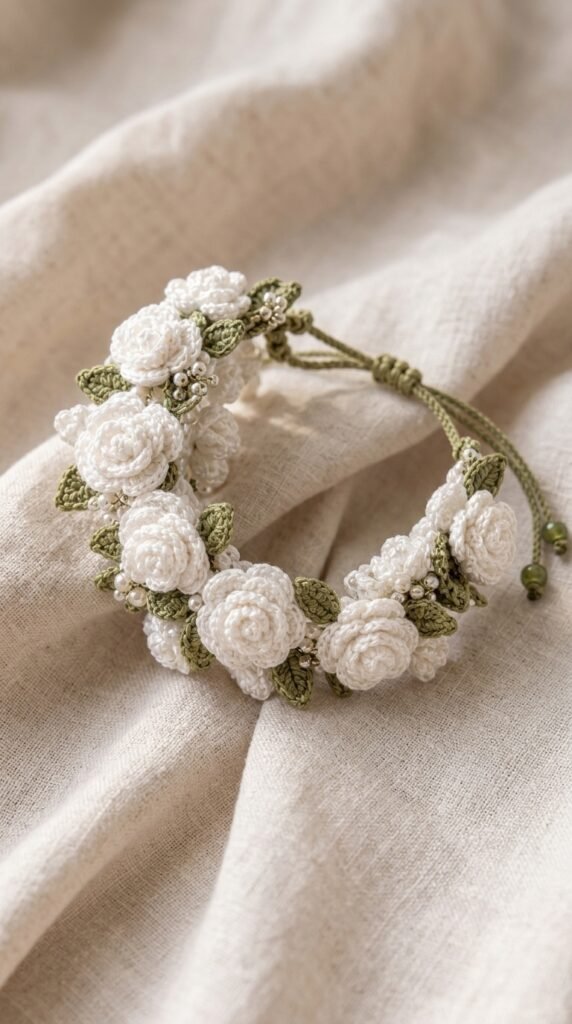
Forget basic chain bracelets. This Winter White Camellia Crochet Bracelet turns tiny thread into a wearable winter garden that looks delicate yet feels substantial on your wrist. Soft white and cream camellia blooms, layered petals, and silvery accents create pure cold-weather elegance. Grab your steel hook and let’s make something that earns compliments the second you slip it on.
About This Crochet Flower Bracelet Pattern
This bracelet stacks multiple flower styles into one lush cluster. You get rolled camellia roses, layered petal blooms, and textured centers that sit side by side with soft green leaves. Tiny silver or pearl seed beads add quiet sparkle without overwhelming the white palette.
The base stays simple: a soft leather or faux-leather cord with an adjustable sliding-knot closure. One size fits most wrists and the flowers stay the star of the show. Intermediate skill level means you should feel comfortable working small motifs in the round and sewing tiny pieces together. Finished floral section covers about 5 to 6 inches, with the cord stretching the fit from 6 to 8 inches.

IMO, the real magic happens when the white petals catch the light. Suddenly a plain winter outfit looks intentional.
Materials You Will Need
Yarn / Thread:
- Size 10 crochet thread or fingering-weight cotton in winter white / cream (about 30 yards total)
- Soft sage or pale mint for leaves (about 15 yards)
- Tiny amount of soft gray or champagne for optional flower centers
DMC Natura Just Cotton or Aunt Lydia’s Classic Crochet Thread both hold shape beautifully at this scale.
Tools:
- Steel crochet hook size 7 (1.65 mm) or the size that gives tight, structured stitches
- Sharp tapestry needle
- Small sharp scissors
- Sewing needle and matching thread
Additional Supplies:
- 24 inches of 2 mm leather or faux-leather cord in dark brown or soft gray
- Two small glass or pearl beads with holes large enough for doubled cord
- 40–50 silver or pearl seed beads (size 8/0 or 6/0)
- Beading needle (optional but helpful)
- Fabric glue or clear nail polish for locking knots
Good lighting and a magnifying lamp turn fiddly thread work into something almost meditative.
Stitch Abbreviations and Definitions
Quick reference so you never have to pause mid-petal:
- Ch – chain
- Sl st – slip stitch
- Sc – single crochet
- Hdc – half double crochet
- Dc – double crochet
- Tr – treble crochet
- Inc – increase (two stitches in one)
- Magic ring – adjustable starting loop that closes tight for flower centers
These stitches stay small and dense so the flowers keep their shape once assembled.
The Rolled Camellia Rose Pattern
Make 5 roses: three in pure white, two in soft cream.
This rose starts as a flat strip that you roll into a tight spiral.
Row 1: Chain 42. Sc in second chain from hook and next chain, *chain 3, skip 1 chain, sc in next 2 chains* repeat across.
Row 2: Chain 1, turn. Sc in first sc, *5 dc in next chain-3 space, skip 1 sc, sc in next sc* repeat across. Fasten off with a 12-inch tail.

Starting at the beginning of the strip, roll tightly for the center then slightly looser outward so the petals fan. Stitch through the base every few turns with the tail to lock the shape. Finished rose sits about 1 inch across. The first one always looks a little wonky. The second one already looks better.
The Layered Camellia Bloom Pattern
Make 4 layered blooms in white and cream.
Round 1: Magic ring, chain 1, 6 sc into ring, pull closed, join.
Round 2: 2 sc in each stitch around (12 sc).
Round 3: *Sc in next stitch, 2 sc in next* around (18 sc).
Round 4 (front petals): Working in front loops only, *chain 3, 2 dc in same stitch, skip 2 stitches, slip stitch in next* around.
Round 5 (back petals): Working in the unused back loops of Round 3, *chain 4, 3 dc in same stitch, skip 2 stitches, slip stitch in next* around. Fasten off.
The second layer sits slightly behind the first and gives the bloom real depth.
The Textured Center Bloom Pattern
Make 3 textured centers for variety.
Round 1: Magic ring, 6 sc, join.
Round 2: 2 sc in each stitch (12 sc).
Round 3: *Chain 2, 4 hdc in next stitch, chain 2, slip stitch in next stitch* around for six small puffs.
Round 4: Working behind the puffs into Round 2 stitches, *chain 3, 5 dc in next stitch, chain 3, slip stitch in next, skip 1 stitch* around. Fasten off.
These add a denser, almost bobble-like texture that contrasts beautifully with the smoother rolled roses.
The Leaf Patterns
You need 20–25 leaves in soft sage and pale mint. Three shapes keep the arrangement interesting.
Simple Small Leaf (make 10)
Chain 8. Sc in second chain, hdc, dc in next 2, hdc, sc, (sc, chain 2, sc) in last chain. Work matching stitches back along the opposite side of the chain. Fasten off.
Pointed Medium Leaf (make 8)
Chain 10. Slip stitch in second chain, sc, hdc, dc in next 2, hdc, sc, slip stitch, (slip stitch, chain 2, slip stitch) in last. Mirror the stitches back along the other side. Fasten off.
Rounded Large Leaf (make 7)
Chain 12. Sc in second and next, hdc in next 2, dc in next 3, hdc, sc, (sc, chain 3, sc) in last. Mirror back along the opposite side. Optional: surface slip stitch a center vein. Fasten off.
Block the leaves flat with a quick steam so they stay open and graceful.
Adding the Bead Accents
Thread a fine sewing needle with matching thread. Stitch silver or pearl seed beads randomly through the arrangement, clustering a few near flower centers and tucking others between leaves. Forty to fifty beads give a soft winter sparkle without turning the bracelet into a disco ball. Some beads can sit flat; a few can dangle on short loops for gentle movement.
Assembling the Bracelet Base
Cut the leather cord to 24 inches. Slide both glass or pearl beads onto the cord before you form the closure.
Create the adjustable sliding knot:
- Overlap the two ends about 4 inches, pointing opposite directions.
- Wrap the left end around both cords 3–4 times toward the center, thread the tip through the loops, and pull tight.
- Repeat with the right end in the opposite direction.
- Slide each bead down to the cord ends and tie a simple overhand knot below each bead.
- Dab fabric glue or clear nail polish on the knots and let dry completely.
Pull the ends to test. The knots should slide smoothly and lock the size wherever you leave them.
Attaching the Flowers and Leaves
Lay the cord in a gentle curve. Arrange the flowers and leaves around it, overlapping generously so no cord shows through. Start with the largest rolled roses as focal points and stitch them firmly to the cord and to each other. Fill gaps with layered blooms and textured centers. Tuck leaves underneath and around the flowers, securing as you go.
Try the bracelet on your wrist several times while you work. The cluster should curve naturally and sit comfortably without gaps or stiff bumps. Secure every piece with small, firm stitches so daily wear does not loosen anything.
Tips for Success
Crochet thread feels fiddly until your hands adjust. Strong lighting and occasional breaks keep frustration low. If the roses look loose, drop a hook size for denser petals that hold their roll better.
Block every leaf before assembly. A quick steam flattens curls and makes the final arrangement look intentional rather than crumpled.
This bracelet turns into a gorgeous gift. Make a second one in soft blush or icy blue for a matching set, or use the smallest flowers for simple stud earrings.
Caring for Your Crochet Bracelet
Store the bracelet flat or in a small box so the flowers keep their shape. Spot clean with a barely damp cloth if needed. Treat the leather cord with a tiny bit of leather conditioner once in a while to keep it soft. Avoid soaking the whole piece—water can soften the thread petals and make them lose definition.
You Might Also Like
- Midnight Navy Classic Granny Backpack Free Crochet Pattern
- Dolphin Pod Crochet Summer Bag Free Pattern
- Mint Green Woven Bag on Vanity Free Pattern
- Classic Black Woven Crossbody Free Crochet Pattern
FAQ’s
Can a confident beginner finish this bracelet?
If you already know single crochet, double crochet, and how to work in the round, yes. The small scale is the main challenge. Start with one rose and one leaf before committing to the full set.
What if I only have regular yarn instead of size 10 thread?
Fingering or lace-weight cotton works in a pinch, but the flowers will sit larger and softer. You may need fewer blooms to keep the bracelet wearable.
How long does the whole project take?
Most people finish the flowers and leaves over two or three evenings and assemble everything in one focused session. Working while watching a show makes the time disappear.
Do the flowers stay secure with daily wear?
Yes if you sew them firmly to the cord and to neighboring pieces. Reinforce any high-stress spots with a few extra stitches and a tiny dab of fabric glue under the densest clusters.
Can I change the color palette?
Absolutely. Soft blush and sage, icy blue and silver, or classic red and green all look stunning with the same construction. Winter white simply feels especially elegant against dark coats.
Is the sliding knot durable?
When tied correctly and sealed with glue, it holds up well. Pull both ends gently to open and close so you do not stress the wraps.
Final Thoughts
There you have it—your complete guide to a winter white camellia bracelet that looks like it came from a boutique jewelry case. Tiny stitches, layered petals, and a simple cord base come together into something delicate yet surprisingly sturdy. Pick up that steel hook, start with one rose, and keep going. Once this little garden sits on your wrist, you will already be planning the next color story. Happy crocheting!


Leave a Reply
You must be logged in to post a comment.