


Picture this: a structured mint green bag with that expensive woven texture sitting pretty on your vanity, and you made it yourself. This free pattern delivers designer-level looks using chunky t-shirt yarn and a simple herringbone stitch that creates serious visual impact. No need to drop three figures at a boutique when your hook can pull off the same vibe. Ready to stitch something that actually gets compliments every time you carry it?

Why You’ll Love This Woven Crochet Bag Pattern
This bag hits differently. The diagonal texture looks like real woven fabric, yet you’re just repeating one stitch. People will ask where you bought it, and you’ll get to drop the “I made it” bomb with a smug little smile.
Structure is the real win here. T-shirt yarn holds its shape so the bag stays boxy and polished instead of collapsing into a sad pouch by lunchtime. Add polished hardware and suddenly it stops looking handmade and starts looking intentional.

And the best part? Once you lock in the stitch rhythm, you can binge an entire season of whatever show currently owns your attention while your hands stay busy. One main stitch, continuous rounds, and boom—you have a crossbody that actually looks expensive.
Skill Level
Intermediate
You should already feel comfortable working in continuous rounds and keeping tension steady with bulky yarn. The herringbone half double crochet needs a few practice stitches before it clicks, but once it does, the rest of the bag practically flies off the hook.
If you’ve finished a couple of simple bags or amigurumi pieces, you’re good to go. Absolute beginners might want to practice the special stitch on a small swatch first so the actual bag doesn’t become a frustration project.
Finished Dimensions
Width: About 8 inches (20 cm)
Height: About 6 inches (15 cm) without the handle
Depth: About 3 inches (7.5 cm)
Handle Drop: Roughly 3 inches (7.5 cm)
Chain Strap Length: Around 45 inches (114 cm), adjustable
These measurements give you a compact crossbody that still fits your phone, keys, wallet, and a lip balm without turning into a mini suitcase. Perfect vanity companion that doesn’t hog the whole surface.
Materials Needed
Yarn
Grab t-shirt yarn (trapillo or jersey yarn) in mint green or seafoam. You’ll need roughly 200–250 yards. Super bulky weight means two or three skeins depending on the brand.
This yarn comes from recycled jersey fabric cut into continuous strips. It’s soft, slightly stretchy, and thick enough to create real structure. Popular options include Hoooked Zpagetti, Lion Brand Fettuccini, or even homemade strips from old tees if you’re feeling thrifty.
Hook
A 10mm (US N/15) or 12mm (US P/16) crochet hook works best. T-shirt yarn varies wildly between brands, so check your gauge and size up or down as needed. Too tight and the bag turns rigid; too loose and it loses that crisp shape.
Hardware
- 1 push lock clasp (tongue lock or tuck lock), about 1.5 inches
- 2 D-rings, roughly 1 inch
- 2 swivel lobster clasps
- 1 chain strap around 45 inches, or buy chain by the foot
- 4 metal rivets or Chicago screws for the D-rings
Silver looks classic, but gold or rose gold would also kill it. Bag hardware kits online make this part painless.
Additional Supplies
- Large-eye tapestry needle
- Stitch marker
- Scissors
- Small cardboard piece for the tassel
- Optional fabric for lining (about half a yard)
- Optional leather hole punch or awl
Abbreviations and Stitch Definitions
Here’s the full list so you never have to guess mid-round.
- Ch = Chain
- Sl st = Slip stitch
- Sc = Single crochet
- Hdc = Half double crochet
- Hbhdc = Herringbone half double crochet (the star of the show)
- Inc = Increase (2 stitches in one)
- Dec = Decrease (work 2 together)
- St(s) = Stitch(es)
- Rnd = Round
The herringbone half double crochet creates that diagonal woven look. Yarn over, insert hook, yarn over and pull through the first loop only, yarn over and pull through the next loop only, then yarn over and pull through the last two. Think of it as three deliberate steps instead of one smooth motion. That separation is what gives the lean.
Gauge
12 stitches and 8 rows = 4 inches (10 cm) in herringbone half double crochet using a 10mm hook and t-shirt yarn.
Gauge actually matters here. Loose tension turns your bag floppy. Tight tension makes it stiff and hard to work. Spend five minutes on a quick swatch so you don’t hate the finished piece.
Step by Step Crochet Pattern
Time to actually make the thing. Grab your yarn, hook, and a good playlist.
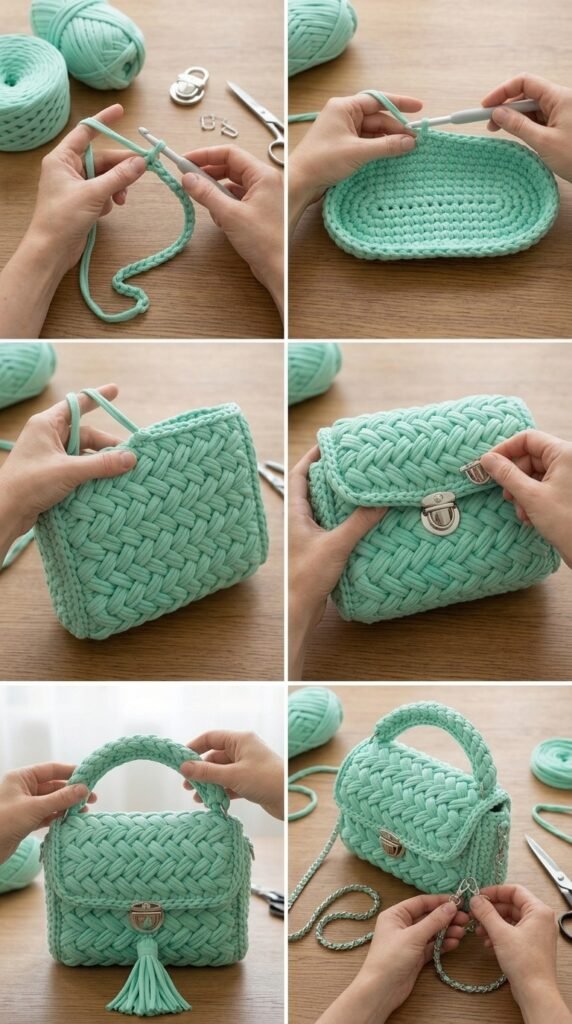
The Base
Start with an oval base that becomes the structured bottom of the bag.
Foundation: Chain 15.
Round 1: Half double crochet in the 3rd chain from the hook, half double crochet in the next 11 chains, 4 half double crochet in the last chain (corner), work along the opposite side with half double crochet in the next 11 chains, 3 half double crochet in the last chain. Slip stitch to join. Place a marker. You should have 32 stitches.
Round 2: Chain 2 (doesn’t count as a stitch), half double crochet in the same stitch, half double crochet in the next 12, 2 half double crochet in each of the next 3, half double crochet in the next 12, 2 half double crochet in each of the next 3. Slip stitch to join. 38 stitches.
Round 3: Chain 2, half double crochet around, placing increases at the short ends so the oval stays even. Aim for 44 stitches total.
Round 4: Chain 2, half double crochet in every stitch. Slip stitch to join. Still 44 stitches.
Your base should measure roughly 8 by 3 inches and look like a rounded rectangle.
The Body
Now the fun part. Switch to the herringbone stitch and watch the texture appear.
Round 5: Chain 2, work herringbone half double crochet in the back loops only all the way around. This creates a clean edge where the sides meet the base. 44 stitches.
Your first few herringbone stitches might look weird. Keep going. By stitch 15 you’ll find the rhythm.
Rounds 6–18: Chain 2, herringbone half double crochet through both loops in every stitch. Slip stitch to join each round. Keep 44 stitches the whole time.
Thirteen body rounds give you about 6 inches of height. Diagonal lines will start marching across the fabric. Resist the urge to pull the beginning of each round too tight or the sides will suck inward.
Creating the Opening and Shaping the Flap Area
Round 19: Chain 2, herringbone half double crochet in the next 15 stitches, chain 14 and skip 14 stitches (this becomes the flap opening), then herringbone half double crochet in the remaining 15 stitches. Slip stitch to join.
Round 20: Chain 2, herringbone half double crochet in every stitch and chain around. Slip stitch to join. Fasten off and weave in the ends.
The Flap
Work the flap separately and attach it later.
Join yarn at the center back of the opening. Chain 2, herringbone half double crochet across 14 stitches. Turn.
Work 7 more rows even. Then start decreasing: skip the first and last stitch on the next two rows until you reach 10 stitches. Work one final even row.
Finish with a single crochet border all the way around the flap, putting 3 single crochets in each corner so it stays flat. Fasten off.
The Handle
Make three long chains of 50 stitches each. Braid them tightly together. Secure both ends and whip-stitch the braid to the sides of the bag about an inch below the top edge. Reinforce well so it can handle daily use.
The Tassel
Wrap yarn around a 4-inch piece of cardboard 8–10 times. Tie the top tightly, cut the bottom loops, and wrap another piece of yarn about an inch down to form the head. Trim the ends even and attach the tassel to the push lock.
Hardware Installation
Position the push lock on the flap about an inch from the bottom edge. Mark and punch small holes, then secure the prongs with the backing plate. Align the catch plate on the bag body and install the same way.
For the D-rings, crochet two small tabs, thread each through a ring, fold, and rivet or sew them firmly to the top corners. Clip the chain strap onto the D-rings. If the chain has open links, weave a bit of matching yarn through for a cohesive look.
Optional: Adding a Fabric Lining
Want a polished interior? Cut two fabric pieces slightly smaller than the bag, sew them together leaving the top open, slip the lining inside, and hand-stitch it to the top edge with tiny invisible stitches. A lining keeps pens from poking through and hides any imperfect ends.
Care Instructions
Spot clean with mild soap and water. Lay the bag flat to dry. Skip the washing machine—hardware and t-shirt yarn both hate it. Stuff the bag with tissue paper when storing so it keeps its shape.
Customization Ideas
This pattern loves a makeover. Try coral, mustard, or classic black yarn. Swap silver hardware for antique brass or gold. Add a small monogram to the flap. Skip the chain and wear it as a clutch. Leather straps instead of the braided handle also look sharp. Crochet a tiny interior pocket and sew it in before lining if you want extra organization.
Troubleshooting Common Issues
Stitches won’t lean diagonally: You’re probably pulling through too many loops at once. Force yourself to work the three separate steps of the herringbone stitch.
Bag feels floppy: Check gauge and tension. A smaller hook or firmer pull usually fixes it.
Base is curling: Keep going. The back-loop-only round and the rising sides almost always settle the curl.

Can’t find matching hardware: Search “vintage purse hardware” or “designer bag clasp” on Etsy or specialty bag-making sites. Plenty of silver and gold options exist.
You Might Also Like
- Classic Black Woven Crossbody Free Crochet Pattern
- Icy Blue Winter Frost Bag Free Crochet Pattern
- Forest Jewel Tone Shell Crossbody Free Crochet Pattern
- Classic Black Round Evening Bag Free Crochet Pattern
FAQ’s
Can I use regular worsted weight yarn instead of t-shirt yarn?
You can, but the bag will lose most of its structure and the finished size will shrink. T-shirt yarn is what gives this design its sturdy, high-end look. If you must substitute, go up several hook sizes and expect a softer, less structured result.
How long does this bag actually take to finish?
Most people finish the body in one evening and the flap, handle, and hardware the next day. Once the herringbone stitch clicks, the rounds move surprisingly fast.
Is the herringbone stitch hard to learn?
It feels awkward for the first ten stitches. After that it becomes muscle memory. Practice on a short chain if you’re nervous, then jump into the real project.
Do I have to add the chain strap?
Nope. The braided handle alone works as a short top-handle bag. The chain just makes it a true crossbody.
What if my t-shirt yarn keeps splitting?
Some brands are more prone to it than others. Slow down, use a smoother hook if possible, and try not to yank the yarn. A slightly larger hook can also reduce splitting.
Final Thoughts
This mint green woven bag proves you don’t need complicated stitches or expensive materials to create something that looks high-end. One special stitch, sturdy yarn, and a few pieces of hardware turn a free pattern into a vanity staple you’ll actually reach for. Grab your hook and start the base—you’ll be carrying it sooner than you think.


Leave a Reply
You must be logged in to post a comment.