


I still remember the exact afternoon this dress took shape in my mind. I was walking along the harbor after a long stretch of gray days, watching the boats rock gently against the docks. The deep navy of the water met the crisp white of the sails, and something clicked. I wanted a dress that felt like that moment — clean, free-moving, and just a little bit bold. Not a costume, not overly themed, just a simple flared mini that carries a quiet nautical spirit.
I spent weeks refining the proportions so the bodice would skim without clinging and the skirt would flare with every step. The result is this free pattern: a navy nautical flared mini dress that feels modern, wearable, and satisfying to make. It has just enough structure to look polished and enough swing to feel like summer.

About This Pattern
This is a top-down, seamless dress worked in one piece from the neckline to the hem. The bodice is fitted with gentle waist shaping, then the skirt is increased gradually to create a soft, full flare that sits at mid-thigh. A simple white stripe detail at the hem and a clean boat-neckline give it that quiet nautical nod without going overboard.
Skill level is intermediate. You should be comfortable with basic increases, working in the round, and keeping track of stitch counts. The construction is straightforward once you settle into the rhythm, but the shaping requires attention.
Finished measurements (after blocking):
- Bust: 34 (38, 42, 46) inches
- Waist: 28 (32, 36, 40) inches
- Hip (at flare): 42 (46, 50, 54) inches
- Length from shoulder to hem: 34 (34.5, 35, 35.5) inches
The sample is shown in the second size. The fabric has nice drape and a soft hand that moves with you rather than standing stiffly away from the body.
Materials You’ll Need
Yarn
- Color A (Navy): 1100 (1250, 1400, 1550) yards of DK weight cotton or cotton-blend yarn (approximately 4.5–5.5 skeins of 250-yard balls). Allow 15% extra for gauge variation.
- Color B (White): 120 (140, 160, 180) yards of the same DK weight yarn.
I used a soft mercerized cotton that gives clean stitch definition and a slight sheen. Any smooth DK that gives you the correct gauge will work.
Hooks
- 3.5 mm (E) for the main fabric
- 3.25 mm (D) for the neckline and hem edging if you prefer a tighter finish
Notions
- Stitch markers (at least 8)
- Tapestry needle
- Scissors
- Measuring tape
- Blocking mats and pins (or wires if you prefer)
Abbreviations and Terminology
All instructions use US crochet terminology.
- ch – chain
- sc – single crochet: insert hook, yarn over, pull up a loop, yarn over, pull through both loops
- hdc – half double crochet: yarn over, insert hook, yarn over, pull up a loop, yarn over, pull through all three loops
- dc – double crochet: yarn over, insert hook, yarn over, pull up a loop, yarn over, pull through two loops, yarn over, pull through remaining two loops
- sc2tog – single crochet two together: insert hook in next stitch, yarn over, pull up a loop, insert hook in following stitch, yarn over, pull up a loop, yarn over, pull through all three loops
- dc2tog – double crochet two together: yarn over, insert hook in next stitch, yarn over, pull up a loop, yarn over, pull through two loops, yarn over, insert hook in following stitch, yarn over, pull up a loop, yarn over, pull through two loops, yarn over, pull through remaining three loops
- st(s) – stitch(es)
- rnd – round
- RS – right side
- WS – wrong side
Turning chains do not count as a stitch unless a step explicitly says they do. The dress is worked in continuous rounds for the skirt; join with a slip stitch only when instructed.
Gauge
Work a swatch in the main stitch pattern (alternating rounds of hdc and dc) using the 3.5 mm hook.
20 stitches and 14 rows = 4 inches in the pattern stitch after light blocking.
If your swatch is too small, go up a hook size. If it is too large, go down. The drape of the skirt depends on accurate gauge, so take the time to get it right.
Main Pattern Instructions
Bodice
With Color A and 3.5 mm hook, ch 120 (136, 152, 168). Being careful not to twist, join with a slip stitch to form a ring.
Rnd 1 (RS): Ch 1, sc in each ch around. Join with slip stitch to first sc. Place marker for beginning of round. 120 (136, 152, 168) sc.
Rnd 2: Ch 2 (does not count as a stitch), hdc in each st around. Join. 120 (136, 152, 168) hdc.
Rnd 3: Ch 3 (does not count as a stitch), dc in each st around. Join.
Rnd 4: Ch 2, hdc in each st around. Join.
Rnd 5: Ch 3, dc in each st around. Join.
Repeat Rnds 4–5 until the piece measures approximately 7 (7.5, 8, 8.5) inches from the starting chain, ending with a dc round.
Waist Shaping
Continue in established pattern (alternating hdc and dc rounds), decreasing as follows:
Decrease Rnd 1: Ch 2, *hdc in next 13 (15, 17, 19) sts, hdc2tog; repeat from * around. Join. 112 (128, 144, 160) sts.
Work 3 rounds even in pattern.
Decrease Rnd 2: Ch 3, *dc in next 12 (14, 16, 18) sts, dc2tog; repeat from * around. Join. 104 (120, 136, 152) sts.
Work 3 rounds even.
Decrease Rnd 3: Ch 2, *hdc in next 11 (13, 15, 17) sts, hdc2tog; repeat from * around. Join. 96 (112, 128, 144) sts.
Work even in pattern until the bodice measures 12 (12.5, 13, 13.5) inches from the starting chain, ending with a dc round. This is the waistline.
Skirt Flare
The skirt is worked in continuous rounds without joining so the fabric stays smooth. Place a marker in the first stitch of each round and move it up as you go.
Rnd 1: Ch 2, *hdc in next 11 (13, 15, 17) sts, 2 hdc in next st; repeat from * around. Do not join. 104 (120, 136, 152) sts.
Rnd 2: Dc in each st around.
Rnd 3: *Hdc in next 12 (14, 16, 18) sts, 2 hdc in next st; repeat from * around. 112 (128, 144, 160) sts.
Rnd 4: Dc in each st around.
Continue increasing every other round (on the hdc rounds) by working one additional stitch between increases each time. Work as follows:
- Increase Rnd: *hdc in next X sts, 2 hdc in next st; repeat from * around
- Even Rnd: dc in each st around
Increase the number of stitches between increases by one on every increase round until you have increased a total of 8 times. You will have 160 (176, 192, 208) stitches after the final increase.
Work even in the alternating hdc/dc pattern until the skirt measures 20 (20, 20.5, 20.5) inches from the waistline, or until the total dress length from shoulder is about 1 inch less than desired.
Hem Stripe
Join Color B.
Rnd 1: With Color B, sc in each st around.
Rnd 2: Sc in each st around.
Rnd 3: Sc in each st around. Fasten off Color B.
Join Color A.
Rnd 4: Sc in each st around. Fasten off.
Special Techniques / Additional Elements
Boat Neckline Finish
With RS facing and 3.25 mm hook, join Color A at the center back of the original foundation chain.
Rnd 1: Ch 1, sc evenly around the neckline, working approximately 1 sc in each foundation chain and 2 sc in each corner if needed to keep the edge smooth. Join with slip stitch to first sc.
Rnd 2: Ch 1, sc in each sc around. Join and fasten off.
This simple edge keeps the boat neckline clean and prevents stretching.
Optional Armhole Reinforcement (if desired)
If you prefer a slightly more structured armhole, work a round of sc around each armhole opening after the bodice is complete, using the smaller hook. This is optional and depends on how the fabric sits on your body.
Assembly and Finishing
Because the dress is worked in one piece, there is no seaming. Weave in all ends carefully on the wrong side, paying special attention to the color changes at the hem and the neckline join.
Try the dress on and check the length and flare. If the skirt feels too full or too narrow, you can frog back a few increase rounds and adjust the rate of increasing before finishing the hem.
Blocking and Care
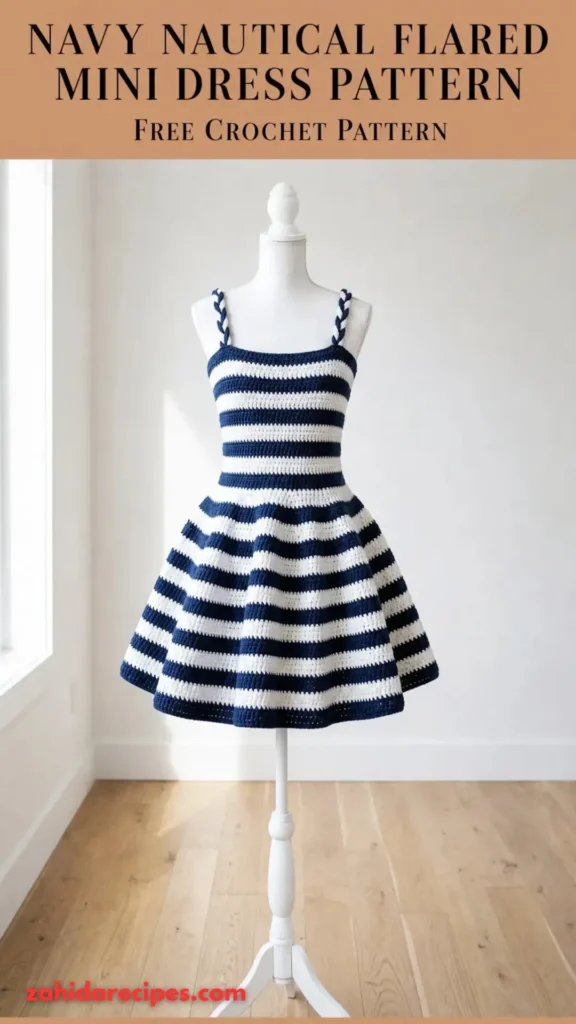
Wet-block the finished dress for best results. Soak in cool water with a mild wool wash for 15–20 minutes. Gently squeeze out excess water (do not wring). Lay flat on blocking mats and shape the bodice and skirt to the finished measurements. Pin the hem evenly so the flare hangs smoothly. Allow to dry completely.
Care: Hand wash in cool water. Reshape and dry flat. Never hang a wet cotton dress — the weight of the water can stretch the fabric permanently. Store folded rather than on a hanger to protect the neckline.
Fit and Troubleshooting Tips
- If the bodice feels tight across the bust, go up one size or add a few extra stitches evenly in the first few rounds.
- If the waist sits too high or too low, adjust the length of the bodice section before beginning the decreases.
- Cupping at the hem usually means the final rounds were worked too tightly. Try a larger hook for the last few inches or add a few extra increases.
- Ruffling in the skirt often comes from increasing too quickly. Space the increases more gradually if this happens.
- The fabric will relax slightly after blocking, so do not panic if it feels a little stiff while you are working.
You Might Also Like:
- Cherry Blossom Pink Spring Braided Bag Free Crochet Pattern
- Mint Cottage Garden Bow Purse Free Crochet Pattern
- Classic Black Woven Crossbody Free Crochet Pattern
- Peach Ombre Baby Hooded Cardigan Free Crochet Pattern
Final Thoughts
There is something deeply satisfying about watching a simple tube of stitches become a dress that swings when you walk. This navy nautical flared mini dress is one of those projects that rewards patience with a finished piece you will actually wear. I hope it brings you the same quiet pleasure it brought me — the kind that comes from making something both practical and a little bit special with your own hands.
If you make one, I would love to see how it turns out. Tag your photos or leave a note in the comments. Fair winds and happy stitching.



Leave a Reply
You must be logged in to post a comment.