


There is something about tiny handmade sea creatures that makes me smile every single time. Maybe it’s their adorable little faces, their wiggly tentacles, or the fact that you can make something so charming with just a little yarn and a crochet hook.
I wanted to create a jellyfish that felt cheerful, colorful, and slightly magical. Instead of using traditional ocean colors, I reached for soft pastel shades of pink, lavender, baby blue, mint, and sunshine yellow. The result was a tiny rainbow jellyfish that looks absolutely adorable hanging from a backpack, purse, or set of keys.
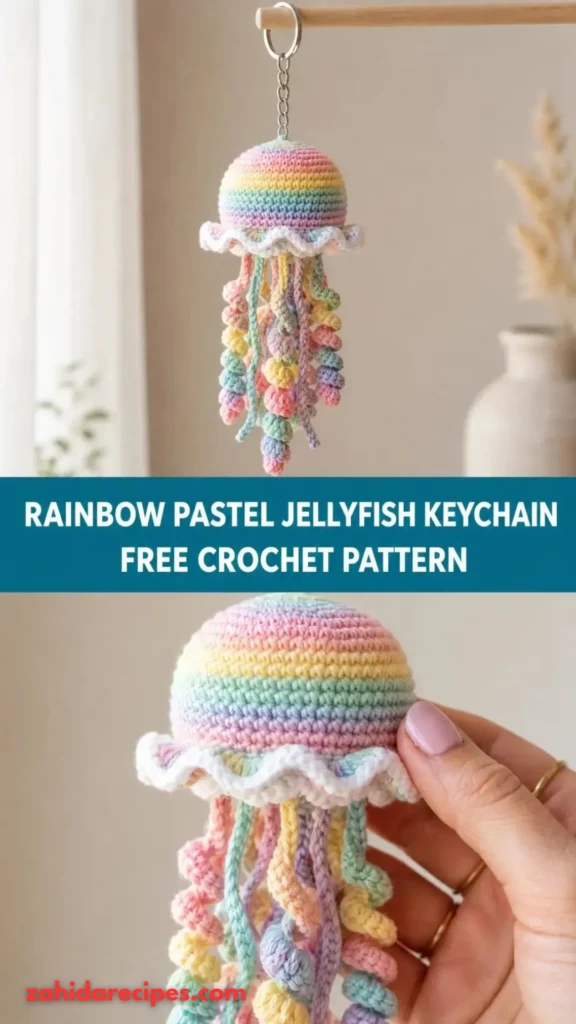
This Rainbow Pastel Jellyfish Keychain Free Crochet Pattern is a fun amigurumi project that combines simple stitches, colorful tentacles, and a sweet embroidered smile. It’s small enough to finish in an afternoon and makes a lovely handmade gift for anyone who enjoys cute crochet accessories.
About This Rainbow Pastel Jellyfish Keychain Pattern
This little jellyfish features a rounded dome-shaped head, a softly curved underside, and five colorful dangling tentacles.
The body is crocheted in continuous rounds using single crochet stitches. The top section creates a smooth dome, while the lower section is worked in pastel stripes for a playful rainbow effect.
The tentacles are made separately and attached underneath the body. Some are straight, while others feature curly spirals that give the jellyfish its characteristic floating appearance.
- Skill Level: Beginner to easy intermediate
- Construction: Amigurumi worked in continuous rounds
- Finished Size: Approximately 3–3.5 inches tall, excluding the keychain hardware
- Width: Approximately 2.5 inches
- Terminology: US crochet terms
- Project Type: Keychain, bag charm, small handmade gift
The finished jellyfish should feel soft but firmly stuffed. Avoid adding too much filling because an overly firm body can stretch the stitches and make the shape look uneven.
Materials You’ll Need
Yarn
Use lightweight cotton or acrylic DK yarn for a neat, compact amigurumi.
- Color A – Pastel Pink: Approximately 12 yards for the upper dome.
- Color B – Lavender: Approximately 8 yards for the body stripe and tentacle details.
- Color C – Baby Blue: Approximately 8 yards.
- Color D – Mint Green: Approximately 8 yards.
- Color E – Butter Yellow: Approximately 8 yards.
- Color F – White: Small amount for optional eye highlights.
Allow approximately 15% extra yarn if your tension is loose or you plan to make longer tentacles.
Crochet Hooks
- 2.5 mm crochet hook for the jellyfish body.
- 2.5 mm crochet hook for the tentacles.
Notions
- Polyester fiberfill stuffing.
- Two 6 mm safety eyes or black embroidery thread.
- Stitch marker.
- Tapestry needle.
- Small scissors.
- Metal keychain ring with connecting chain.
- Optional locking pliers for securing the hardware.
Safety note: If making this keychain for a young child, embroider the eyes instead of using safety eyes. Metal keychain hardware is also not suitable as a toy component for babies.
Abbreviations and Terminology
This pattern uses US crochet terminology.
| Abbreviation | Meaning |
|---|---|
| MR | Magic ring |
| ch | Chain |
| sc | Single crochet |
| inc | Increase (2 sc in one stitch) |
| dec | Invisible decrease |
| sl st | Slip stitch |
| st | Stitch |
| sts | Stitches |
| BLO | Back loop only |
| FO | Fasten off |
| rep | Repeat |
| rnd | Round |
Stitch Explanations
- Magic Ring (MR): Make an adjustable loop, crochet the required stitches into it, and pull the tail to close the center.
- Chain (ch): Yarn over and pull through the loop on your hook.
- Single Crochet (sc): Insert the hook, yarn over and pull up a loop, yarn over again and pull through both loops.
- Increase (inc): Work two single crochet stitches into the same stitch.
- Invisible Decrease (dec): Insert the hook into the front loop of the next two stitches, yarn over and pull through both front loops, then yarn over and pull through both loops.
- Slip Stitch (sl st): Insert the hook, yarn over and pull through the stitch and the loop on your hook.
- Back Loop Only (BLO): Work into the back loop of the stitch instead of both loops.
Important: Work the body in continuous rounds unless instructed otherwise. Do not join rounds with slip stitches. Use a stitch marker to identify the first stitch of each round.
Turning chains are not needed for the body.
Gauge
Gauge is not critical for this small amigurumi project, but your stitches should be tight enough to prevent the stuffing from showing.
Make a small single crochet swatch using your 2.5 mm hook.
Aim for approximately:
- 24 single crochet stitches across 4 inches.
- 26 rounds across 4 inches.
If your stitches look loose, switch to a smaller hook. If the fabric feels extremely stiff and difficult to crochet, try a slightly larger hook.
For amigurumi, a firm and even fabric is more important than matching the gauge exactly.
Main Pattern Instructions
Part 1: Crochet the Jellyfish Head
Begin with pastel pink yarn (Color A).
Work in continuous rounds.
Round 1: Make a magic ring and crochet 6 sc into the ring. Pull tight. (6 sts)
Round 2: Inc in each stitch around. (12 sts)
Round 3: Sc in next stitch, inc in next stitch. Repeat around. (18 sts)
Round 4: Sc in next 2 sts, inc in next stitch. Repeat around. (24 sts)
Round 5: Sc in next 3 sts, inc in next stitch. Repeat around. (30 sts)
Round 6: Sc in next 4 sts, inc in next stitch. Repeat around. (36 sts)
Round 7: Sc in each stitch around. (36 sts)
Round 8: Sc in each stitch around. (36 sts)
Round 9: Sc in each stitch around. (36 sts)
Round 10: Sc in each stitch around. (36 sts)
At this point, the top should resemble a rounded dome.
Part 2: Create the Rainbow Body Stripes
Now it’s time to introduce the pastel rainbow colors.
The color changes create a cheerful striped effect around the lower half of the jellyfish.
Round 11: Change to lavender (Color B). Sc in each stitch around. (36 sts)
Round 12: Change to baby blue (Color C). Sc in each stitch around. (36 sts)
Round 13: Change to mint green (Color D). Sc in each stitch around. (36 sts)
Round 14: Change to butter yellow (Color E). Sc in each stitch around. (36 sts)
Keep your color changes neat by completing the final yarn-over of the last stitch with the new color.
Part 3: Shape the Underside
The lower part of the jellyfish needs to narrow gradually so the stuffing stays inside.
Round 15: Sc in next 4 sts, dec. Repeat around. (30 sts)
Round 16: Sc in next 3 sts, dec. Repeat around. (24 sts)
Now add the eyes if you are using safety eyes.
Place them between Rounds 8 and 9, approximately 6 stitches apart. Check that they are centered before attaching the safety backs.
Begin stuffing the jellyfish with small amounts of fiberfill.
Round 17: Sc in next 2 sts, dec. Repeat around. (18 sts)
Round 18: Sc in next stitch, dec. Repeat around. (12 sts)
Add a little more stuffing if needed.
Round 19: Dec around. (6 sts)
FO, leaving a long tail.
Using a tapestry needle, weave the tail through the front loops of the remaining stitches. Pull firmly to close the opening and secure the yarn.
The finished body should have a rounded top and a gently tapered underside.
Special Techniques: Crochet Jellyfish Tentacles
The tentacles are what make this project especially cute.
I recommend making five tentacles in different pastel shades. Use a mixture of straight and curly tentacles to create movement.
Tentacle 1: Pastel Pink Spiral
Using pastel pink yarn:
Step 1: Ch 18.
Step 2: Starting in the second chain from the hook, work 2 sc into each chain across.
The piece will naturally curl into a spiral.
FO, leaving a long sewing tail.
Tentacle 2: Lavender Spiral
Using lavender yarn:
Step 1: Ch 20.
Step 2: Work 2 sc into each chain across, starting in the second chain from the hook.
FO and leave a long tail.
Tentacle 3: Baby Blue Straight Tentacle
Using baby blue yarn:
Step 1: Ch 16.
Step 2: Starting in the second chain from the hook, work 1 sc into each chain across. (15 sts)
FO and leave a sewing tail.
Tentacle 4: Mint Green Spiral
Using mint green yarn:
Step 1: Ch 17.
Step 2: Work 2 sc into each chain across, starting in the second chain from the hook.
FO and leave a long sewing tail.
Tentacle 5: Butter Yellow Spiral
Using butter yellow yarn:
Step 1: Ch 19.
Step 2: Work 2 sc into each chain across, starting in the second chain from the hook.
FO and leave a long sewing tail.
Designer tip: Don’t worry if the spirals curl differently. That slight variation makes the jellyfish look more natural and playful.
Add the Jellyfish Face
A sweet little face gives your jellyfish its personality.
If you are embroidering the eyes, use black embroidery thread or a strand of black yarn.
- Place the eyes symmetrically between Rounds 8 and 9.
- Keep approximately 6 stitches between the eye centers.
- Use a short strand of black yarn to create a small curved smile.
- Add tiny white highlights if desired.
For a more kawaii appearance, you can embroider two small blush circles beneath the eyes using pink yarn.
Keep the facial details small. The body is tiny, so oversized features can make the finished jellyfish look crowded.
Assembly and Finishing
Now comes the fun part: bringing all the colorful pieces together!
Step 1: Arrange the Tentacles
Turn the jellyfish upside down.
Arrange the five tentacles around the bottom opening area.
A balanced arrangement works best:
- Pink spiral at the front-left.
- Lavender spiral at the front-right.
- Baby blue straight tentacle in the center.
- Mint green spiral toward the back-left.
- Butter yellow spiral toward the back-right.
Leave a little space between each attachment point.
Step 2: Sew the Tentacles
Thread the yarn tails through your tapestry needle.
Sew each tentacle securely to the underside of the jellyfish. Make several small stitches around the top of each tentacle.
Avoid pulling too tightly because this can distort the body.
After attaching all five tentacles, weave in the remaining yarn ends.
Step 3: Add a Decorative Scalloped Edge
For an extra decorative finish, attach lavender yarn to the front loop of Round 14.
Work the following repeat around:
Sl st in next stitch, ch 3, sl st in same stitch, sl st in next stitch.
Repeat around the body.
FO and weave in the end.
Step 4: Attach the Keychain Hardware
Find the center of the top dome.
Using a tapestry needle and a doubled strand of strong yarn, create a small secure attachment loop at the top.
Pass the loop through the connecting ring of your keychain hardware and sew it firmly to the body.
Alternatively, use a small metal eye screw designed for craft accessories, ensuring it is securely installed and appropriate for the intended use.
Give the connection a gentle pull to check that it is secure.
Your rainbow pastel jellyfish keychain is now complete!
Blocking and Care
Amigurumi generally does not need traditional blocking.
However, you can gently shape the jellyfish with your fingers after finishing.
If the tentacles look uneven, lightly dampen them and arrange the curls while they dry.
For acrylic yarn, avoid applying high heat because it can damage the fibers.
For cotton yarn, gentle hand washing is usually suitable.
Care recommendations:
- Hand wash with cool water and mild detergent.
- Avoid twisting or squeezing the body.
- Press gently with a clean towel.
- Allow the jellyfish to air-dry completely.
- Never hang it while wet.
- Keep the metal keychain hardware dry whenever possible.
Fit and Troubleshooting Tips

1. My Jellyfish Body Looks Too Flat
You may have used a hook that is too large or added too little stuffing.
Try a smaller hook and add fiberfill gradually. Shape the dome with your fingers as you work.
2. The Stuffing Is Showing Through
This usually happens when the stitches are too loose.
Use a smaller hook and maintain consistent tension. Make sure you are not stretching the stitches while stuffing.
3. My Tentacles Don’t Curl Properly
Make sure you work two single crochet stitches into every chain.
If the curls look too loose, use a slightly smaller hook or try a thinner yarn.
4. The Jellyfish Looks Uneven
Check that your increases and decreases are distributed evenly.
Use a stitch marker and count each round. Incorrect stitch counts can make the dome lean or become lopsided.
5. The Keychain Attachment Feels Weak
Don’t attach the hardware using only a single strand of yarn.
Use doubled yarn and several secure stitches through the top of the body. Check the attachment regularly, especially if the keychain is used every day.
Final Thoughts
I absolutely love how this Rainbow Pastel Jellyfish Keychain turns a few small amounts of colorful yarn into something so cheerful.
The little rounded body, sweet embroidered face, and curly rainbow tentacles make it a lovely addition to any collection of handmade crochet accessories.
You can experiment with different color combinations, make the tentacles longer, or add tiny blush cheeks for an extra dose of cuteness. You could even create an entire family of jellyfish in different pastel shades!
This Rainbow Pastel Jellyfish Keychain Free Crochet Pattern is a wonderful little project when you want something creative without committing to a large crochet project.
If you make one, I’d love to see your color combinations and finished jellyfish. Share your creation, save the pattern to Pinterest, and enjoy making your own tiny underwater friend.
Happy crocheting!


Leave a Reply
You must be logged in to post a comment.