

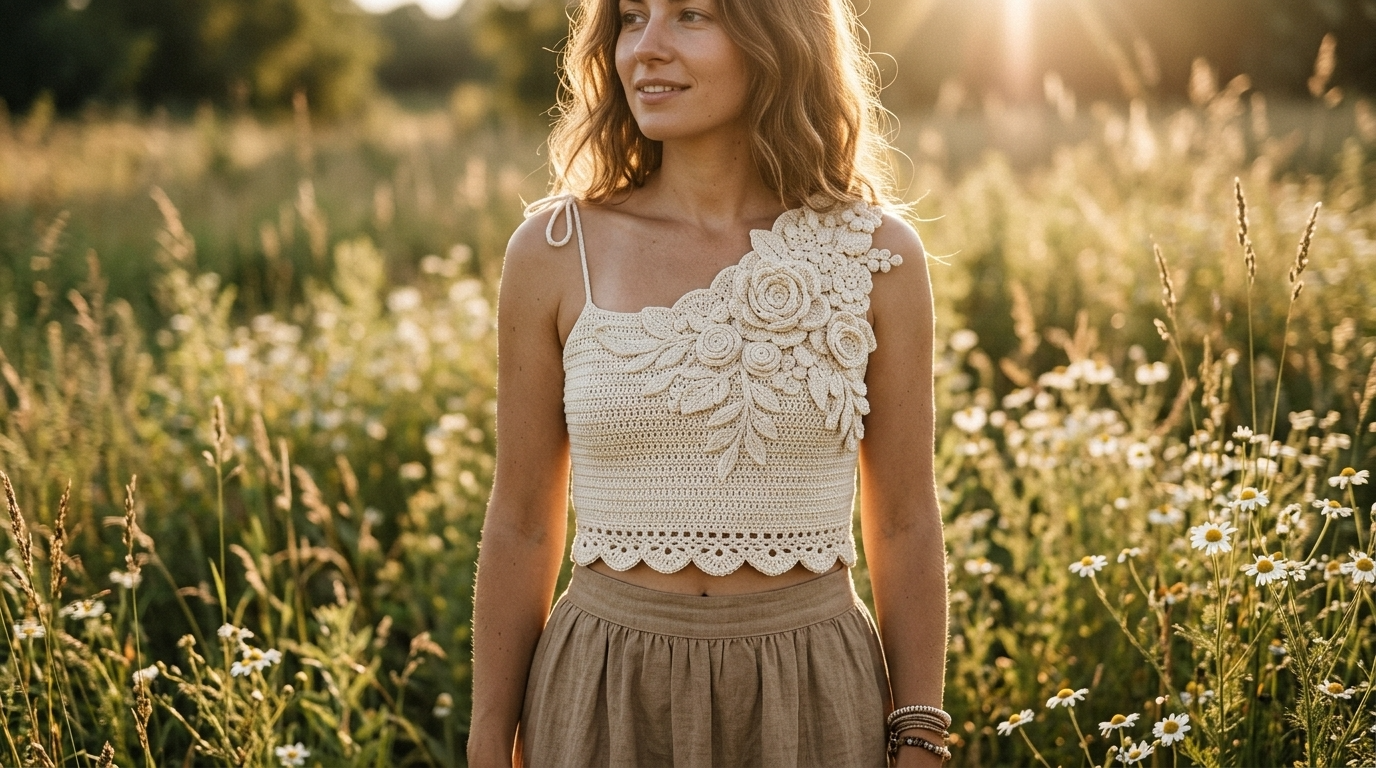
I chose a soft cream color because it makes the floral details stand out without making the top feel overly busy. The design combines breathable mesh stitches, textured flower motifs, and a comfortable fitted body.
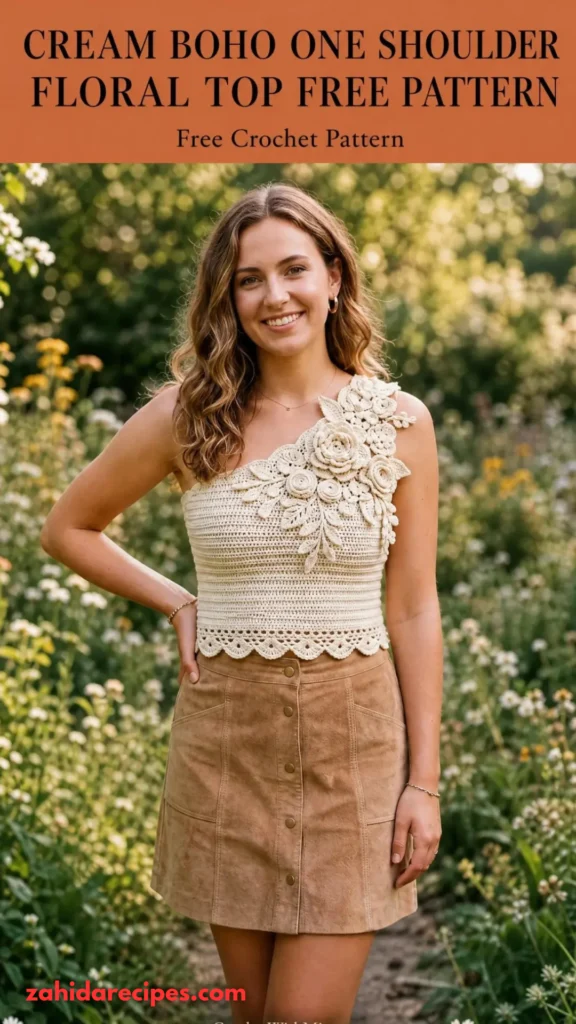
The result is the Cream Boho One Shoulder Floral Top Free Crochet Pattern, a charming summer garment that feels special every time you wear it.
About This Pattern
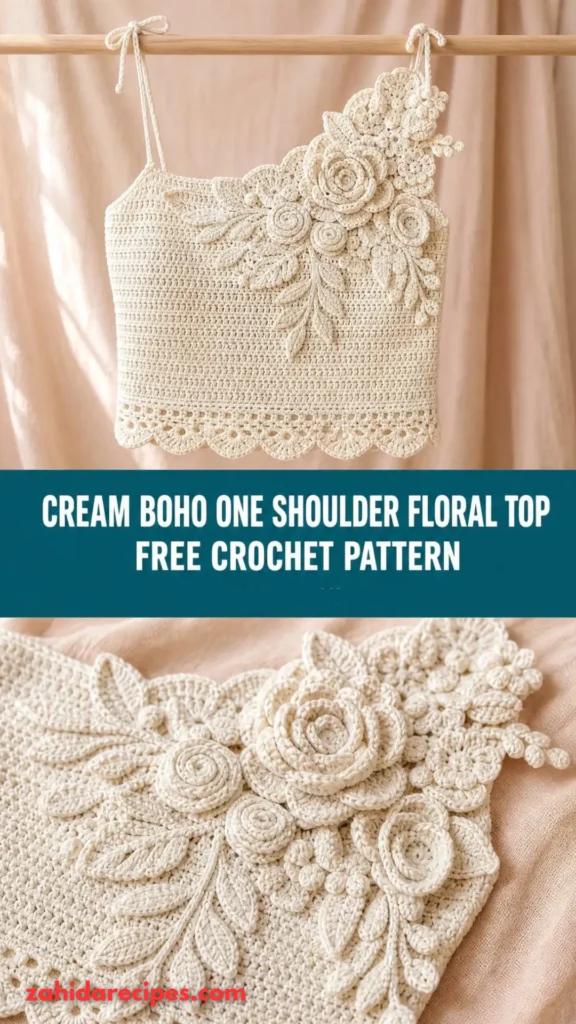
This crochet top is worked using a combination of flat panels, floral motifs, and simple shaping techniques.
The main body is constructed from two rectangular sections that are joined along the sides. The upper edge is shaped asymmetrically to create the one shoulder neckline. A decorative shoulder strap provides support on one side, while the opposite side remains open for the signature off-shoulder appearance.
Small crochet flowers are made separately and attached across the upper bodice and neckline.
The body features a lightweight mesh-and-solid-stitch combination. This creates a breathable fabric that feels comfortable in warm weather.
Skill Level: Intermediate.
You should be comfortable with basic stitches, working in rows and rounds, making small floral motifs, and sewing crochet pieces together.
Finished Sizes
- XS: 30–32-inch bust
- S: 34–36-inch bust
- M: 38–40-inch bust
- L: 42–44-inch bust
- XL: 46–48-inch bust
The top is designed with approximately 1–2 inches of negative ease for a gently fitted silhouette.
You can adjust the length and width to suit your preferred fit.
Materials You’ll Need
Yarn
Choose a soft cotton or cotton-blend yarn for a comfortable summer garment.
- Color A – Cream: Approximately 650–900 yards (595–823 meters), DK-weight cotton yarn for the body.
- Color B – Soft Ivory: Approximately 80–120 yards (73–110 meters), DK-weight cotton yarn for the flowers.
- Color C – Warm Beige: Approximately 30–50 yards (27–46 meters), DK-weight yarn for flower centers and decorative details.
Allow 15% extra yarn if your gauge varies or you prefer additional floral decoration.
Crochet Hooks
- 3.5 mm crochet hook for floral motifs.
- 4 mm crochet hook for the main body.
- 3 mm crochet hook for neckline and strap edging.
Notions
- Tapestry needle
- Stitch markers
- Measuring tape
- Scissors
- Rust-free blocking pins
- Blocking mat
- Sewing needle and matching thread (optional)
Abbreviations and Terminology
This pattern uses US crochet terminology.
| Abbreviation | Meaning |
| ch | Chain |
| sl st | Slip stitch |
| sc | Single crochet |
| hdc | Half double crochet |
| dc | Double crochet |
| tr | Treble crochet |
| st | Stitch |
| sts | Stitches |
| sp | Space |
| sk | Skip |
| rep | Repeat |
| inc | Increase |
| dec | Decrease |
| FO | Fasten off |
| RS | Right side |
| WS | Wrong side |
Stitch Explanations
- Chain (ch): Yarn over and pull through the loop on your hook.
- Slip Stitch (sl st): Insert your hook, yarn over, and pull through both the stitch and the loop on your hook.
- Single Crochet (sc): Insert hook, yarn over and pull up a loop. Yarn over and pull through both loops.
- Half Double Crochet (hdc): Yarn over, insert hook, pull up a loop, yarn over and pull through all three loops.
- Double Crochet (dc): Yarn over, insert hook, pull up a loop, yarn over and pull through two loops twice.
- Treble Crochet (tr): Yarn over twice, insert hook, pull up a loop, then yarn over and pull through two loops three times.
Important Notes
- Turning chains do not count as stitches unless stated otherwise.
- Count your stitches at the end of every shaping row.
- Keep your tension relaxed, especially when working mesh stitches.
- The flower motifs are worked separately before being attached.
- Instructions are written for the smallest size, with larger sizes in parentheses.
Gauge
Gauge is especially important for a fitted crochet garment.
Using a 4 mm crochet hook and Color A, work the following swatch:
Foundation: Ch 23.
Row 1: Dc in fourth ch from hook and in each remaining ch. Turn.
Row 2: Ch 3, dc in each st across. Turn.
Row 3: Ch 3, dc in next 2 sts, ch 1, sk next st. Rep across, ending with dc in remaining sts. Turn.
Row 4: Ch 2, hdc in each st and ch-1 space across. Turn.
Repeat Rows 2–4 until your swatch measures approximately 4 inches tall.
Target Gauge:
- 18 stitches = 4 inches.
- 12 rows = 4 inches in the main stitch pattern.
If your swatch is too small, use a larger hook. If it is too large, switch to a smaller hook.
Wash and dry your swatch before measuring if you plan to wash the finished top.
Main Pattern Instructions
1. Crochet the Front Bodice
The front bodice forms the main decorative section of the top.
Using Color A and a 4 mm hook, make a foundation chain according to your size.
| Size | Foundation Chain |
| XS | 69 |
| S | 77 |
| M | 85 |
| L | 93 |
| XL | 101 |
Row 1: Dc in fourth ch from hook and in each remaining ch. Turn.
Count: 66 (74, 82, 90, 98) dc.
Row 2: Ch 3, dc in each st across. Turn.
Row 3: Ch 3, dc in next 2 sts, ch 1, sk next st, dc in next 3 sts. Rep across. Turn.
Row 4: Ch 2, hdc in each dc and ch-1 space across. Turn.
Row 5: Ch 3, dc in every st across. Turn.
Row 6: Ch 3, dc in next st, ch 1, sk next st, dc in next 2 sts. Rep across. Turn.
Row 7: Ch 2, hdc in each stitch and chain space across. Turn.
Repeat Rows 2–7 until the front bodice measures approximately 8 inches from the foundation edge.
For a longer top, add another 1–2 inches before beginning the neckline shaping.
FO and weave in the loose end.
2. Create the Asymmetrical Neckline
The one shoulder neckline is what gives this top its distinctive shape.
Lay the front bodice flat with the right side facing you.
The upper edge will be divided into two sections:
- The wider section forms the covered shoulder.
- The shorter section creates the open side of the neckline.
For the neckline shaping, use the following approximate measurements:
| Size | Covered Shoulder Width |
| XS | 3 inches |
| S | 3.25 inches |
| M | 3.5 inches |
| L | 3.75 inches |
| XL | 4 inches |
Rejoin Color A at the upper corner of the covered shoulder.
Shaping Row 1: Ch 2, hdc across the designated shoulder section. Turn.
Shaping Row 2: Ch 2, hdc2tog over the first two sts, hdc across to the last two sts, hdc2tog. Turn.
Shaping Row 3: Ch 2, hdc across. Turn.
Repeat Shaping Rows 2 and 3 twice more, maintaining the shoulder section’s width and gradually forming the angled neckline.
FO.
The neckline should slope gently rather than forming a sharp corner.
3. Crochet the Back Bodice
The back bodice is worked similarly to the front, but without the decorative asymmetrical neckline shaping.
Using Color A, make the same foundation chain as the front.
Row 1: Dc in fourth ch from hook and across. Turn.
Row 2: Ch 3, dc across. Turn.
Row 3: Ch 3, dc in next 2 sts, ch 1, sk next st. Rep across. Turn.
Row 4: Ch 2, hdc in every st and ch space across. Turn.
Repeat Rows 2–4 until the back panel measures approximately 8 inches.
Continue with solid double crochet rows until the back panel matches the front bodice’s overall height.
FO.
The back should remain relatively simple because the floral details on the front are intended to be the main attraction.
4. Shape the Lower Body
The lower portion of the top has a relaxed, slightly flared finish.
Rejoin Color A along the bottom edge of the front bodice.
Round 1: Ch 2, work hdc evenly along the lower edge. Join with sl st.
Round 2: Ch 3, dc in each st around. Join.
Round 3: Ch 3, dc in next 4 sts, 2 dc in next st. Rep around. Join.
Round 4: Ch 2, hdc in each st around. Join.
Round 5: Ch 3, dc in next 3 sts, ch 1, sk next st. Rep around. Join.
Continue repeating Rounds 4 and 5 until the lower section measures approximately 3–4 inches.
Repeat the same process for the back panel.
This creates a soft, flowing bottom edge without making the top excessively heavy.
Special Techniques and Additional Elements
5. Crochet the Small Floral Motifs
The little flowers are the prettiest part of this design.
They add texture and give the top its romantic bohemian appearance.
Make approximately 7–11 flowers depending on your preferred decoration.
Using Color C and a 3.5 mm hook:
Round 1: Make a magic ring. Ch 1, work 10 sc into the ring. Join with sl st.
Pull the ring closed.
Round 2: Switch to Color B. Ch 1, sl st in next st, ch 3, 2 dc in same st, ch 3, sl st in same st. This creates one small petal.
Repeat around to create five petals.
Join with sl st and FO.
You should have a small flower with five rounded petals.
Flower Center
Using Color C, make a small French knot or embroidered center in the middle of each flower.
Alternatively, make a tiny center with a contrasting yarn loop.
Make the flowers in slightly different sizes by changing the hook:
- Small flowers: 3 mm hook.
- Medium flowers: 3.5 mm hook.
- Larger flowers: 4 mm hook.
This variation gives the floral arrangement a more natural appearance.
6. Make the Decorative Shoulder Strap
The shoulder strap should be comfortable and secure.
Using Color A and a 3.5 mm hook, ch 9.
Row 1: Hdc in third ch from hook and across. Turn.
Row 2: Ch 2, hdc across. Turn.
Repeat Row 2 until the strap measures approximately 9–11 inches, or long enough to connect the front and back shoulder edges comfortably.
FO, leaving a long sewing tail.
Pin the strap in position before sewing.
The strap should sit comfortably over the shoulder without pulling the bodice upward.
7. Add the Decorative Neckline Border
Using Color A and a 3 mm hook:
Round 1: Attach yarn at the neckline edge. Ch 1, work sc evenly around the neckline.
Round 2: Ch 1, sc in each st around.
Round 3: Ch 1, sc in next st, ch 2, sk next st. Rep around for a delicate picot-inspired open border.
Join with sl st and FO.
The narrow edging gives the asymmetrical neckline a neat finish while providing a little extra stability.
Assembly and Finishing
8. Join the Front and Back Panels
Place the front and back bodice pieces together with the right sides facing inward.
Align the side edges carefully.
Using Color A and a tapestry needle:
- Begin at the lower edge.
- Sew upward along the first side.
- Leave an opening of approximately 7–8 inches for the armhole.
- Repeat on the opposite side.
- Check that both openings are comfortable and symmetrical.
Use mattress stitch for a neat, nearly invisible seam.
Avoid pulling the yarn too tightly because this can distort the mesh fabric.
9. Attach the Shoulder Strap
Position the strap between the front and back shoulder edges.
Use stitch markers to hold both ends in place.
Try the top on before sewing permanently.
The strap should lie flat without twisting.
Secure each end using several small stitches through the reinforced shoulder edges.
Weave in all loose ends.
10. Arrange and Attach the Flowers
Now comes the fun part!
Lay the top flat with the front facing upward.
Arrange your flowers around the upper bodice and neckline.
I recommend this arrangement:
- Place three medium flowers near the covered shoulder.
- Add two smaller flowers along the neckline.
- Position two or three flowers diagonally across the upper bodice.
- Add one larger flower near the opposite upper corner.
You can adjust the arrangement to your taste.
Once satisfied, attach each flower using a tapestry needle and matching yarn.
Sew through the center and several points around the petals.
Make sure the flowers are secure but not so tightly attached that they pull the fabric.
11. Add a Decorative Bottom Edge
For a pretty boho finish, add a simple scalloped border.
Using Color A and a 3.5 mm hook:
Round 1: Attach yarn along the bottom edge. Ch 1, sc evenly around.
Round 2: Sk 1 st, 5 dc in next st, sk 1 st, sl st in next st. Rep around.
Adjust the spacing slightly if necessary to finish evenly.
Join with sl st and FO.
The scallops add a soft feminine detail without competing with the flowers.
Blocking and Care
Blocking helps the floral motifs open beautifully and gives the body panels a more polished shape.
Because this pattern uses cotton yarn, gentle wet blocking works well.
Wet Blocking
- Fill a basin with cool or lukewarm water.
- Add a small amount of gentle wool wash or mild detergent.
- Submerge the top and allow it to soak for approximately 10–15 minutes.
- Remove it carefully without twisting.
- Press out excess water using a clean towel.
- Lay the garment flat on a blocking mat.
- Shape the neckline, side seams, and lower edge.
- Pin the floral motifs gently into place.
- Allow the top to dry completely.
Avoid stretching the garment excessively because cotton can lose its shape when wet.
Care Instructions
- Hand wash in cool water.
- Use mild detergent.
- Do not wring or twist.
- Dry flat in the shade.
- Avoid hanging the top while wet.
- Store folded rather than hanging for long periods.
Fit and Troubleshooting Tips
The Top Feels Too Loose
If the bodice feels loose, check your gauge first.
You can use a smaller hook for a firmer fabric or reduce the foundation chain in future versions.
For minor adjustments, add a narrow side seam.
The Mesh Fabric Looks Uneven
Uneven mesh usually comes from inconsistent chain tension.
Keep the chain spaces relaxed and avoid pulling the yarn tightly after each stitch.
Blocking will help improve the overall appearance.
The Neckline Slips Off the Shoulder
The strap may be too long or the neckline too wide.
Shorten the strap slightly and reinforce the shoulder seam.
You can also add a discreet adjustable elastic thread inside the neckline edging.
The Flowers Curl
If your flowers curl inward, gently wet-block them.
Pin each petal outward and allow it to dry completely.
Check that your flower stitches are not too tight.
The Bottom Edge Waves Too Much
If the lower edge becomes excessively wavy, you may have added too many increases.
Remove the last round and work a plain round of double crochet instead.
How Can I Make the Top Longer?
Simply add more rounds of the lower body section.
For every additional inch, work approximately three more rounds, depending on your personal gauge.
Final Thoughts
I absolutely love how this Cream Boho One Shoulder Floral Top brings together delicate crochet flowers, breathable stitches, and an asymmetrical silhouette.
It has that relaxed summer feeling while still looking thoughtfully handmade. The cream color makes it easy to style, and the floral details give it a little extra personality.
You can keep the flower arrangement delicate or add more motifs for a fuller garden-inspired look. You can also experiment with soft beige, ivory, dusty pink, or pale sage yarn if you want a different color combination.
Most importantly, take your time with the shaping and try the top on during assembly. A few small adjustments can make a big difference in the final fit.
I hope you enjoy making this free Cream Boho One Shoulder Floral Top Crochet Pattern as much as I enjoyed designing it. Don’t forget to share your finished creation, save it to Pinterest, and inspire another crocheter to pick up their hook!
Happy crocheting! 💛



Leave a Reply
You must be logged in to post a comment.