


There is something about autumn colors that makes handmade accessories feel extra special. Warm rust, golden mustard, creamy beige, and deep olive always remind me of cozy afternoons, falling leaves, and little trips to the local market.
I wanted to create a crochet bag that captured that feeling without looking too complicated or overly decorative. After experimenting with different flower motifs and earthy color combinations, I settled on a bucket-style bag decorated with cheerful crochet flowers.
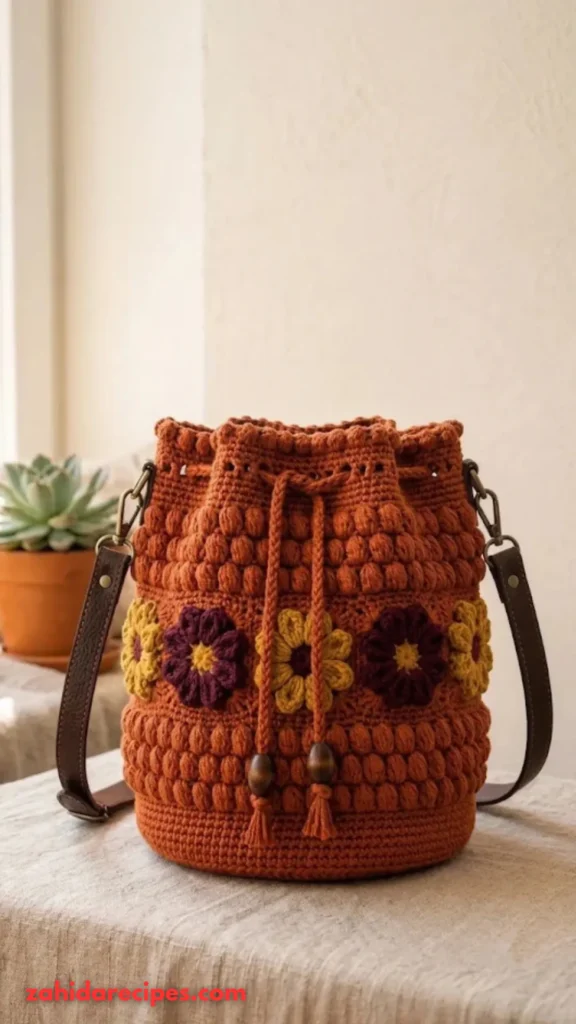
The result is this Autumn Harvest Floral Bucket Bag, a practical little handbag with a sturdy rounded base, textured floral panels, and a comfortable drawstring closure. It is a lovely project if you enjoy colorful crochet motifs and want to make something useful enough to carry every day.
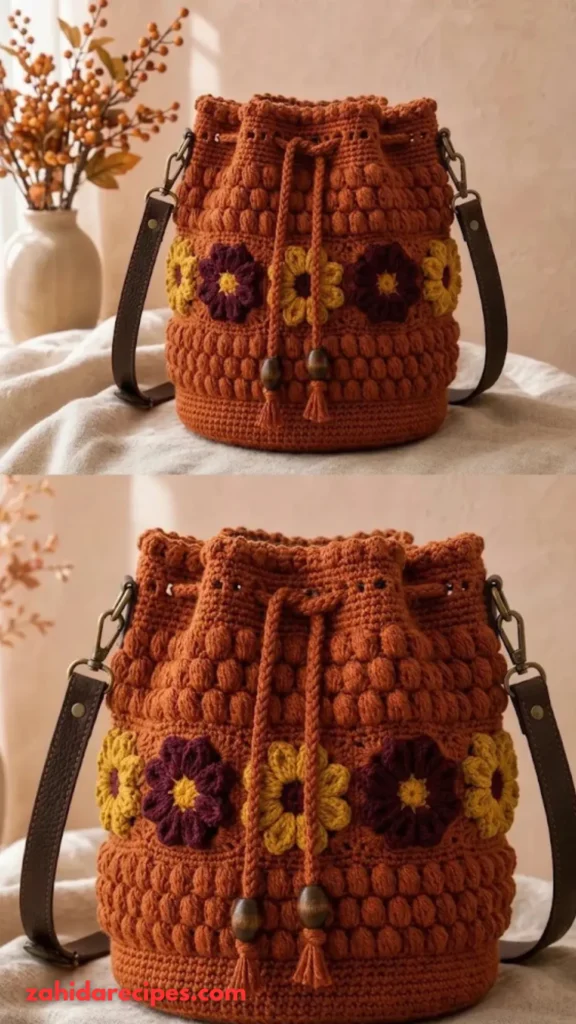
About This Autumn Harvest Floral Bucket Bag Pattern
This bag combines traditional crochet flower motifs with a simple bucket construction.
The body is made from individual floral squares joined together into a rectangular panel. Once joined, the panel forms the sides of the bag and is attached to a circular crochet base.
The floral squares use warm seasonal shades, while the background stitches create a neat structure that allows the flowers to stand out.
Skill Level: Intermediate
Construction: Motif-based body with a separate circular base.
Finished Measurements:
- Height: Approximately 9 inches (23 cm).
- Diameter: Approximately 8 inches (20 cm).
- Handle drop: Approximately 9 inches (23 cm).
- Drawstring opening: Approximately 7 inches (18 cm).
The bag is designed to hold everyday essentials such as a small wallet, phone, keys, sunglasses, and a few personal items. It is not intended for particularly heavy objects unless you reinforce the base.
Materials You’ll Need
Yarn
Choose a durable worsted-weight cotton yarn for a firm finish.
- Color A – Rust Orange: 120 yards (110 m), for flower centers and accents.
- Color B – Golden Mustard: 140 yards (128 m), for flower petals.
- Color C – Cream: 220 yards (201 m), for motif backgrounds and joining.
- Color D – Olive Green: 100 yards (91 m), for leaves and decorative details.
- Color E – Deep Brown: 180 yards (165 m), for the bag body, base, and finishing.
Allow approximately 15% extra yarn if your gauge differs or you prefer a denser fabric.
Crochet Hooks
- 4.0 mm crochet hook for floral motifs.
- 4.5 mm crochet hook for the bag body and base.
- 3.5 mm crochet hook for the drawstring and decorative details.
Additional Supplies
- Tapestry needle.
- Stitch markers.
- Scissors.
- Measuring tape.
- Removable stitch markers for assembly.
- Optional cotton fabric lining.
- Sewing needle and matching thread.
- Small safety pin for threading the drawstring.
Abbreviations and Terminology
This pattern uses standard US crochet terminology.
| Abbreviation | Meaning |
|---|---|
| ch | Chain |
| sl st | Slip stitch |
| sc | Single crochet |
| hdc | Half double crochet |
| dc | Double crochet |
| tr | Treble crochet |
| st | Stitch |
| sts | Stitches |
| sp | Space |
| sk | Skip |
| rep | Repeat |
| rnd | Round |
| RS | Right side |
| WS | Wrong side |
Basic Stitch Explanations
- Chain (ch): Yarn over and pull through the loop on your hook.
- Slip Stitch (sl st): Insert the hook, yarn over, and pull through both the stitch and the loop on your hook.
- Single Crochet (sc): Insert the hook, yarn over and pull up a loop, yarn over and pull through both loops.
- Half Double Crochet (hdc): Yarn over, insert the hook, pull up a loop, yarn over and pull through all three loops.
- Double Crochet (dc): Yarn over, insert the hook, pull up a loop, yarn over and pull through two loops twice.
- Treble Crochet (tr): Yarn over twice, insert the hook, pull up a loop, then work off two loops at a time three times.
Important: Turning chains do not count as stitches unless specifically stated.
Gauge
Gauge is important because the floral motifs need to fit together neatly and the finished bag should have enough structure to hold its shape.
Motif Gauge:
- One completed floral square should measure approximately 4 × 4 inches (10 × 10 cm).
- In single crochet, aim for approximately 12 stitches and 14 rounds over 4 inches using the 4.5 mm hook.
How to Check Your Gauge
Make one complete floral motif and measure it after lightly blocking.
If your square measures larger than 4 inches, try a smaller hook. If it is too small, move up one hook size.
Keep your tension consistent across all 12 motifs. Even a small difference in square size can make joining the bag body more difficult.
Main Pattern Instructions
Pattern Overview
The bag uses the following components:
- 12 floral granny squares.
- One circular crochet base.
- One joined bucket body.
- Two handle attachment points and one shoulder handle.
- One decorative drawstring.
- Optional lining.
Arrange the 12 squares in two horizontal rows of six squares each.
Each square measures approximately 4 inches, creating a body panel approximately 24 inches wide and 8 inches tall before joining.
Part 1: Crochet the Floral Motifs
Make 12 identical squares using the following color arrangement.
For a balanced autumn appearance, use:
- 4 rust-orange flower centers.
- 4 mustard-yellow flower centers.
- 4 cream flower centers.
Use Color C for the background and Color D for optional leaf details.
Round 1 – Flower Center
Using Color A, make a magic ring.
Ch 2 (does not count as a stitch), work 12 dc into the ring.
Pull the ring closed and join with a sl st to the first dc.
Count: 12 dc.
Fasten off.
Round 2 – Flower Petals
Join Color B in any dc.
Ch 2, work 3 dc in the same stitch, then sl st into the next stitch.
Repeat the following sequence around:
- Sl st in the next stitch.
- Work 4 dc in the following stitch.
- Sl st in the next stitch.
Continue until you have six rounded petals.
Fasten off.
You should now have a small flower with six full, rounded petals.
Round 3 – Background Foundation
Join Color C in the space between any two petals.
Ch 3, work 2 dc in the same space.
Ch 2, work 3 dc in the same space to create the first corner.
In the next space between petals, work 3 dc.
Repeat this sequence around the flower, placing a corner group of 3 dc, ch 2, 3 dc in every alternate petal gap and a 3-dc group in each remaining gap.
Join with a sl st to the beginning.
You should have four corner spaces and four side groups.
Round 4 – Square Formation
Sl st across to the first corner space.
In the corner space, work:
3 dc, ch 2, 3 dc.
Work 3 dc in each side space until you reach the next corner.
Repeat the corner sequence at all four corners.
Join with a sl st.
Fasten off.
Round 5 – Final Motif Border
Join Color E in any corner space.
Ch 1, work 2 sc, ch 2, 2 sc in the same corner.
Work 1 sc in each stitch along the side.
Repeat around all four sides, placing 2 sc, ch 2, 2 sc in every corner.
Join with a sl st and fasten off.
Your completed square should measure approximately 4 inches.
Repeat until you have 12 matching floral squares.
Part 2: Join the Floral Squares
Lay your squares on a flat surface with the right sides facing upward.
Arrange them into two rows of six.
Try alternating rust, mustard, and cream centers so that no two identical flower colors sit directly beside one another.
Joining Method: Flat Slip-Stitch Join
Place two squares with their wrong sides together.
Using Color E, insert your hook through the corresponding back loops of both squares.
Work a sl st through each pair of stitches along the edge.
Keep your tension relaxed so the seam does not pull the squares inward.
Join all six squares in each row first.
Then join the two completed rows together using the same technique.
You should now have one rectangular floral panel measuring approximately 24 × 8 inches.
Part 3: Shape the Bucket Bag Body
Fold the floral panel so that its short ends meet.
The floral squares should face outward.
Using Color E, join the two short edges with a flat slip-stitch seam.
Work carefully from the bottom edge toward the top.
You now have a cylindrical bag body.
Place a stitch marker at the seam. This will help you identify the back of the bag during the remaining steps.
Work one round of sc evenly around the lower edge of the cylinder.
Aim for approximately 72–76 sc, distributing the stitches evenly along the motif edges.
This round creates a neat foundation for attaching the circular base.
Part 4: Crochet the Circular Bag Base
Using Color E and the 4.5 mm hook, create a firm circular base.
Round 1: Make a magic ring and work 8 sc into it. Join with a sl st. (8 sts)
Round 2: Ch 1, work 2 sc in every stitch around. Join. (16 sts)
Round 3: Ch 1, *1 sc in next stitch, 2 sc in next stitch.* Repeat around. (24 sts)
Round 4: Ch 1, *1 sc in next 2 sts, 2 sc in next stitch.* Repeat around. (32 sts)
Round 5: Ch 1, *1 sc in next 3 sts, 2 sc in next stitch.* Repeat around. (40 sts)
Round 6: Ch 1, *1 sc in next 4 sts, 2 sc in next stitch.* Repeat around. (48 sts)
Round 7: Ch 1, *1 sc in next 5 sts, 2 sc in next stitch.* Repeat around. (56 sts)
Round 8: Ch 1, *1 sc in next 6 sts, 2 sc in next stitch.* Repeat around. (64 sts)
Round 9: Ch 1, *1 sc in next 7 sts, 2 sc in next stitch.* Repeat around. (72 sts)
Round 10: Ch 1, *1 sc in next 8 sts, 2 sc in next stitch.* Repeat around. (80 sts)
Join with a sl st and fasten off, leaving a long tail for sewing.
Base note: The final base should measure approximately 8 inches across, depending on your tension. Check its circumference against the bottom edge of your joined body before attaching it.
Part 5: Attach the Circular Base
Turn the bag body inside out.
Place the circular base against the bottom opening of the floral cylinder.
Match the base stitches with the single-crochet foundation round.
Use the long yarn tail and tapestry needle to sew the pieces together.
Work through one stitch from the base and one stitch from the body, keeping the seam firm but not overly tight.
Continue around the entire circle.
Before finishing, check that the base sits evenly and does not create puckers.
Turn the bag right side out.
You should now have a recognizable bucket-shaped handbag with a flat bottom and colorful floral sides.
Part 6: Create the Top Rim
Join Color E at the upper edge of the bag.
Work one round of sc evenly around the opening.
Join with a sl st.
For a slightly thicker rim, work one additional round of sc.
Keep the stitches firm and even. This section helps the opening maintain its shape.
Part 7: Make the Drawstring Eyelet Round
The drawstring gives the bag a traditional bucket-bag finish.
Eyelet Round:
Ch 1, *work 1 sc in each of the next 2 sts, ch 1, sk 1 st.*
Repeat around.
Join with a sl st.
Final Rim Round:
Ch 1 and work 1 sc in every stitch and chain space around.
Join and fasten off.
The small openings created by the previous round will allow the drawstring to slide through easily.
Special Techniques and Additional Elements
Part 8: Crochet Small Decorative Leaves
The floral squares already provide plenty of color, but a few tiny leaves make the autumn theme even prettier.
Using Color D, make 6 small leaves.
Leaf Pattern:
Ch 7.
Starting in the second ch from the hook:
- Sl st in the first ch.
- Sc in the next ch.
- Hdc in the next ch.
- Dc in the next ch.
- Hdc in the next ch.
- Work 3 sc in the final ch.
Turn your work and crochet along the opposite side of the foundation chain:
- Hdc in the next ch.
- Dc in the next ch.
- Hdc in the next ch.
- Sc in the next ch.
- Sl st in the final ch.
Fasten off, leaving a sewing tail.
Make six leaves in total.
Part 9: Attach the Decorative Leaves
Arrange the leaves around selected flower motifs.
I recommend placing one leaf near the outer edge of four different squares and saving the remaining two for the upper section of the bag.
Use a tapestry needle to sew each leaf securely.
Avoid placing too many leaves on one side. The goal is to create a natural garden-inspired appearance rather than overcrowd the flowers.
Part 10: Crochet the Drawstring
Using Color D or Color E and the 3.5 mm hook, make a simple crochet cord.
Drawstring Instructions:
Ch 100.
Starting in the second chain from the hook, work 1 sl st into every chain.
Fasten off.
Your finished cord should measure approximately 25–28 inches (63–71 cm), depending on your tension.
Thread the cord through the eyelet round using a safety pin.
Start at the back seam and weave in and out of the eyelets until you return to your starting point.
Tie the ends into a secure bow.
You can also add two small decorative tassels to the ends for a more finished look.
Part 11: Make the Crochet Bag Handle
For this design, I recommend a comfortable shoulder strap made from dense single crochet stitches.
Using Color E and the 4.5 mm hook:
Foundation: Ch 9.
Row 1: Sc in the second ch from the hook and across. (8 sts)
Row 2: Ch 1, turn, sc in every stitch across. (8 sts)
Repeat Row 2 until your strap measures approximately 22 inches (56 cm).
For a slightly firmer strap, work one additional round of sl st along both long edges.
Fasten off, leaving long tails.
The strap should feel sturdy without becoming too thick or stiff.
Part 12: Attach the Handle
Lay your bag flat and identify two opposite points near the upper rim.
Place each strap end approximately 2 inches (5 cm) from the side seam.
Pin the strap in place before sewing.
Using Color E and a tapestry needle, securely sew each end to the inside of the bag.
Reinforce each attachment point by sewing around the edges several times.
If you plan to carry heavier items, add small pieces of cotton fabric behind the handle attachments for extra reinforcement.
Assembly and Finishing
Your Autumn Harvest Floral Bucket Bag is nearly complete!
Before calling it finished, take a few minutes to check the construction.
- Make sure all 12 floral squares are securely joined.
- Check the bottom seam for loose stitches.
- Inspect both handle attachment points.
- Pull the drawstring gently to confirm that it closes smoothly.
- Weave in every remaining yarn end.
- Trim loose fibers carefully.
If you want a more professional finish, consider adding a fabric lining.
A simple cotton lining in cream, rust, or mustard would look beautiful against the floral crochet exterior.
Optional Fabric Lining
Cut a piece of cotton fabric approximately 24 inches wide and 9 inches tall, allowing extra fabric for seams.
Sew the short edges together to create a cylinder.
Cut a circular piece for the bottom, matching the bag’s base measurement and allowing a seam allowance.
Sew the bottom circle to the fabric cylinder.
Fold the upper edge inward by approximately half an inch and hem it.
Insert the lining inside the crochet bag with the wrong side facing the crochet fabric.
Fold the top edge neatly beneath the crochet rim and hand-sew it in place.
Keep your stitches small and avoid pulling the crochet fabric.
A lining helps prevent small belongings from slipping through the crochet stitches and gives the bag a more polished appearance.
Blocking and Care
Blocking helps the floral squares settle into their proper shape and makes the finished bag look much neater.
Wet Blocking
If you have used cotton yarn:
- Fill a basin with cool or lukewarm water.
- Add a small amount of gentle detergent.
- Submerge the bag briefly.
- Gently squeeze out excess water without twisting.
- Roll the bag inside a clean towel.
- Lay it flat on a blocking mat.
- Shape the floral panels and circular base.
- Allow the bag to dry completely.
Avoid hanging the wet bag because its weight can stretch the handle and body.
Care Instructions
- Hand wash whenever possible.
- Use mild detergent.
- Avoid bleach and harsh cleaning products.
- Do not wring or twist the bag.
- Dry flat away from direct sunlight.
- Store in a cool, dry place.
- Remove the contents before storing to help maintain its shape.
If you have added a fabric lining, follow the care instructions for that fabric as well.
Fit and Troubleshooting Tips
Even experienced crocheters sometimes run into little problems. Here are a few things to watch for while making your bag.
1. My Floral Squares Are Different Sizes
This usually happens because of inconsistent tension or different hook sizes.
Check your gauge after completing the first motif.
If the squares are slightly different, block them individually before joining.
2. The Circular Base Is Curling
A curling base usually means there are not enough increases.
Check that you have completed all 10 increase rounds correctly.
If the base still curls, try a slightly larger hook or add another increase round while maintaining the same spacing formula.
3. The Base Looks Wavy
Too many increases can make the base ruffle.
Check your stitch counts carefully.
If your base is significantly larger than the body opening, remove the extra increase round or use a smaller hook.
4. The Bag Looks Too Soft
A loosely crocheted bag may collapse when empty.
Try using a smaller hook for the base and upper rim.
A cotton lining or removable stiff fabric insert can also help maintain the bucket shape.
5. The Handle Stretches
Crochet straps can stretch with regular use.
For a stronger finish, use tightly worked cotton stitches and reinforce both attachment points.
You can also sew a narrow cotton webbing strip along the inside of the strap.
6. The Drawstring Does Not Slide Easily
Check that the eyelet spaces are not too small.
If necessary, use a slightly looser chain space in the eyelet round or make a thinner drawstring cord.
Easy Ways to Customize Your Autumn Harvest Floral Bucket Bag
One of my favorite things about this design is how easily you can change its personality.
Here are a few ideas:
- Rustic Harvest: Combine burnt orange, mustard, chocolate brown, and cream.
- Soft Autumn: Use dusty rose, beige, caramel, and muted olive.
- Golden Garden: Choose sunflower yellow, ivory, sage green, and warm brown.
- Vintage Cottage: Use muted terracotta, faded mustard, and antique cream.
- Winter Version: Replace the warm colors with burgundy, forest green, and oatmeal.
You can also experiment with the strap length. A shorter strap creates a handbag-style finish, while a longer strap gives you a comfortable crossbody option.
If you want a larger bag, increase the number of floral squares around the body and adjust the circular base circumference to match.
Remember that changing the number of motifs also changes the amount of yarn required.
Frequently Asked Questions
1. Is This Autumn Harvest Floral Bucket Bag Suitable for Beginners?
This pattern is best suited to intermediate crocheters because it involves floral motifs, joining techniques, circular shaping, and bag assembly.
However, adventurous beginners who already understand basic stitches can work through it slowly.
2. Can I Use Acrylic Yarn Instead of Cotton?
Yes, acrylic yarn can work, but cotton is my preferred choice for this project because it provides better stitch definition and a firmer finish.
If you use acrylic, choose a sturdy yarn and consider adding a fabric lining.
3. How Many Floral Squares Do I Need?
The standard design uses 12 floral squares arranged in two rows of six.
Each square should measure approximately 4 inches.
4. Can I Make the Bag Without a Lining?
Absolutely! The lining is optional.
However, a lining helps support the shape and prevents smaller belongings from slipping through the stitches.
5. Can I Make the Handle Longer?
Yes. Simply continue repeating Row 2 until you reach your preferred length.
For a crossbody-style bag, you may want a longer strap of approximately 42–48 inches.
Final Thoughts
There is something especially satisfying about turning a collection of colorful crochet flowers into a useful everyday accessory.
I love how the warm rust, mustard, cream, and olive shades work together in this Autumn Harvest Floral Bucket Bag. The floral panels bring a little personality, while the simple bucket construction keeps the design practical and wearable.
Don’t worry if your first few motifs aren’t perfectly identical. Take your time, enjoy the color combinations, and remember that handmade pieces have their own lovely character.
You can experiment with different autumn shades, add extra leaves, or create a completely new floral arrangement using the same construction.
I hope you enjoy making this bag as much as I enjoyed designing it. When yours is finished, share your color combination and finished project with other crochet lovers. I’d love to see how your own autumn-inspired version turns out!
Happy crocheting! 🍂


Leave a Reply
You must be logged in to post a comment.