


I still remember the exact afternoon this design started forming in my head. I was sorting through leftover skeins of a soft lavender cotton blend and kept running my fingers over the yarn, imagining how it would look with deep, twisting cables running up the front. Something structured enough to feel special, yet light enough for warm evenings. A crop top that could be dressed up with a skirt or kept casual with high-waisted jeans.
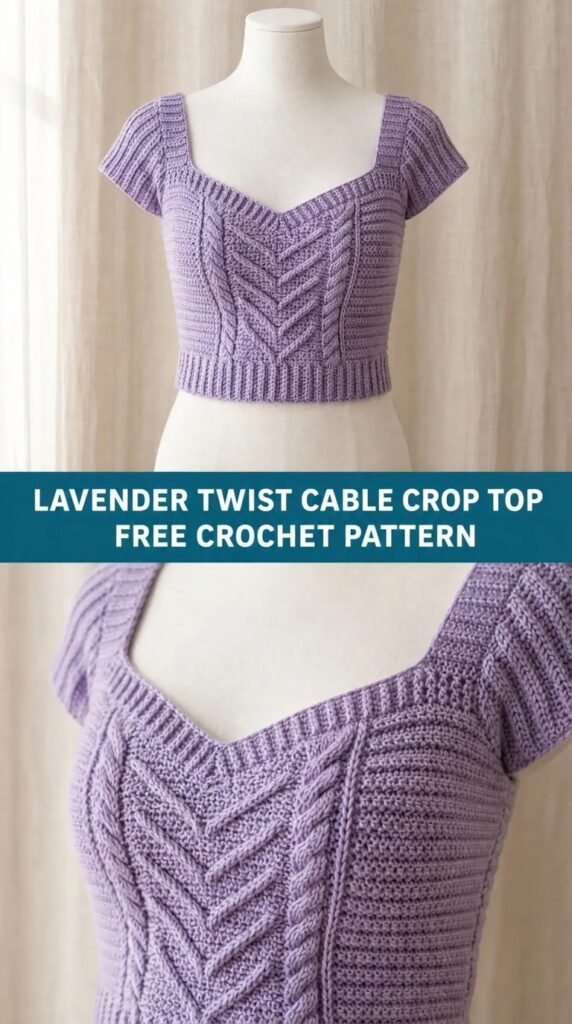
I sketched, frogged, and re-sketched until the cables sat just right against the body. The result is this Lavender Twist Cable Crop Top—an intermediate project that rewards careful counting with beautiful, raised texture and a flattering fit. The twisted cables create a soft, sculptural look that catches the light, while the simple side and back panels keep the overall construction approachable once the cable pattern is established.
About This Pattern
This crop top is worked from the bottom up in separate front and back panels that are seamed at the sides and shoulders. The front features a central panel of twisting cables flanked by smooth stockinette-style single crochet fabric. The back is mostly solid with a simple textured band at the hem for visual balance. Armholes and neckline are shaped with straightforward decreases, then finished with a clean single-crochet edging.
Skill level is intermediate. You should be comfortable reading cable charts or written cable instructions, maintaining consistent tension across textured and smooth sections, and seaming panels neatly. Finished measurements are given for sizes XS through XL, with the crop length hitting roughly at the natural waist or slightly above, depending on your preference. The fabric has moderate drape and gentle stretch from the cables, so it skims the body without clinging tightly.
Materials You’ll Need
Yarn
- Main Color (MC): Approximately 650 (700, 780, 860, 950) yards / 595 (640, 715, 785, 870) meters of DK-weight cotton or cotton-blend yarn in a soft lavender shade.
- Contrast Color (optional, for hem and edging): 80–100 yards / 75–90 meters of the same yarn in a slightly deeper or lighter lavender.
Allow 15% extra for gauge variation and swatching. A smooth, lightly plied cotton or bamboo-cotton blend works especially well for clear cable definition and comfortable wear against the skin.
Hooks
- 4.0 mm (US G/6) for the main fabric
- 3.5 mm (US E/4) for the edging and optional tighter hem
Notions
- Tapestry needle
- Stitch markers (at least 6)
- Cable needle or spare double-pointed needle
- Scissors
- Blocking mats and pins
Abbreviations and Terminology
All instructions use US crochet terminology.
- ch – chain
- sc – single crochet: insert hook, yarn over, pull up loop, yarn over, pull through both loops
- hdc – half double crochet: yarn over, insert hook, yarn over, pull up loop, yarn over, pull through all three loops
- dc – double crochet: yarn over, insert hook, yarn over, pull up loop, yarn over, pull through two loops, yarn over, pull through remaining two loops
- fpdc – front post double crochet: yarn over, insert hook from front to back to front around the post of the indicated stitch, yarn over and complete as a regular dc
- bpdc – back post double crochet: yarn over, insert hook from back to front to back around the post of the indicated stitch, yarn over and complete as a regular dc
- C6F – cable 6 front: slip next 3 stitches onto cable needle and hold in front of work, dc in next 3 stitches, then dc in the 3 stitches from the cable needle
- C6B – cable 6 back: slip next 3 stitches onto cable needle and hold in back of work, dc in next 3 stitches, then dc in the 3 stitches from the cable needle
- sc2tog – single crochet two together: insert hook into next stitch, yarn over, pull up loop, insert hook into following stitch, yarn over, pull up loop, yarn over and pull through all three loops on hook
- st(s) – stitch(es)
- RS – right side
- WS – wrong side
Turning chains do not count as a stitch unless a specific step states that they do. When working post stitches, always work around the post of the stitch from the previous row, not into the top of the stitch.
Gauge
Work a practice swatch in the cable pattern over 24 stitches and 16 rows using the 4.0 mm hook.
After blocking, the central cable panel (the 18-stitch cable section) should measure approximately 3.5 inches / 9 cm wide. The surrounding single-crochet fabric should give you roughly 18 sc and 20 rows = 4 inches / 10 cm.
If your cable panel is narrower than 3.5 inches, try a larger hook. If it is wider, drop down a hook size. Consistent tension is more important than exact row gauge because length is easy to adjust.
Main Pattern Instructions

Sizing Notes
Instructions are written for sizes XS (S, M, L, XL).
Finished bust circumference (after seaming): 30 (34, 38, 42, 46) inches / 76 (86, 97, 107, 117) cm.
Crop length from underarm to hem: approximately 8.5–9.5 inches / 21.5–24 cm, adjustable by adding or removing rows before armhole shaping.
Front Panel
With larger hook and MC, chain 62 (70, 78, 86, 94).
Row 1 (RS): Sc in 2nd ch from hook and in each ch across. Turn.
Count: 61 (69, 77, 85, 93) sc.
Row 2 (WS): Ch 1, sc in each st across. Turn.
Repeat Row 2 until the piece measures 1.5 inches / 4 cm from the beginning, ending with a WS row. Place markers 22 (26, 30, 34, 38) stitches in from each side edge to mark the boundaries of the central cable panel. You will have 17 (17, 17, 17, 17) stitches outside each marker for the side panels, and 27 stitches between the markers for the cable section (the extra stitches allow for the cable width).
Begin Cable Pattern
Row 1 (RS): Ch 1, sc in each st to first marker, slip marker, hdc in next st, dc in next 3 sts, C6F, dc in next 3 sts, C6B, dc in next 3 sts, hdc in next st, slip marker, sc in each remaining st to end. Turn.
Row 2 (WS): Ch 1, sc in each st to first marker, slip marker, hdc in next st, bpdc around next 3 sts, bpdc around next 6 sts, bpdc around next 6 sts, bpdc around next 3 sts, hdc in next st, slip marker, sc in each remaining st to end. Turn.
Row 3: Ch 1, sc in each st to first marker, slip marker, hdc in next st, dc in next 3 sts, C6B, dc in next 3 sts, C6F, dc in next 3 sts, hdc in next st, slip marker, sc in each remaining st to end. Turn.
Row 4: Repeat Row 2.
Rows 5–8: Repeat Rows 1–4 once more.
These eight rows establish the twisting cable sequence. Continue repeating Rows 1–4 for the cable section while working the side panels in plain sc until the piece measures approximately 7 (7.25, 7.5, 7.75, 8) inches / 18 (18.5, 19, 19.5, 20.5) cm from the beginning, ending with a WS row. Adjust length here if you prefer a longer or shorter crop.
Armhole Shaping
Next Row (RS): Ch 1, sc2tog, work in established pattern to last 2 sts, sc2tog. Turn.
Count: 59 (67, 75, 83, 91) sts.
Repeat the decrease row every RS row 3 (4, 5, 6, 7) more times.
Count after final decrease: 53 (59, 65, 71, 77) sts.
Continue even in pattern until armhole measures 6.5 (7, 7.5, 8, 8.5) inches / 16.5 (18, 19, 20.5, 21.5) cm, ending with a WS row.
Neck and Shoulder Shaping
Place markers to separate the center 19 (21, 23, 25, 27) stitches for the neckline. You will work the right and left shoulders separately.
Right Shoulder
Next Row (RS): Work in pattern to the first neck marker. Turn, leaving remaining stitches unworked.
Continue on these stitches only, decreasing 1 stitch at the neck edge every RS row 3 times, then work even until armhole depth matches the desired length. Fasten off.
Left Shoulder
With RS facing, skip the center neck stitches, join yarn at the second neck marker, and work the left shoulder to match the right, decreasing at the neck edge on RS rows. Fasten off.
Back Panel
With larger hook and MC, chain 62 (70, 78, 86, 94).
Row 1 (RS): Sc in 2nd ch from hook and in each ch across. Turn.
Count: 61 (69, 77, 85, 93) sc.
Work in plain single crochet until the piece measures the same length as the Front from the beginning to the start of armhole shaping. For visual interest, you may work a simple textured band for the first 1.5 inches by alternating rows of sc and hdc, then switch to all sc.
Armhole Shaping
Shape the armholes exactly as for the Front, decreasing 1 stitch at each end of every RS row 4 (5, 6, 7, 8) times.
Count after final decrease: 53 (59, 65, 71, 77) sts.
Continue even until the armhole measures the same as the Front, ending with a WS row.
Neck and Shoulder Shaping
Place markers for a slightly wider back neck of 23 (25, 27, 29, 31) stitches. Work the shoulders separately as for the Front, decreasing 1 stitch at each neck edge every RS row 2 times only. Fasten off both shoulders.
Special Techniques
Twisted Cable Panel
The cable sequence (C6F and C6B alternating) creates the characteristic “twist” that runs up the center of the front. Always hold the cable needle firmly and keep the post stitches tall enough so the cable does not pull the fabric in too tightly. If the cables look cramped, try working the post stitches a half-hook size larger than the surrounding fabric.
Post-Stitch Texture on Wrong Side
Working bpdc on the WS rows keeps the cables raised and defined on the RS. Take care not to twist the stitches when inserting the hook around the post.
Assembly and Finishing
Weave in all ends on the WS before seaming.
With RS together, sew the shoulder seams using mattress stitch or a tidy whip stitch, matching the edges carefully so the cable panel sits centered.
Sew the side seams from the hem up to the armhole, leaving the armhole open. Take care to keep the seam neat so it does not pull the side panels out of shape.
Armhole and Neckline Edging
With smaller hook and MC (or Contrast Color if desired), join yarn at the underarm seam. Work one round of single crochet evenly around the entire armhole, placing roughly 3 sc for every 4 rows along the vertical edges and 1 sc in each stitch along the horizontal edges. Join with a slip stitch and fasten off. Repeat for the second armhole.
For the neckline, join yarn at one shoulder seam and work one round of single crochet evenly around the entire neck opening, decreasing 1 or 2 stitches at each corner if needed for a smooth curve. Join and fasten off.
Optional Hem Band
If you prefer a more finished lower edge, pick up stitches evenly around the bottom hem with the smaller hook and work 3–4 rounds of single crochet, or a simple rib of alternating fpdc and bpdc for a slight elastic effect.
Blocking and Care
Wet-block the finished top by soaking it briefly in lukewarm water with a mild wool wash or gentle detergent. Gently squeeze out excess water (do not wring). Lay the piece flat on blocking mats, pin the side seams and armholes to the finished measurements, and allow to dry completely. The cables will open and the fabric will relax into a soft, even drape.

Care: Hand wash in cool water and lay flat to dry. Never hang the top when wet, as the weight of the cables can stretch the shoulders. Store folded rather than on a hanger for long-term shape retention.
Fit and Troubleshooting Tips
- If the cable panel cups or pulls inward, your post stitches may be too tight. Try a slightly larger hook for the cable section only, or work the post stitches more loosely.
- If the sides flare or the fabric looks loose next to the cables, check that your single-crochet tension matches the cable tension. A few extra rows of sc at the hem can also help balance the look.
- For a longer crop, simply add more pattern rows before beginning the armhole decreases. For a shorter version, begin the armhole shaping earlier.
- If the neckline feels too wide after seaming, add a second round of single crochet or a round of slip stitches to firm it up.
- Heavy cables can sometimes stretch over time with wear. Blocking firmly and choosing a yarn with good recovery (cotton with a touch of acrylic or nylon) helps maintain the shape.
FAQ’s
Can a confident beginner make this pattern?
This is written as an intermediate project mainly because of the cables and the need for consistent tension between textured and smooth fabric. If you already know how to work front and back post stitches and are comfortable following multi-step row instructions, you can manage it. I recommend practicing the cable sequence on a small swatch before starting the actual top.
What yarn substitutes work well?
Any smooth DK-weight yarn with good stitch definition will work. Cotton, cotton-bamboo, or a cotton-acrylic blend are ideal for warm-weather wear and clear cables. Avoid very fuzzy or highly textured yarns, as they will hide the twists. If you want to use worsted weight, go up a hook size and expect a slightly larger finished garment—recheck gauge carefully.
How do I adjust the length of the crop top?
The easiest place to change length is before the armhole shaping begins. Add or remove full pattern repeats (the 4-row cable sequence) until you reach your preferred measurement from the hem to the underarm. Keep notes so both front and back match.
Can I add sleeves?
Yes. After seaming the shoulders and sides, you can pick up stitches around the armhole and work short sleeves in plain single crochet or a simple rib. Start with a few decrease rounds if you want a tapered sleeve, then work even to the desired length and finish with the same single-crochet edging used on the neckline.
Why do my cables look tight or the fabric puckers?
This usually means the post stitches are worked more tightly than the surrounding single crochet. Try relaxing your tension on the fpdc and bpdc, or switch to a half-size larger hook just for the cable stitches. Blocking will also open the cables and even out the fabric.
Is it possible to work this top in the round or seamless?
The current version is designed in two panels for clearer cable placement and easier shaping. A seamless version would require recalculating the cable placement across the front only and working the back in plain fabric while joining at the sides as you go. It is doable but more advanced; the seamed method is more straightforward for most makers.
How much yarn will I need if I make a longer version or add sleeves?
For every additional 2 inches of body length, plan on roughly 60–80 extra yards of the main color, depending on size. Short sleeves typically add 100–150 yards total. Always buy an extra skein if you are unsure—leftover yarn is useful for matching accessories.
Can I make this in multiple colors?
Absolutely. You could work the cable panel in a contrasting shade or stripe the side panels. Just carry the unused yarn up the side or cut and rejoin cleanly at color changes. The optional contrast color for the hem and edging already gives a nice polished finish if you prefer only a subtle accent.
Final Thoughts
There is something quietly satisfying about watching those twisted cables climb the front of this top as the rows accumulate. The finished piece has a soft structure that feels both polished and comfortable—the kind of garment you reach for when you want a little texture and a lot of wearability.
I hope your Lavender Twist Cable Crop Top turns out even prettier than you imagined. Take a photo when you finish, share it with fellow makers, and enjoy every wear. Happy crocheting.



Leave a Reply
You must be logged in to post a comment.