

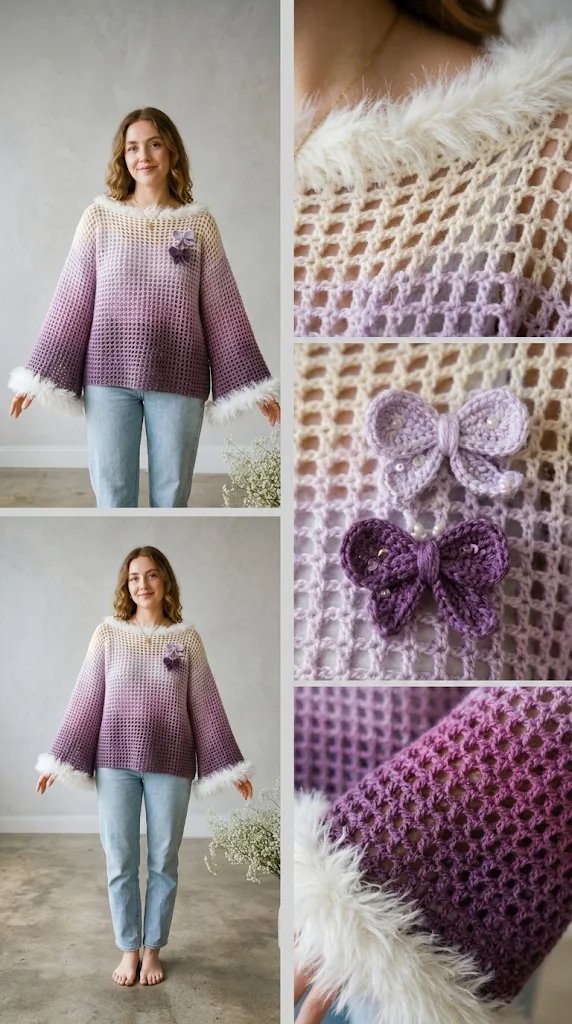
There is something especially lovely about soft purple shades in handmade clothing. Lavender, lilac, and deeper purple create a gentle color combination that feels romantic, cozy, and easy to wear. I wanted to bring those shades together in a sweater that would feel comfortable enough for everyday outfits while still having a beautiful handmade appearance.
For this design, I chose a gradual color transition rather than sharp stripes. The lighter lavender begins near the neckline, blends into delicate lilac through the body, and finishes with a richer purple shade. The result is a soft gradient that makes the sweater look interesting without needing complicated colorwork.
This Lavender Lilac Purple Gradient Sweater Free Crochet Pattern features a relaxed fit, comfortable ribbed edges, long sleeves, and a simple textured stitch pattern. It is a satisfying project if you enjoy making wearable crochet pieces.
About This Pattern
This sweater is worked in separate front and back panels, with sleeves crocheted individually and sewn into the armholes. The neckline is shaped with a gentle opening, and ribbed bands finish the neckline, cuffs, and bottom hem.
The pattern uses half double crochet stitches combined with alternating front-loop rows to create a subtle texture.
- Skill Level: Intermediate
- Construction: Flat panels with seamed shoulders and sides.
- Fit: Relaxed, slightly oversized fit.
- Sizes: XS, S, M, L, XL, and 2XL.
Finished Bust Measurements
| Size | Bust |
| XS | 34 in |
| S | 38 in |
| M | 42 in |
| L | 46 in |
| XL | 50 in |
| 2XL | 54 in |
Choose a size approximately 4–6 inches larger than your actual bust measurement for a comfortable fit.
Materials You’ll Need
Yarn
Choose a soft worsted-weight (Category 4) yarn with good stitch definition and comfortable drape.
- Color A – Soft Lavender: Approximately 450 (500, 550, 600, 650, 700) yards.
- Color B – Light Lilac: Approximately 350 (400, 450, 500, 550, 600) yards.
- Color C – Medium Lilac: Approximately 300 (350, 400, 450, 500, 550) yards.
- Color D – Deep Purple: Approximately 250 (300, 350, 400, 450, 500) yards.
Allow 15% extra yarn if your gauge varies or you prefer longer sleeves.
Crochet Hooks
- 5.0 mm (H/8) crochet hook for the main sweater.
- 4.5 mm (7) crochet hook for ribbing.
Additional Supplies
- Tapestry needle.
- Stitch markers.
- Measuring tape.
- Scissors.
- Blocking mats and rustproof pins.
Abbreviations and Terminology
All instructions use US crochet terminology.
- ch: Chain stitch. Yarn over and pull through the loop.
- sl st: Slip stitch. Insert hook, yarn over, and pull through both loops.
- sc: Single crochet. Insert hook, yarn over, pull up a loop, yarn over, and pull through both loops.
- hdc: Half double crochet. Yarn over, insert hook, pull up a loop, yarn over, and pull through all three loops.
- BLO: Back loop only. Work into the back loop of the stitch.
- FLO: Front loop only. Work into the front loop of the stitch.
- st/sts: Stitch/stitches.
- rep: Repeat.
- RS: Right side.
- WS: Wrong side.
- FO: Fasten off.
Important: Turning chains do not count as stitches unless specifically stated.
Gauge
Using the 5.0 mm hook:
- 14 hdc stitches = 4 inches.
- 11 rows = 4 inches.
Make a 6-inch practice swatch using the main stitch pattern. Measure the center 4 inches after lightly blocking it.
If you have more stitches than required, use a larger hook. If you have fewer stitches, try a smaller hook.
Correct gauge is important because it determines the finished bust measurements and sleeve width.
Main Pattern Instructions

1. Back Panel
The back panel is worked from the bottom upward.
With Color D and the 5.0 mm hook, chain:
- XS: 60
- S: 67
- M: 74
- L: 81
- XL: 88
- 2XL: 95
Row 1: Hdc in the second chain from hook and in each remaining chain. Turn.
Row 2: Ch 1, hdc in each stitch across. Turn.
Row 3: Ch 1, hdc in BLO across. Turn.
Row 4: Ch 1, hdc across. Turn.
Repeat Rows 3–4 to create the textured fabric.
Creating the Gradient
Work the lower portion in deep purple, gradually changing to lighter shades.
- Lower 3 inches: Color D.
- Next 4 inches: Color C.
- Next 4 inches: Color B.
- Upper portion: Color A.
For a softer transition, alternate the old and new colors over two rows when changing shades. Carry the unused yarn loosely along the edge only if it will be concealed in the seam; otherwise, cut and rejoin.
Continue until the panel measures approximately 22 (23, 24, 25, 26, 27) inches from the bottom edge.
Count: Keep the original stitch count throughout the back panel.
Fasten off.
2. Front Panel
Work the front panel exactly like the back panel until it measures approximately 17 (18, 19, 20, 21, 22) inches.
Now shape the neckline.
Next Row: Work across the first 20 (23, 25, 28, 30, 33) stitches. Fasten off.
Skip the center 20 (21, 24, 25, 28, 29) stitches.
Join yarn to the remaining stitches and work across the second shoulder section.
Shoulder Shaping
Continue working each shoulder separately until the front panel reaches the same length as the back panel.
Maintain the gradient sequence so the front and back color transitions align when assembled.
Fasten off both shoulder sections.
3. Sleeves
Make two identical sleeves.
Using Color D and the 5.0 mm hook, chain:
- XS: 34
- S: 36
- M: 38
- L: 40
- XL: 42
- 2XL: 44
Row 1: Hdc in the second chain from hook and across. Turn.
Row 2: Ch 1, hdc across. Turn.
Row 3: Ch 1, hdc in BLO across. Turn.
Continue repeating Rows 2–3.
Sleeve Increases
To create a comfortable sleeve shape, increase one stitch at each end every 6th row.
Increase Row: Ch 1, 2 hdc in first stitch, hdc across until the final stitch, 2 hdc in final stitch. Turn.
Repeat the increase every sixth row until the sleeve reaches:
- XS: 48 stitches.
- S: 52 stitches.
- M: 56 stitches.
- L: 60 stitches.
- XL: 64 stitches.
- 2XL: 68 stitches.
Continue without increasing until the sleeve measures approximately 17 (17.5, 18, 18.5, 19, 19.5) inches.
Change colors following the same gradient arrangement as the body, keeping the deeper purple near the cuffs and lighter lavender toward the shoulders.
Fasten off.
Make the second sleeve.
4. Ribbed Bottom Hem
Join Color D to the bottom edge of the assembled sweater body.
Using the 4.5 mm hook:
Row 1: Ch 1, sc evenly along the bottom edge. Join with sl st.
Row 2: Ch 7, sc in second chain from hook and across the next 5 chains, sl st into the next two body stitches. Turn.
Row 3: Skip the two slip stitches, sc in BLO across the six ribbing stitches. Turn.
Row 4: Ch 1, sc in BLO across, sl st into the next two body stitches. Turn.
Repeat Rows 3–4 around the bottom edge.
Join the first and last ribbing rows with slip stitches through the back loops.
The ribbed band should sit comfortably against the waist without pulling the sweater inward.
5. Sleeve Cuffs
Join Color D around the lower edge of each sleeve.
Using the 4.5 mm hook, work the same ribbing technique used for the bottom hem.
Work 7 chains for the ribbing foundation and repeat the ribbing rows around the cuff.
Keep the tension consistent so both cuffs have the same width.
6. Neckline Ribbing
Join Color A around the neckline.
Using the 4.5 mm hook:
Round 1: Ch 1, sc evenly around the neckline. Join with sl st.
Round 2: Ch 1, sc in each stitch around. Join.
For a simple finished edge, repeat Round 2 once more.
Fasten off and weave in the yarn ends.
7. Assembly and Finishing
Lay the front and back panels together with right sides facing inward.
Shoulder Seams
Use a tapestry needle and matching yarn to sew the shoulder seams.
Leave the center neckline opening unsewn.
Side Seams
Starting at the bottom hem, sew both side seams upward.
Stop at the point where you want the armholes to begin. Keep both sides equal.
For a relaxed sweater, leave approximately 7–8 inches open for the armholes, adjusting according to your size and sleeve width.
Attaching the Sleeves
Fold each sleeve in half lengthwise and mark the center of its upper edge.
Match the sleeve center with the shoulder seam.
Pin the sleeve evenly around the armhole and sew it into place using small, secure stitches.
Repeat with the second sleeve.
Turn the sweater right side out and check that both sleeves sit evenly.
8. Blocking and Care
Blocking helps the stitches relax and gives the sweater a more professional finish.
If you used acrylic yarn, check the yarn label before applying steam. Avoid pressing a hot iron directly against the fabric because excessive heat can permanently damage acrylic fibers.
For cotton or suitable wool blends:
- Soak the finished sweater in cool or lukewarm water.
- Gently press out excess water without twisting.
- Roll the sweater in a clean towel.
- Lay it flat on blocking mats.
- Adjust the sleeves, neckline, and body edges.
- Allow it to dry completely.
Care Instructions
- Hand wash gently in cool water.
- Use mild detergent.
- Do not wring or twist.
- Dry flat.
- Avoid hanging the sweater while wet.
- Store folded to protect its shape.
9. Fit and Troubleshooting Tips
My sweater looks too wide.
Check your stitch gauge. If you have too few stitches per 4 inches, your hook may be too large. Adjust the hook before continuing.
The fabric feels stiff.
Try a larger hook or a softer yarn with better drape. Crochet fabric should feel comfortable rather than rigid.
My gradient looks uneven.
Plan your color transitions before beginning. Use similar amounts of fabric for each color section and change shades at consistent row intervals.
The sleeves are too tight.
Add extra increase rows, spacing them evenly along the sleeve length.
The neckline stretches too much.
Use a smaller hook for the neckline edging and avoid making the border too loose.
The seams look bulky.
Use a mattress stitch or a neat whip stitch with matching yarn. Avoid pulling the sewing yarn too tightly.
10. Final Thoughts
I love how the lavender, lilac, and deep purple shades work together in this sweater. The gradual gradient creates a soft, dreamy appearance, while the textured stitches and ribbed details keep the design practical and comfortable.
This Lavender Lilac Purple Gradient Sweater Free Crochet Pattern is a lovely project for anyone who enjoys making handmade clothing with beautiful color combinations.
Take your time with the gradient changes, check your measurements as you work, and remember that neat finishing makes a wonderful difference.
I’d love to see your finished sweater! Share your creation, experiment with your favorite shades of purple, and enjoy every stitch of your handmade wardrobe. 💜


Leave a Reply
You must be logged in to post a comment.