


The Cream Lace Wedding Bow Purse is romantic on purpose. Soft shells, an oversized bow, a pearl-trimmed handle, and a layered flower turn a simple bucket shape into something wedding-worthy. The pattern itself is clear. What separates a good version from a truly elegant one is how you handle the lace texture, the firmness of the base, and the final bridal details.
These tips are written for intermediate crocheters who already know how to follow the pattern and now want the finished purse to look polished and intentional.
Yarn Choice Changes Everything for Lace
Lace shells only look delicate when the yarn has clean stitch definition. Fuzzy or highly textured yarns hide the shell structure. Smooth sport or DK cotton, cotton-bamboo, or mercerized cotton works best.
Scheepjes Catona held double, Paintbox Cotton DK, and Hobbii Rainbow Cotton 8/6 all produce a firm, slightly crisp fabric that shows every double crochet in the shells. Avoid acrylic if you can. It stretches more and softens the lace effect over time. If you must use acrylic, choose a tightly spun one and go down a hook size.
Cream or ivory is the classic bridal choice, but the same pattern works in soft blush, pale gold, or even black for a dramatic evening look. Just keep the yarn smooth so the lace remains the star.

Gauge and the Base Decide the Shape
The base must stay flat. If it cups upward, the whole purse will sit unevenly. Work the first twelve rounds carefully and measure after Round 12. You want roughly 6 to 6.25 inches across. Too tight? Go up a hook size for the base only. Too loose? Drop a size.
Working Round 13 in the back loop only creates a clean ridge where the base meets the body. That ridge helps the purse stand and gives the lace body a neat starting edge. Do not skip it.
Getting Even, Dimensional Lace Shells
The alternating shell pattern is simple once the rhythm clicks: single crochet in the center of the previous shell, then a new shell in the single crochet. Keep your tension consistent. Loose shells flare outward and make the body look ruffled. Tight shells pull the fabric in and flatten the lace.
If your shells start looking uneven, pause and check that you are always placing the single crochet in the exact center double crochet of the shell below. Count the sixteen shell repeats every few rounds so you do not accidentally gain or lose stitches.
Steam blocking after the body is finished opens the shells without flattening them. Shape the purse over a bowl or small form so the base stays flat and the sides curve gently. Do not press the shells hard—you want them to keep their dimensional fan shape.
Drawstrings, Handle, and the Eyelet Band
The eyelet band (Rounds 30–32) must sit evenly. Thread the two drawstrings in opposite directions so the purse closes from both sides at once. Uneven threading makes one side gather more than the other.
The padded handle is what gives the purse its formal look. Wrap the crocheted strip firmly around a thin cord and sew the long edges closed with a tight whipstitch. Sew the ends securely to the inside of the top rim at the side seams. If you add pearls along the outer ridge, space them evenly and use a fine beading thread so the pearls sit flat and do not wobble.
The Bow and Flower Need Structure Too
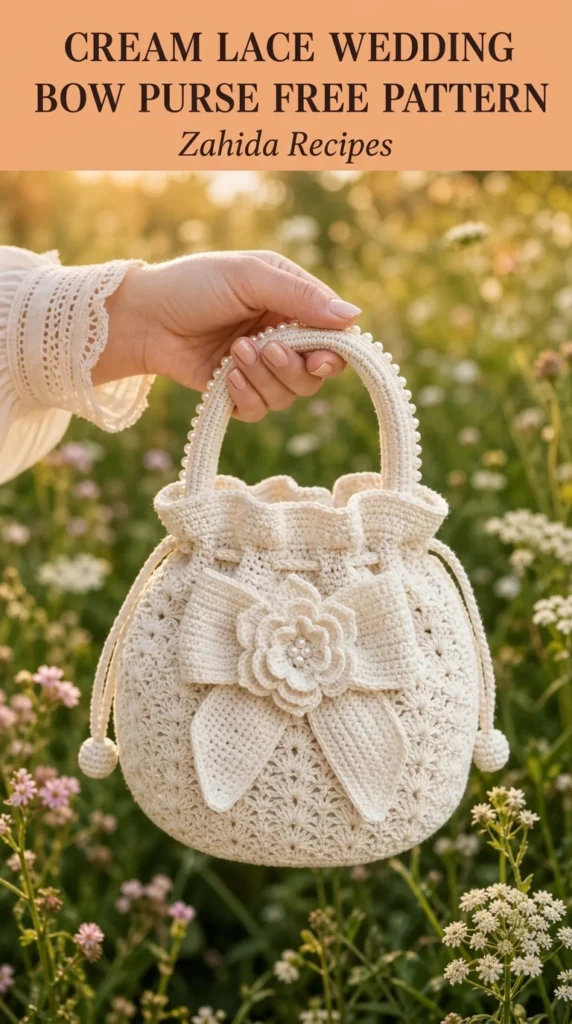
An oversized bow looks romantic only when it holds its shape. Cinch the center of the rectangle tightly and wrap the band several times. If the bow still feels soft, slip a small piece of felt or stiffened fabric behind it before sewing it to the purse. That tiny bit of support keeps the loops from drooping.
The layered flower benefits from the same care. Work the second petal layer behind the first so the petals stack rather than sit flat. A few pearls in the center add sparkle without overwhelming the lace. Sew the flower firmly to the bow center so nothing shifts when the purse is carried.
Bridal Finishing Details That Elevate the Piece
- Lightly steam the entire purse before adding embellishments.
- Weave ends thoroughly on the wrong side and split the tails through nearby stitches so they cannot work free.
- If you line the purse, gather a simple fabric pouch and hand-stitch it just below the eyelet band. The lining hides ends and protects the inside from makeup or jewelry.
- A small magnetic snap under the bow keeps the top closed without visible hardware.
- Spot-clean only. Full immersion can distort the lace and loosen the pearls.
These steps take a little extra time but turn the finished purse into something that feels special enough for a wedding, bridal shower, or formal event.
Common Problems and Fast Fixes
- Base cups → looser tension or larger hook on the increase rounds.
- Body flares too much → tighter tension or smaller hook on the lace rounds.
- Bow droops → add a felt backing or cinch the center more aggressively.
- Handle stretches → use a firm inner cord and sew the ends through multiple layers.
- Pearls sit crookedly → use beading thread and secure each pearl with a double knot on the wrong side.
Related Articles:
- Rainbow Pastel Snake Plant Amigurumi Free Crochet Pattern
- Cozy Tan Kitty Face Tote Bag Free Crochet Pattern
- Warm Mustard Yellow Crochet Backpack Free Pattern
Final Checklist Before You Gift or Carry It
- Base is flat and measures correctly.
- Lace shells are even and dimensional after blocking.
- Drawstrings close the top evenly.
- Handle is padded, secure, and optionally pearl-trimmed.
- Bow holds its shape and sits centered.
- Flower is firmly attached.
- All ends are invisible.
The free Cream Lace Wedding Bow Purse pattern already gives you a beautiful structure. These finishing choices make the difference between a pretty project and a polished bridal accessory. Take the extra care on the lace, the firmness, and the final details—you will see it the moment the purse is finished.
If you make one, try the same techniques on the next formal bag you design. The habits transfer.


Leave a Reply
You must be logged in to post a comment.