


I still remember the afternoon the idea for this dress arrived. I was sorting through a box of vintage lace doilies my grandmother left me when a shaft of late-autumn light caught one particularly fine piece. The openwork looked almost like frost on a window, delicate yet strong. I held it up against the light and thought, What if this could move with a body? What if it could become a dress a bride might actually wear?
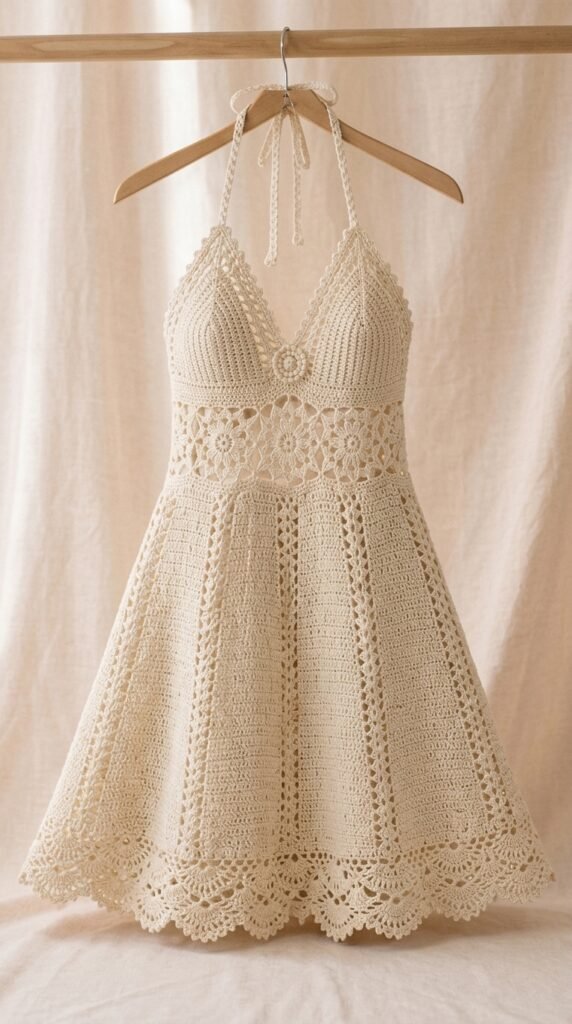
That thought stayed with me for weeks. I sketched, frogged, and reworked until the fabric began to feel right—soft enough to drape, structured enough to hold a clean silhouette, and open enough to feel romantic without being fragile. The result is this ivory lace wedding halter dress. It has a fitted bodice that skims the body, a gently flared skirt that moves beautifully, and a simple magician-style halter neckline that leaves the shoulders bare. The lace is worked in a repeating fan-and-mesh motif that creates soft scallops along the hem and a quiet shimmer when the light hits it.

I designed it for the bride who wants something handmade and meaningful, or for anyone who simply loves the quiet elegance of lace. The pattern is intermediate, with a few advanced moments, but every step is written clearly so you never feel lost.
About This Pattern
This dress is worked in one piece from the top down. The bodice begins at the halter neckline and expands with gentle increases to the underbust. From there the fabric continues in a continuous lace pattern that gradually widens into the skirt. There is no seaming except for the short side joins at the underarm and the final joining of the halter ties.
The finished dress has a fitted upper body and a softly A-line skirt that falls to approximately mid-calf on most wearers. The openwork creates a light, airy fabric with excellent drape. Because the lace is open, the dress is best worn with a simple slip or underdress in a matching or complementary color.
Skill level: Intermediate to advanced. You should be comfortable with working in the round, reading lace charts or written lace instructions, and managing stitch counts in an expanding fabric.
Finished sizes (bust measurement of finished garment):
XS/S: 32–34 in (81–86 cm)
M/L: 36–38 in (91–97 cm)
XL/2X: 40–44 in (102–112 cm)
Length from underarm to hem: approximately 34–36 in (86–91 cm), adjustable.
The sample was made in size M/L with a soft ivory lace-weight yarn that gives beautiful stitch definition and a gentle sheen.
Materials You’ll Need
Yarn
Color A (main color – ivory or soft white): approximately 1,800–2,400 yards (1,650–2,200 m) of lace-weight yarn (Category 0).
Sample used a merino-silk blend that blocked beautifully and held the lace open without stiffness.
Allow 15 % extra for gauge variation and swatching.
Hooks
- 2.75 mm (C/2) for the main lace fabric
- 2.25 mm (B/1) for the neckline and lower edge reinforcement (optional but recommended)
Notions
- Stitch markers (at least 8)
- Tapestry needle
- Blocking wires or long pins
- Measuring tape
- Optional: matching sewing thread and fine needle for securing ends more permanently
Abbreviations and Terminology (US Terms)
- ch – chain
- sc – single crochet (insert hook, yarn over, pull up loop, yarn over, pull through both loops)
- hdc – half double crochet (yarn over, insert hook, yarn over, pull up loop, yarn over, pull through all three loops)
- dc – double crochet (yarn over, insert hook, yarn over, pull up loop, yarn over, pull through two loops, yarn over, pull through remaining two loops)
- tr – treble crochet (yarn over twice, insert hook, yarn over, pull up loop, [yarn over, pull through two loops] three times)
- sl st – slip stitch
- sp – space
- sk – skip
- rep – repeat
- beg – beginning
- RS – right side
- WS – wrong side
Special stitches:
- Fan – (dc, ch 1) four times, dc in same stitch or space
- Mesh – ch 3, sk 2 sts, sc in next st
- Picot – ch 3, sl st in first ch
Turning chains do not count as a stitch unless a step explicitly says they do. When working into a chain space, work into the space itself, not into the individual chains, unless directed otherwise.
Gauge
Work a gauge swatch in the main lace pattern (see Main Pattern Instructions, Rows 1–8 of the skirt section).
After blocking, 4 full fan-and-mesh repeats should measure approximately 4 in (10 cm) wide and 3 in (7.5 cm) tall.
If your swatch is smaller, go up a hook size. If larger, go down a hook size. Lace fabric can change significantly after blocking, so always block your swatch the same way you plan to block the finished dress.
Main Pattern Instructions

Halter Neckband and Upper Bodice
With 2.75 mm hook and Color A, ch 12.
Row 1 (RS): Sc in 2nd ch from hook and in each ch across. (11 sc) Turn.
Row 2: Ch 1, sc in each st across. Turn.
Rep Row 2 until the band measures 14 in (35.5 cm) for sizes XS/S, 15 in (38 cm) for M/L, or 16.5 in (42 cm) for XL/2X. Do not fasten off.
Place a marker in the center stitch of the final row. This marker indicates the center back of the neck.
Shaping the Bodice Front
You will now work increases to form the upper chest and underarm areas.
Row 1: Ch 1, sc in first 5 sts, 2 sc in next st, sc in next st (center), 2 sc in next st, sc in remaining 5 sts. Turn. (13 sc)
Row 2: Ch 1, sc in each st across. Turn.
Row 3: Ch 1, sc in first 5 sts, 2 sc in next st, sc in next 3 sts, 2 sc in next st, sc in remaining 5 sts. Turn. (15 sc)
Row 4: Ch 1, sc in each st across. Turn.
Continue in this manner, increasing one stitch on each side of the center every RS row, until you have 31 (35, 41) stitches for sizes XS/S (M/L, XL/2X). Work even for 2 more rows after the final increase row.
Transition to Lace Pattern
Setup Row (RS): Ch 3 (counts as dc), dc in next st, *ch 2, sk 2 sts, dc in next st; rep from * across, ending with dc in last st. Turn.
You now begin the lace motif that continues through the rest of the dress.
Lace Row 1 (WS): Ch 1, sc in first dc, *ch 3, sk next ch-2 sp, sc in next dc; rep from * across, ending with sc in top of turning ch. Turn.
Lace Row 2 (RS): Ch 3, *Fan in next ch-3 sp, ch 1, sc in next sc, ch 1; rep from * across, ending with Fan in last ch-3 sp, dc in last sc. Turn.
Lace Row 3: Ch 1, sc in first dc, *ch 3, sk next Fan, sc in next sc; rep from * across, ending with sc in top of turning ch. Turn.
Lace Row 4: Ch 3, *Fan in next ch-3 sp, ch 1, sc in next sc, ch 1; rep from * across, ending with Fan in last ch-3 sp, dc in last sc. Turn.
Rep Lace Rows 3–4 until the bodice measures approximately 7.5 in (19 cm) from the start of the lace for size XS/S, 8 in (20.5 cm) for M/L, or 8.5 in (21.5 cm) for XL/2X, ending after a Lace Row 4.
Underarm Opening and Skirt Transition
At this point the fabric is still worked flat. You will now create the underarm openings and join the work into the round for the skirt.
Underarm Setup (RS): Work across in established lace pattern until you reach the last Fan before the side edge. Ch 12 (14, 16) for underarm, sk the remaining stitches of the front, and join with a sl st to the corresponding point on the other side of the bodice (you will temporarily leave the back stitches free). Fasten off temporarily.
Rejoin yarn at the center back neck and work the back bodice in the same lace pattern for the same number of rows as the front, ending at the underarm points. When both front and back underarm edges are ready, join the work into the round by working across the underarm chains in the lace pattern, then continue around.
You should now have a continuous circle of lace ready for the skirt. Place a marker at each underarm join and at the center front and center back.
Skirt
The skirt continues in the same fan-and-mesh lace, with gradual increases worked every 6th–8th round to create a gentle A-line flare.
Round 1: Working in the established lace pattern, work one full Fan in every ch-3 space and maintain the mesh spaces between Fans. Join with sl st to beginning, turn if desired (or work in continuous rounds without turning for a smoother fabric).
Increase Round (every 6th or 8th round): In two evenly spaced locations (usually near the side seams), work an extra Fan by placing two Fans in the same ch-3 space, or by adding an extra mesh-and-Fan unit. Move the increase points slightly each time so the flare remains balanced.
Continue in pattern, working Increase Rounds as needed, until the skirt measures approximately 28–30 in (71–76 cm) from the underarm, or until the desired length is reached. End after a Fan round.
Lower Edge
Edging Round 1: Ch 1, sc in each dc and each ch-1 space around, working 2 sc in the center of each Fan if needed to keep the edge smooth. Join.
Edging Round 2: Ch 1, *sc in next 3 sts, picot; rep from * around. Join and fasten off.
Halter Ties
With 2.25 mm or 2.75 mm hook, join yarn at one end of the neckband. Ch 80–100 (depending on desired length and size). Work 1 row of sc back along the chain. Fasten off. Repeat for the other side.
Alternatively, make two simple I-cord or twisted cords of the desired length and attach them securely to the ends of the neckband.
Special Techniques
Blocking the Lace
Lace fabric only reveals its true beauty after blocking. Pin the dress to shape on a large blocking board or clean carpet, stretching the Fans open so the mesh spaces are even. Use blocking wires along the lower edge if possible for a smooth hem. Spray or wet-block thoroughly and allow to dry completely before removing pins.
Working into Chain Spaces
Always insert the hook under the entire chain space rather than into individual chains unless the pattern specifically instructs otherwise. This keeps the fabric consistent.
Assembly and Finishing
Because the dress is worked mostly in one piece, assembly is minimal.
- Weave in all ends carefully on the wrong side, following the path of the stitches so they disappear into the lace.
- Secure the underarm joins with a few extra stitches if needed for strength.
- Attach the <PRIVATE_DATE>haler ties firmly.
- Try the dress on with the intended undergarment and check the fit. The lace has some natural give; if the bodice feels slightly loose, a simple running stitch along the underbust line (worked on the wrong side) can take in a small amount without showing on the right side.
Blocking and Care
Wet-block the finished dress as described above. After the first blocking, the fabric will hold its shape well.
Care instructions:
Hand wash gently in cool water with a mild wool wash. Do not wring or twist. Roll in a towel to remove excess water, then lay flat to dry on a clean towel or blocking board. Never hang the wet dress, as the weight of the water can stretch the lace permanently. Store folded or rolled rather than hung for long periods.
Fit and Troubleshooting Tips
- If the bodice cups or pulls, you may need a larger size or a few extra increase rows before beginning the lace.
- If the skirt flares too quickly, reduce the frequency of Increase Rounds.
- If the lace looks tight or closed after the first few rows, check your tension and consider going up a hook size for the lace sections only.
- Heavy beading or additional embellishment can weigh the fabric down; test a small section first.
- For a more modest neckline, lengthen the neckband slightly before beginning the bodice increases.
FAQ’s
Can I use a different weight of yarn?
This pattern is designed for lace-weight yarn. Using a heavier yarn (fingering or sport) will produce a denser, less delicate fabric and will require significant adjustments to stitch counts and overall sizing. If you want to experiment, make a full gauge swatch and recalculate the number of repeats needed for your measurements.
How long does this dress take to make?
Most intermediate crocheters report 40–70 hours depending on size, speed, and how often they frog. The lace sections move quickly once the rhythm is established, but the bodice shaping and careful counting take focused time.
Do I need to wear a slip or underdress?
Yes. The open lace is intentionally sheer. A simple bias-cut slip in ivory, champagne, or a soft blush works beautifully. Some makers line only the bodice and leave the skirt sheer for a more dramatic effect.
Can I make the dress longer or shorter?
Absolutely. Simply continue or stop the skirt rounds until you reach the desired length. Keep the same increase frequency so the flare remains balanced. For a floor-length version, plan on an extra 400–600 yards of yarn.
Is this pattern suitable for a beginner?
It is best suited to intermediate crocheters who are already comfortable with lace, working in the round, and tracking stitch counts. Absolute beginners may find the expanding lace and underarm joins frustrating. If you are new to lace, practice the fan-and-mesh motif on a large swatch first.
What if my stitch count is off after an Increase Round?
Count the Fans rather than individual stitches. Each full Fan-and-mesh unit should remain consistent. If you are short or over by a few stitches, adjust by adding or removing a single chain space in a discreet location (usually near a side seam) on the next round.
Can I add beads or embroidery?
Yes. Many makers add small seed beads to the center of each Fan or along the picot edge. Work the beads in as you go, or sew them on after blocking. Keep the added weight light so the lace still drapes well.
How should I store the finished dress?
After the wedding or special occasion, clean it according to the care instructions, block it once more if needed, and store it folded in acid-free tissue inside a breathable cotton bag or archival box. Avoid hanging it long-term, as the lace can stretch under its own weight.
You Might Also Like
- Cherry Blossom Spring Dress Free Crochet Pattern
- Buttercream Wildflower Crochet Dress Free Crochet Pattern
- Rainbow Garden Festival Crochet Dress Free Crochet Pattern
- Blush Ombre Camellia Crochet Dress Free Crochet Pattern
Final Thoughts
There is something deeply satisfying about wearing a garment that began as a single strand of yarn and became something that moves with you. This ivory lace wedding halter dress is meant to feel personal—whether you make it for a wedding day, a special anniversary, or simply because you fell in love with the lace.
I hope the stitches bring you the same quiet pleasure they brought me while I designed it. When you finish, I would love to see how yours turned out. Share a photo in the comments or tag your project so others can admire the lace you created.
Happy crocheting, and may your finished dress feel as lovely as the idea that first sparked it.





Leave a Reply
You must be logged in to post a comment.