

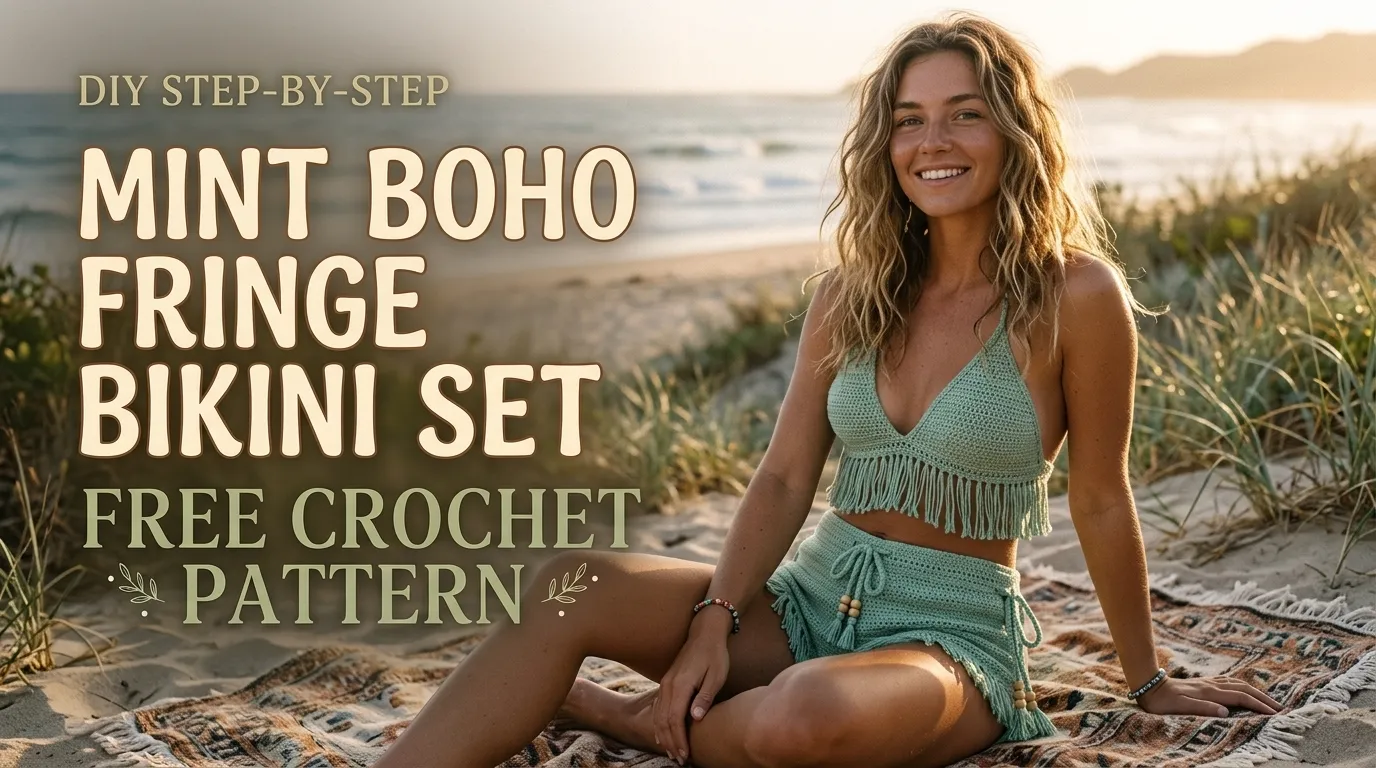
There is something about soft mint yarn that instantly makes me think of sunny beaches, warm afternoons, and those carefree summer days when you don’t need much more than a cute outfit and a little sunshine.
I wanted to create a crochet bikini set that felt playful without looking overly complicated. Something with a handmade bohemian personality, pretty texture, and just enough fringe to make it stand out.
The result is this Mint Boho Fringe Bikini Set Free Crochet Pattern. It features a triangle-style bikini top, adjustable neck and back ties, matching side-tie bottoms, and delicate fringe that gives the entire set a relaxed festival-inspired look.
This pattern is especially lovely for confident crocheters who enjoy shaping, working small details, and creating wearable handmade pieces.

About This Mint Boho Fringe Bikini Pattern
This bikini set includes two separate pieces: a triangle bikini top and matching crochet bikini bottoms.
The top is worked as two individual triangular cups. Each cup begins at the lower point and gradually increases toward the upper edge. Once both cups are complete, decorative edging and adjustable ties are added.
The bottoms are constructed from a front panel and back panel, shaped with gradual increases and decreases. The panels are joined along the sides and finished with adjustable waist ties.
The decorative fringe is added beneath the bikini cups and along selected sections of the bottoms.
Skill Level: Intermediate
You should be comfortable with chain stitches, single crochet, half double crochet, double crochet, increases, decreases, and working into stitch spaces.
Finished Size: Designed for an adult Small, with adjustment instructions for Medium and Large.
Approximate finished measurements:
- Bikini top cup height: 5.5 inches.
- Bikini top cup width: 5 inches.
- Bottom front panel width: 8 inches.
- Bottom back panel width: 9 inches.
- Bottom rise: approximately 8.5 inches.
These measurements are approximate and will vary with yarn choice, tension, and blocking.
Important: This is a decorative crochet swimwear design. Crochet fabric is not automatically opaque or chlorine-resistant. Use a suitable swimwear lining and wear it over appropriate swimwear undergarments rather than relying on the crochet fabric alone.
Materials You’ll Need
Yarn
Choose a smooth, lightweight cotton yarn with a little stretch and good stitch definition.
- Color A – Soft Mint Green: Approximately 180–220 yards (165–201 meters), sport-weight cotton yarn.
- Color B – Matching Mint Green: Approximately 35–45 yards (32–41 meters) for fringe and finishing, if using a separate shade.
Cotton is a lovely choice because it feels comfortable against the skin and gives the stitches a clean appearance.
Allow approximately 15% extra yarn if you crochet tightly or plan to make a larger size.
Crochet Hooks
- 2.5 mm crochet hook for the bikini fabric.
- 2.0 mm crochet hook for tighter edging and decorative details.
Additional Supplies
- Tapestry needle.
- Stitch markers.
- Measuring tape.
- Sharp scissors.
- Removable stitch markers.
- Swimwear lining fabric.
- Stretch swimwear elastic.
- Sewing needle and matching thread.
- Blocking mat and rust-resistant pins.
Abbreviations and Terminology
This pattern uses US crochet terminology.
| Abbreviation | Meaning |
|---|---|
| ch | Chain |
| sl st | Slip stitch |
| sc | Single crochet |
| hdc | Half double crochet |
| dc | Double crochet |
| inc | Increase |
| dec | Decrease |
| st | Stitch |
| sts | Stitches |
| sp | Space |
| rep | Repeat |
| RS | Right side |
| WS | Wrong side |
| FO | Fasten off |
Stitch Explanations
Chain (ch): Yarn over and pull through the loop on your hook.
Slip Stitch (sl st): Insert your hook into the indicated stitch, yarn over, and pull through both the stitch and the loop on your hook.
Single Crochet (sc): Insert your hook, yarn over and pull up a loop. Yarn over again and pull through both loops.
Half Double Crochet (hdc): Yarn over, insert your hook, pull up a loop, yarn over, and pull through all three loops.
Double Crochet (dc): Yarn over, insert your hook, pull up a loop, yarn over and pull through two loops. Yarn over again and pull through the remaining two loops.
Increase (inc): Work two stitches into the same stitch.
Decrease (dec): Work two stitches together to create one stitch.
Turning chains do not count as stitches unless a step explicitly says otherwise.
Gauge
Gauge is important because this bikini needs to fit comfortably without becoming too loose or too tight.
Using the 2.5 mm hook:
- 24 sc = 4 inches.
- 26 rows = 4 inches.
Make a small single crochet swatch and measure it after gently washing and drying.
If your swatch is larger than the measurements, try a smaller hook. If it is smaller, move up one hook size.
Your fabric should feel flexible but reasonably firm. Avoid large gaps between stitches, particularly in the bikini cups and front and back panels.
Main Pattern Instructions
Part 1: Crochet Bikini Top Cups
The bikini top consists of two matching triangular cups.
Make two identical pieces using Color A.
Foundation: Ch 3.
Row 1: Work 2 dc into the third chain from your hook. Ch 2, turn. (2 dc)
Row 2: Work 2 dc into the first stitch, dc in the next stitch, and 2 dc into the final stitch. Ch 2, turn. (5 dc)
Row 3: Work 2 dc in the first stitch, dc across until the final stitch, and 2 dc in the last stitch. Ch 2, turn. (7 dc)
Row 4: Repeat the increase pattern, placing 2 dc in the first and last stitches. Ch 2, turn. (9 dc)
Row 5: Repeat Row 4. (11 dc)
Row 6: Repeat Row 4. (13 dc)
Row 7: Repeat Row 4. (15 dc)
Continue increasing by 2 stitches every row until the cup reaches approximately 5 inches across its widest edge.
For the Small size, work approximately 15–17 rows, depending on your gauge.
For larger cups, continue increasing until the desired width is reached.
Final cup row: Ch 1, sc evenly around the entire triangle. Work 3 sc into the bottom point and 2 sc into each upper corner where needed to keep the edging flat.
Sl st to finish and FO.
Make the second cup exactly the same way.
Part 2: Decorative Cup Edging
The edging gives the bikini top a softer, more finished appearance.
Attach Color A at one lower corner of the first cup.
Round 1: Ch 1, sc evenly along the cup edges. Work 3 sc into the bottom point and 2 sc into the upper corners. Sl st to join.
Round 2: Ch 3, skip 1 stitch, sl st into the next stitch. Repeat across the upper sloping edges to create small decorative loops.
FO and weave in the ends.
Repeat on the second cup.
Part 3: Connecting the Bikini Cups
Place both cups side by side with their bottom points facing downward.
The inner edges should sit close together, with a small gap between them for comfortable shaping.
Using Color A:
- Position the cups approximately 1 inch apart at their upper inner corners.
- Use a tapestry needle to sew the inner edges together for approximately 1 inch from the lower points upward.
- Check that both cups remain symmetrical.
- Secure the yarn carefully.
The center join should feel firm without pulling the cups inward.
Part 4: Adjustable Bikini Top Ties
The adjustable ties help the top sit comfortably.
Neck Ties
Attach yarn to the top outer corner of one cup.
Row 1: Ch 45.
Sl st back along the chain to create a neat, slightly firm tie.
FO.
Repeat on the second cup.
Back Ties
Attach yarn to the lower outer corner of each cup.
Row 1: Ch 55.
Sl st back along the chain.
FO.
These longer ties wrap around the back and can be adjusted to suit your preferred fit.
For a more decorative appearance, finish each tie with a small tassel.
Part 5: Crochet Bikini Bottoms – Front Panel
The bikini bottoms are made from two panels.
Begin with the front panel using Color A.
Foundation: Ch 16.
Row 1: Sc in the second chain from the hook and across. Ch 1, turn. (15 sc)
Row 2: Sc across. Ch 1, turn. (15 sc)
Row 3: Inc in the first stitch, sc across, inc in the last stitch. Ch 1, turn. (17 sc)
Row 4: Sc across. Ch 1, turn. (17 sc)
Row 5: Inc in the first stitch, sc across, inc in the last stitch. Ch 1, turn. (19 sc)
Row 6: Sc across. Ch 1, turn. (19 sc)
Continue alternating one increase row with one plain row until the panel reaches approximately 8 inches wide.
Work evenly without increasing for another 3 inches.
This creates the main front section of the bikini bottoms.
Shaping the Front Panel
To create the upper shaping, decrease one stitch at each end of every second row.
Decrease Row: Sc2tog at the beginning, sc across until the last two stitches, sc2tog. Ch 1, turn.
Next Row: Sc across without decreasing.
Repeat until the upper edge reaches approximately 6 inches wide.
FO.
Part 6: Crochet Bikini Bottoms – Back Panel
The back panel follows a similar construction but is made slightly wider for comfortable coverage.
Foundation: Ch 16.
Row 1: Sc in the second chain from the hook and across. Ch 1, turn. (15 sc)
Row 2: Sc across. Ch 1, turn.
Row 3: Inc in the first stitch, sc across, inc in the last stitch. Ch 1, turn. (17 sc)
Row 4: Sc across. Ch 1, turn.
Continue increasing at both ends of every second row until you reach approximately 21–23 stitches.
Work evenly until the panel measures approximately 4 inches from the narrow foundation section.
Continue with gradual increases to create the wider back coverage.
Adjust the length to match your measurements.
Upper shaping: Decrease one stitch at each end of every second row until the top edge reaches the desired waist width.
FO.
For Medium and Large, increase the foundation chain and add shaping rows as needed. Always compare the panels against your own measurements before joining.
Part 7: Boho Fringe Details
This is my favorite part of the entire design!
The fringe gives the mint bikini set its relaxed bohemian character without making the piece feel too heavy.
Cut approximately 5-inch strands of mint yarn.
For each fringe bundle:
- Cut two or three equal-length yarn strands.
- Fold them in half.
- Insert your hook through the selected edge stitch.
- Pull the folded loop through.
- Pass the loose ends through the loop.
- Pull gently to secure.
Add fringe along the lower edge of both bikini cups.
Space each fringe bundle approximately ½ inch apart.
Trim the ends evenly to create a neat decorative finish.
You can also add a few smaller fringe bundles along the outer edges of the bikini bottoms.
Avoid placing bulky fringe where it might interfere with the fit or create uncomfortable pressure against the skin.
Part 8: Assembly and Finishing
Lay the front and back bikini bottom panels together with their right sides facing inward.
Align the crotch sections carefully.
Using a tapestry needle and matching yarn, sew the panels together along the crotch seam.
Turn the piece right side out.
Waistband Edging
Attach yarn to the upper edge of the bikini bottoms.
Round 1: Work sc evenly around the entire waist opening.
Round 2: Sc in each stitch around. Sl st to join.
Keep the edging firm but not tight.
Side Ties
At each side of the waistband, attach yarn and chain approximately 40–45 stitches.
Sl st back along the chain.
Repeat for the opposite side.
These ties allow you to adjust the waist comfortably.
Adding the Lining
For practical wear, sew suitable swimwear lining to the inside of the bikini top and bottom panels.
Use a soft, stretch-friendly swimwear fabric and matching thread.
The lining should follow the shape of each crochet piece without stretching or distorting the crochet stitches.
For additional security, use swimwear elastic inside the appropriate edges.
Test the finished garment for comfort and coverage before wearing it.
Blocking and Care
Blocking helps the bikini pieces look neat and symmetrical.
Because this design uses cotton yarn, gentle wet blocking works well.
- Fill a basin with cool or lukewarm water.
- Add a small amount of gentle detergent.
- Submerge the crochet pieces.
- Allow them to soak for approximately 10 minutes.
- Remove them carefully without twisting.
- Press excess water out using a clean towel.
- Lay each piece flat on a blocking mat.
- Pin the cups and panels into their intended shapes.
- Allow everything to dry completely.
Avoid stretching the fabric excessively.
For long-lasting results:
- Hand wash gently.
- Avoid bleach and harsh detergents.
- Do not wring or twist.
- Dry flat in the shade.
- Never hang the bikini while wet.
- Avoid excessive heat.
- Rinse promptly after exposure to saltwater or chlorine.
Fit and Troubleshooting Tips
My Bikini Cups Are Curling

This usually happens when the stitches are too tight or the increases are not evenly distributed.
Try using a slightly larger hook and check that you are placing increases in the first and last stitches.
The Cups Look Too Pointed
Add one or two extra plain rows near the upper section of each cup before finishing the edging.
This can create a softer triangular shape.
My Bikini Bottoms Feel Too Narrow
Increase the foundation chain and add additional increase rows to both panels.
Always compare the finished width with your actual measurements.
The Fringe Looks Uneven
Lay the garment flat and trim the fringe with sharp scissors.
A cardboard measuring guide can help you keep the lengths consistent.
The Waist Ties Feel Too Loose
Use a slightly smaller hook for the ties and work slip stitches back along each chain.
You can also add a little swimwear elastic inside the waistband for extra support.
How Can I Make the Bikini Larger?
For Medium, increase the cup width and add several rows to the bottom panels.
For Large, increase the cup width further and adjust the front and back panel measurements to match your body.
Remember that adding stitches alone does not guarantee a good fit. Check the finished measurements as you work.
Final Thoughts
I absolutely love how this Mint Boho Fringe Bikini Set comes together. The soft mint color gives it a fresh summer feeling, while the little fringe details add just the right amount of bohemian charm.
The adjustable ties make it easy to customize the fit, and the separate construction allows you to change the cup size and bottom measurements independently.
If you’re looking for a handmade summer project that feels playful, creative, and a little different from an ordinary crochet bikini, I hope you enjoy making this one.
Take your time with the shaping, check your measurements as you go, and don’t be afraid to personalize the fringe or edging.
Most importantly, enjoy every stitch!
I’d love to see your finished Mint Boho Fringe Bikini Set Free Crochet Pattern. Share your version, experiment with different colors, and let your creativity make this design your own. 💚


Leave a Reply
You must be logged in to post a comment.