

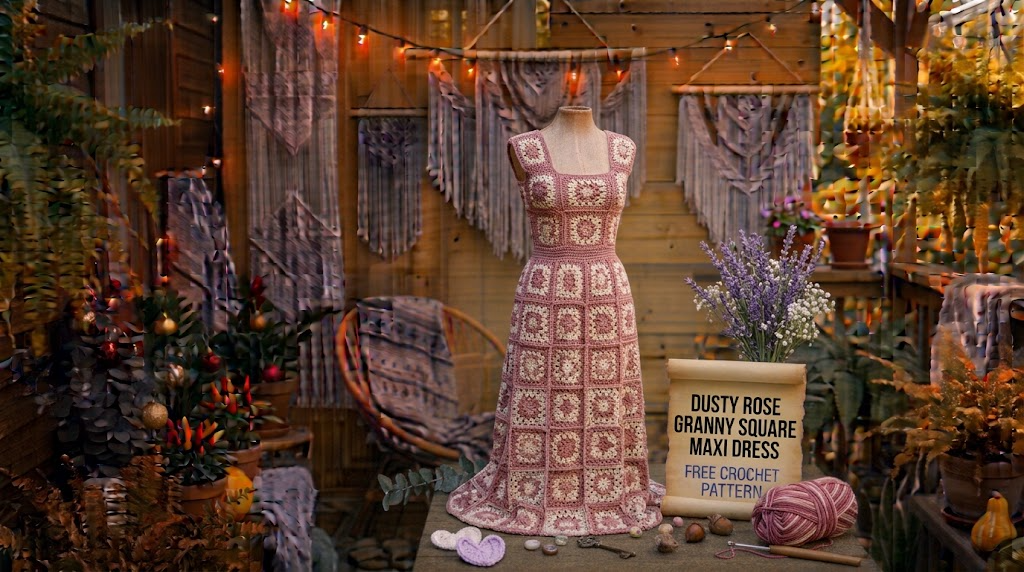
Some crochet projects are beautiful because of their details, while others stand out because of the way all their little pieces come together. This Dusty Rose Granny Square Maxi Dress is one of those designs that makes you appreciate every stitch. I wanted to create something feminine, romantic, and comfortable, with the timeless charm of traditional granny squares and the graceful movement of a long maxi skirt.
The inspiration came from the soft dusty rose shade itself. It has a gentle vintage feeling without looking old-fashioned. When combined with delicate square motifs, small floral centers, and a flowing skirt, the color creates a dress that feels lovely for summer gatherings, holidays, outdoor celebrations, and relaxed evenings.
I also wanted this design to be more than a decorative crochet project. It needed to be wearable, thoughtfully shaped, and comfortable enough to move in.
This Dusty Rose Granny Square Maxi Dress Free Crochet Pattern features a fitted square-motif bodice, adjustable straps, a defined waist, and a flowing granny-stitch skirt. The result is a romantic handmade dress with plenty of personality.

About This Pattern
This maxi dress is constructed from individual granny square motifs joined together to create the bodice and waist section. The lower skirt is worked in joined rounds, gradually increasing to create a soft A-line silhouette.
The floral-inspired centers give the squares extra texture, while the dusty rose background keeps the overall appearance delicate and coordinated.
Skill Level: Intermediate
You should be comfortable with chain stitches, double crochet, slip stitches, working in rounds, joining motifs, and basic garment shaping.
Construction Details:
- Floral-inspired granny squares form the bodice.
- Side and back panels create a comfortable fit.
- Adjustable crochet straps support the upper bodice.
- The skirt begins at the waist and is worked downward.
- A decorative scalloped border finishes the hem.
Finished Measurements:
| Size | Bust | Waist | Dress Length |
|---|---|---|---|
| XS | 30–32 in | 24–26 in | 48 in |
| S | 34–36 in | 28–30 in | 49 in |
| M | 38–40 in | 32–34 in | 50 in |
| L | 42–44 in | 36–38 in | 51 in |
| XL | 46–48 in | 40–42 in | 52 in |
The finished dress should have a little wearing ease around the bust and waist. Because crochet fabric can stretch, check your measurements before joining the motifs permanently.
Materials You’ll Need
Yarn
Choose a soft, breathable cotton or cotton-blend yarn. Cotton gives the granny squares good stitch definition and helps the skirt maintain its shape.
For this pattern, use DK-weight yarn.
- Color A – Dusty Rose: Approximately 1,500–1,900 yards (1,372–1,737 meters). Used for the main squares, bodice, and skirt.
- Color B – Soft Blush: Approximately 180–250 yards (165–229 meters). Used for floral centers and decorative details.
- Color C – Warm Cream: Approximately 150–200 yards (137–183 meters). Used for square outlines and delicate accents.
Allow approximately 15% extra yarn for gauge variation, longer straps, or additional length.
Crochet Hooks
- 3.5 mm crochet hook for granny squares.
- 4.0 mm crochet hook for the skirt and joining sections.
- 3.0 mm crochet hook for the finishing border, if needed.
Additional Supplies
- Tapestry needle.
- Stitch markers.
- Measuring tape.
- Sharp scissors.
- Blocking mats and rust-resistant pins.
- Optional lightweight dress lining.
- Sewing needle and matching thread.
Abbreviations and Terminology
This pattern uses US crochet terminology.
- ch: Chain. Yarn over and pull through the loop on your hook.
- sl st: Slip stitch. Insert hook, yarn over, and pull through both loops.
- sc: Single crochet. Insert hook, yarn over, pull up a loop, yarn over, and pull through both loops.
- dc: Double crochet. Yarn over, insert hook, pull up a loop, yarn over and pull through two loops twice.
- tr: Treble crochet. Yarn over twice, insert hook, pull up a loop, and work through two loops three times.
- sk: Skip the indicated stitch or space.
- sp: Space between stitches.
- ch-sp: Chain space.
- MR: Magic ring.
- rep: Repeat.
- RS: Right side.
- WS: Wrong side.
- FO: Fasten off.
Important Notes:
- Turning chains do not count as stitches unless specifically stated.
- Work all stitches into the indicated spaces.
- Join rounds with a slip stitch unless instructed otherwise.
- Count your granny-square corners carefully to maintain a square shape.
Gauge
Gauge is important because the bodice must fit comfortably while the skirt needs enough room to move.
Using a 3.5 mm hook:
- 4 granny-square rounds should measure approximately 4.5 inches across.
- 16 dc stitches and 8 rows should measure approximately 4 inches square.
Make one complete granny square before beginning the dress.
If your square is too large, try a smaller hook. If it is too small, move up one hook size.
Block your sample before measuring because cotton crochet fabric can change slightly after washing and drying.
Main Pattern Instructions

Part 1: Creating the Floral Granny Squares
The dress uses traditional granny-square construction with a small textured floral center.
Make the squares in dusty rose, blush, and cream according to your preferred color arrangement.
Round 1 – Floral Center
With Color B, make a magic ring.
Ch 3 (counts as first dc), work 11 dc into the ring.
Sl st into the top of the beginning ch-3.
Count: 12 dc.
Pull the magic ring closed.
Round 2 – Creating the Petal Texture
Join Color C in any stitch.
Ch 1, sc in the same stitch.
Repeat: Ch 3, sk next stitch, sc in next stitch.
Repeat around.
You should have 6 chain spaces.
Sl st into the first sc.
Round 3 – Floral Petals
Join Color B in any ch-3 space.
Ch 1, work the following into the same space:
- 1 sc
- 3 dc
- 1 sc
Repeat the petal sequence in each remaining ch-3 space.
Sl st into the first sc.
You should now have six small decorative petals.
Round 4 – Building the Square
Join Color A between two petals.
Ch 3, work 2 dc in the same space.
In the next gap, work 3 dc.
In the following gap, work:
(3 dc, ch 2, 3 dc).
Repeat the arrangement around, placing four corner groups evenly around the flower.
Join with a sl st.
Round 5 – Final Square Border
Ch 3 and work 2 dc in the first space.
Work 3 dc in each side space.
At each corner ch-2 space, work:
(3 dc, ch 2, 3 dc).
Join with a sl st.
Fasten off.
Each completed square should measure approximately 4.5 inches after blocking.
How Many Granny Squares Do You Need?
The following quantities are a starting layout for the dress.
| Size | Bodice Squares | Total Squares |
|---|---|---|
| XS | 24 | 44 |
| S | 28 | 52 |
| M | 32 | 60 |
| L | 36 | 68 |
| XL | 40 | 76 |
The remaining squares are incorporated into the waist and upper skirt transition.
Because the motifs are approximately 4.5 inches wide, check the actual blocked measurements against your body measurements before committing to the layout.
Part 2: Assembling the Bodice
The bodice is made from joined granny squares arranged into front and back panels.
For a medium-size dress, arrange:
- 16 squares across the front and back combined.
- 8 squares in the front panel.
- 8 squares in the back panel.
Use the same arrangement for both panels to create a balanced appearance.
For larger sizes, add squares across the panels or additional side sections. For smaller sizes, reduce the panel width.
Joining the Squares
Place two squares with their right sides facing upward.
Using Color A, insert your hook through the corresponding corner spaces of both squares.
Work slip stitches through matching spaces and stitches along the edge.
Continue until the squares are joined.
Repeat for all squares.
The slip-stitch join creates a subtle raised seam that complements the floral texture.
Check that the seams are not too tight. Tight joining can cause the bodice to pull inward.
Creating the Waist Section
Once the front and back panels are joined, connect them at both sides.
Use stitch markers to keep the side seams aligned.
Join Color A at the lower edge of the bodice.
Work one round of sc evenly around the waist opening.
For the medium size, aim for approximately 144 sc stitches around the waist.
Adjust the number according to the actual circumference of your assembled bodice.
Join with a sl st.
This round creates a stable foundation for the skirt.
Part 3: Crochet Maxi Dress Skirt
The skirt is worked downward from the waist in joined rounds.
This section creates the flowing shape that makes the dress look elegant and comfortable.
Use a 4.0 mm crochet hook.
Round 1: Ch 3 (counts as dc), work 2 dc in the same stitch. Sk 2 stitches, work 3 dc in the next stitch.
Repeat the 3-dc granny clusters around.
Join with a sl st to the beginning ch-3.
Round 2: Sl st into the next two dc and the next cluster space. Ch 3, work 2 dc in the same space. Work 3 dc in every cluster space around. Join.
Round 3: Repeat Round 2.
Continue working granny clusters evenly until the skirt measures approximately 8 inches from the waist.
Creating the A-Line Shape
To create a gently flared silhouette, add increases at four evenly spaced positions.
On an increase round, work two granny clusters into the selected cluster spaces instead of one.
Repeat the increase round every fourth round.
For the medium size, continue until the skirt reaches approximately 36–38 inches from the waist.
The increasing circumference gives the skirt room to flow around your legs.
Count Check: If your skirt begins with 48 granny clusters, adding four extra clusters on an increase round gives you 52 clusters.
Continue increasing gradually until the skirt reaches your preferred fullness.
Adjusting the Dress Length
For a shorter maxi dress, stop when the skirt measures approximately 32 inches from the waist.
For a longer dress, continue working additional rounds.
Always try on the dress or compare it with your desired finished length before beginning the border.
Part 4: Crochet Shoulder Straps
The shoulder straps are worked separately and attached to the upper front and back edges.
For each strap:
Row 1: Join Color A at the marked shoulder position. Ch 1, work 5 sc across the strap foundation. Turn.
Row 2: Ch 1, sc across. Turn.
Repeat Row 2 until the strap measures approximately 10–12 inches.
Fasten off, leaving a long sewing tail.
Make the second strap in the same way.
Attach the front and back ends securely using a tapestry needle.
Try on the bodice before sewing the final ends permanently. Adjust the strap length to achieve a comfortable neckline and secure fit.
Special Techniques and Additional Details
Decorative Scalloped Hem
A scalloped edge gives the bottom of the dress a delicate finish.
Join Color C at any stitch along the lower hem.
Round 1: Ch 1, sc evenly around the skirt.
Round 2: Sk 1 stitch, work 5 dc in the next stitch, sk 1 stitch, sl st in the next stitch.
Repeat around.
If the scallops become too crowded, skip an additional stitch between shell groups.
Fasten off and weave in the ends.
Optional Floral Embellishments
You can add small crochet flowers around the upper bodice for extra decoration.
With Color B, make a magic ring.
Work 6 sc into the ring.
In each stitch, work:
(sl st, ch 3, 2 dc, ch 3, sl st).
Repeat around to create six petals.
Fasten off.
Attach the flowers at selected square centers or along the neckline. Keep the embellishments evenly spaced so the dress does not become visually crowded.
Assembly and Finishing
Before completing the dress, lay the entire garment flat and inspect the joins.
Check the following:
- Both bodice panels have matching widths.
- Side seams are straight and secure.
- The waist is not twisted.
- Both straps have equal lengths.
- The skirt hangs evenly.
- The hem has a consistent scalloped finish.
Weave in all yarn ends using a tapestry needle.
For additional comfort, you can sew a lightweight lining inside the bodice and skirt. Choose a breathable fabric in a matching blush or nude shade.
The lining should be slightly shorter than the crochet hem so the decorative border remains visible.
Do not stretch the lining too tightly. Allow enough room for natural movement.
Blocking and Care
Blocking helps the granny squares look even and allows the skirt to hang more beautifully.
For cotton yarn, wet blocking is a good choice.
- Fill a basin with cool water.
- Add a small amount of gentle detergent.
- Submerge the dress carefully.
- Allow it to soak for approximately 10–15 minutes.
- Remove it without twisting or wringing.
- Press excess water out using a clean towel.
- Lay the dress flat on blocking mats.
- Adjust the square edges, straps, and skirt hem.
- Allow it to dry completely.
Avoid hanging the dress while wet because the weight of the cotton yarn can stretch the fabric.
For regular care, hand wash in cool water and dry flat.
Fit and Troubleshooting Tips
My granny squares are curling.
Your tension may be too tight. Try a larger hook and block the squares before joining.
The bodice feels too loose.
Check the finished square measurements and side seams. You can adjust the fit by reducing the panel width or adding a discreet side seam adjustment.
The skirt looks too narrow.
Add an increase round more frequently. Check that the granny clusters are distributed evenly.
The skirt looks wavy.
You may have increased too quickly. Remove one increase round and check the fabric again.
The straps keep slipping.
Shorten them slightly and reinforce their attachment points with additional sewing stitches.
The dress feels heavy.
Cotton yarn can become heavy in a long garment. Consider using a lighter cotton blend and avoid adding unnecessary decorative layers.
Final Thoughts
I love how this Dusty Rose Granny Square Maxi Dress brings together traditional crochet techniques and a graceful modern silhouette. Every square adds its own little detail, while the flowing skirt transforms those individual motifs into a beautiful wearable piece.
The dusty rose shade makes the dress feel romantic, the floral centers add texture, and the scalloped hem provides a delicate finishing touch.
Take your time with the square placement, check your measurements as you work, and don’t be afraid to adjust the skirt length to suit your style.
I hope you enjoy making this Dusty Rose Granny Square Maxi Dress Free Crochet Pattern as much as I enjoyed designing it. If you create your own version, share your finished dress, color choices, and creative variations. I’d love to see how your handmade maxi dress turns out!
Happy crocheting!



Leave a Reply
You must be logged in to post a comment.