


I still remember the afternoon the idea for this bag arrived. I was sorting through a basket of leftover soft pinks and dusty roses when a single motif caught the light just right. The way the rounds layered felt almost like petals overlapping, quiet and romantic without being fussy. I kept turning that square over in my hands, imagining it repeated and joined into something useful—something I could carry to the market or sling over my shoulder on a weekend walk.
That single square grew into a whole collection of matching motifs, then into a structured tote with just enough body to hold its shape. I wanted the finished bag to feel soft against the skin yet sturdy enough for real life. The dusty rose palette gives it a gentle, vintage-leaning romance, while the classic granny construction keeps the work meditative and familiar.

This is the Dusty Rose Romance Granny Tote. It is the bag I reach for when I want something pretty that still does the job.
About This Pattern
This tote is built from twelve large granny squares that are joined into a rectangular body, then folded and seamed to create depth. A simple border frames the top edge, and two sturdy handles are worked directly onto the bag so there is no awkward seaming later. The raised texture of the granny rounds creates a soft, dimensional surface that catches the light beautifully.
Skill level sits comfortably at intermediate. You should be comfortable with working in the round, changing colors cleanly, joining motifs, and reading basic stitch counts. Nothing here is overly complicated, but attention to tension and consistent joining will give the best result.
Finished size after blocking measures approximately 14 inches wide by 13 inches tall (not including handles) with a 4-inch depth. The handles add another 12 inches of drop. The bag has a gentle structure—soft enough to fold flat for storage, yet firm enough to stand upright when filled.
Materials You’ll Need
Yarn
I used a light worsted / DK-weight cotton blend that softens beautifully with washing and holds its shape after blocking.
- Color A (Dusty Rose – main color): 480 yards / 440 meters
- Color B (Soft Blush – secondary): 220 yards / 200 meters
- Color C (Cream – accent): 160 yards / 145 meters
Allow 15% extra for gauge variation and swatching.
Hooks
- 4.0 mm (G/6) for the granny squares and border
- 3.5 mm (E/4) for the handles (to create a denser, stronger fabric)
Notions
- Tapestry needle
- Stitch markers (at least 8)
- Blocking mats and pins
- Optional: fabric lining and a small piece of interfacing if you prefer a more structured interior
Abbreviations and Terminology
All instructions use US crochet terminology.
- ch – chain
- sc – single crochet (insert hook, yarn over, pull up loop, yarn over, pull through both loops)
- hdc – half double crochet (yarn over, insert hook, yarn over, pull up loop, yarn over, pull through all three loops)
- dc – double crochet (yarn over, insert hook, yarn over, pull up loop, yarn over, pull through two loops, yarn over, pull through remaining two loops)
- tr – treble crochet (yarn over twice, insert hook, yarn over, pull up loop, [yarn over, pull through two loops] three times)
- sl st – slip stitch (insert hook, yarn over, pull through stitch and loop on hook)
- sp – space
- st(s) – stitch(es)
- beg – beginning
- rep – repeat
- RS – right side
- WS – wrong side
Turning chains do not count as a stitch unless a step explicitly says they do. When joining rounds, always join with a slip stitch into the top of the beginning chain or stitch indicated.
Gauge
Work one full granny square following the pattern below. After blocking, the square should measure 5.5 inches by 5.5 inches.
If your square is larger, go down a hook size. If it is smaller, go up a hook size. Consistent tension across all twelve squares is more important than exact gauge, but staying close to 5.5 inches will keep the finished tote proportional.
Main Pattern Instructions

Granny Square (Make 12)
Each square uses all three colors. Work the first three rounds in Color A, the fourth round in Color B, and the fifth round in Color C. Weave in ends as you go or leave them long enough to sew into the joins later.
Round 1 (Color A):
Make a magic ring (or ch 4 and join with sl st to form a ring).
Ch 3 (counts as first dc), 2 dc into ring, ch 2, *3 dc into ring, ch 2; rep from * twice more. Join with sl st to top of beg ch-3. (4 groups of 3 dc, 4 ch-2 corners)
Round 2:
Sl st into next 2 dc and into the first ch-2 corner.
Ch 3, (2 dc, ch 2, 3 dc) in same corner, ch 1, *(3 dc, ch 2, 3 dc) in next corner, ch 1; rep from * twice more. Join with sl st to top of beg ch-3. (8 groups of 3 dc)
Round 3:
Sl st into next 2 dc and into the first ch-2 corner.
Ch 3, (2 dc, ch 2, 3 dc) in same corner, ch 1, 3 dc in next ch-1 sp, ch 1, *(3 dc, ch 2, 3 dc) in next corner, ch 1, 3 dc in next ch-1 sp, ch 1; rep from * twice more. Join with sl st to top of beg ch-3. Fasten off Color A.
Round 4 (Color B):
Join Color B with a standing dc (or ch 3) in any corner ch-2 space.
(2 dc, ch 2, 3 dc) in same corner, ch 1, [3 dc in next ch-1 sp, ch 1] twice, *(3 dc, ch 2, 3 dc) in next corner, ch 1, [3 dc in next ch-1 sp, ch 1] twice; rep from * twice more. Join with sl st to top of first dc. Fasten off Color B.
Round 5 (Color C):
Join Color C with a standing dc in any corner ch-2 space.
(2 dc, ch 2, 3 dc) in same corner, ch 1, [3 dc in next ch-1 sp, ch 1] three times, *(3 dc, ch 2, 3 dc) in next corner, ch 1, [3 dc in next ch-1 sp, ch 1] three times; rep from * twice more. Join with sl st to top of first dc. Fasten off Color C.
You now have a 5-round granny square. Make eleven more identical squares. Block all twelve lightly before joining so the edges sit flat.
Joining the Squares
Arrange the squares into a rectangle that is 4 squares wide by 3 squares tall. This forms the body of the tote before folding.
Join the squares using the continuous join-as-you-go method or by sewing with a tapestry needle using mattress stitch. I prefer the join-as-you-go method for a cleaner look and less bulk:
- Hold two squares with RS facing up, edges aligned.
- Work a row of sc through the corresponding stitches of both squares, inserting the hook under both loops of each edge stitch.
- At corners, work 3 sc into the corner spaces to keep the join flexible.
- Continue until the entire 4 × 3 panel is joined.
You should have one large rectangular panel measuring approximately 22 inches wide by 16.5 inches tall before folding.
Forming the Tote Body
Fold the panel in half so the short edges meet, RS together. The fold becomes the bottom of the bag. Seam the two short side edges with mattress stitch or sc join, leaving the top open. This creates a bag that is 14 inches wide and 13 inches tall with natural depth at the sides.
To add structure to the bottom, fold each bottom corner into a triangle so that the side seam meets the bottom fold. Measure 2 inches along each edge of the triangle and sew across. This creates a flat, boxed bottom approximately 4 inches deep. Turn the bag right side out.
Special Techniques / Additional Elements
Top Border
With Color A and the 4.0 mm hook, join yarn at one side seam on the top edge.
Round 1: Ch 1, sc evenly around the entire top opening, working approximately 2 sc into each corner space for a smooth curve. Aim for a multiple of 4 stitches. Join with sl st to first sc.
Round 2: Ch 1, *sc in next st, ch 1, skip 1 st; rep from * around. Join with sl st to first sc.
Round 3: Ch 1, sc in each sc and in each ch-1 space around. Join with sl st to first sc. Fasten off.
Handles (Make 2)
Using Color A and the 3.5 mm hook for a denser fabric:
Row 1: Ch 8. Sc in second ch from hook and in each ch across. (7 sc) Turn.
Rows 2–60: Ch 1, sc in each st across. Turn.
Work until the strip measures approximately 18 inches long (or desired length). Fasten off, leaving a long tail for sewing.
Position the ends of each handle 3 inches in from the side seams on the top border, centered on the front and back of the bag. Sew securely through both the handle and several rows of the border using the tapestry needle and matching yarn. Reinforce the attachment points by sewing a small square or X through the layers.
Assembly and Finishing
Once the body is seamed, the bottom is boxed, and the handles are attached, weave in all remaining ends carefully on the wrong side. Check that the color changes on the squares are tidy and that no ends are visible on the right side.
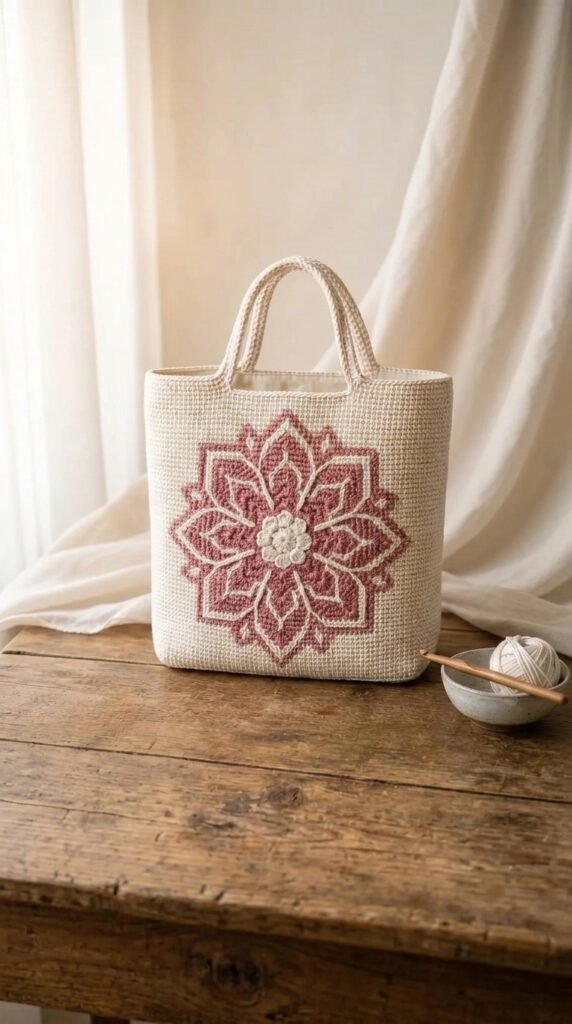
If you prefer a lined bag, cut a rectangle of coordinating fabric slightly larger than the finished body, sew side and bottom seams, and hand-stitch or machine-stitch the lining into the top edge just below the border. A lightweight cotton or cotton-linen blend works beautifully with the dusty rose palette.
Blocking and Care
Wet-block the finished tote by soaking it briefly in cool water with a mild wool wash (even though the yarn is cotton, a gentle wash helps relax the stitches). Gently squeeze out excess water—never wring—and lay the bag flat on blocking mats. Pin the sides and bottom to the finished measurements, shaping the handles into gentle curves. Allow to dry completely.
Care notes: Hand wash in cool water, reshape, and dry flat. Do not hang the bag while wet, as the weight of the water can stretch the handles and body. Store folded or stuffed lightly with tissue paper to maintain shape.
Fit and Troubleshooting Tips
If the bag feels too floppy after joining, a light steam block (hover the iron, do not press) can firm the fabric without flattening the texture.
If the squares cup or ruffle, check that your corner chains are consistent and that you are not pulling the joins too tightly.
For a slightly larger tote, simply work one extra round on each square before joining. For a smaller version, omit the fifth round.
Heavy motifs or dense joining can cause the bag to lean. Balancing the number of squares on front and back and reinforcing the handle attachments usually corrects this.
You Might Also Like
- Lavender Fields Floral Tote Free Crochet Pattern
- Mustard Gold Aztec Pattern Tote Free Crochet Pattern
- Lavender Cream Granny Square Tote Free Crochet Pattern
- Sage Green Botanical Leaf Tote Bag Free Crochet Pattern
- Lemon Citrus Summer Charm Bracelet Free Crochet Pattern
FAQ’s
Can I use a different weight of yarn?
Yes, but the finished size and drape will change. A true worsted-weight yarn will produce a slightly larger, denser bag. A sport-weight yarn will create a softer, more delicate tote. Always make a gauge swatch and adjust the number of squares or rounds if needed.
How long does this project take?
Most intermediate crocheters finish the twelve squares in 6–8 hours of focused work. Joining, seaming, and handles usually take another 3–4 hours. Spread over a few evenings, the whole bag can be completed in a week.
Do I need to line the tote?
Lining is optional. The cotton blend fabric is sturdy enough for light everyday use without a lining. If you plan to carry heavier items or want a more polished interior, a simple fabric lining is a nice addition and helps the bag hold its shape longer.
Can I make the handles longer or shorter?
Absolutely. Work more or fewer rows on the handle strips until you reach the drop you prefer. Just remember that longer handles stretch more under weight, so a denser stitch (or the smaller hook) becomes even more important.
What if my squares don’t match in size?
Slight variations are normal. Block all squares to the same measurements before joining. If one square is noticeably larger or smaller, adjust your tension on the final round or remake that square. Consistent blocking solves most size differences.
Is this pattern suitable for beginners?
It is written for intermediate crocheters because of the color changes, joining, and shaping. Confident beginners who already know how to work a basic granny square and join motifs can certainly try it—just take your time with the first few squares and the side seams.
Can I sell bags I make from this pattern?
Yes. You are welcome to sell finished items made from this free pattern. I simply ask that you credit the design (Dusty Rose Romance Granny Tote) in your listing description.
Final Thoughts
There is something deeply satisfying about watching a collection of soft, romantic squares become a bag you can actually use every day. The dusty rose palette feels gentle and timeless, and the classic granny construction makes the whole process peaceful rather than stressful.
I hope this tote finds a place in your rotation—whether it carries market produce, library books, or just a sweater and a notebook. If you make one, I would love to see how your color choices turn out. Share a photo in the comments or tag your project so others can find a little inspiration too.
Happy stitching. May your bag be as soft and useful as the idea that first sparked it.


Leave a Reply
You must be logged in to post a comment.