


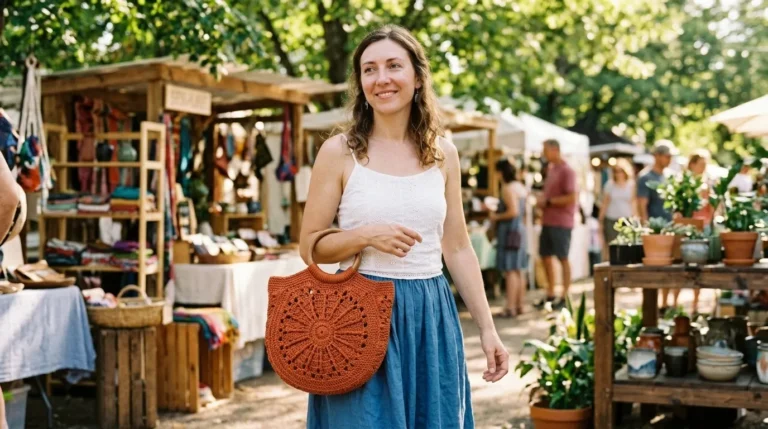
Some crochet projects are simply too pretty to leave sitting in a basket. This Terracotta Boho Flower Bag is one of those projects! I wanted to create something that felt warm, artistic, and a little vintage, with cheerful flowers and earthy colors that would look beautiful throughout the year.
I started imagining a collection of colorful crochet flowers surrounded by warm terracotta borders. The combination reminded me of handmade market bags, sunny afternoons, and those charming little accessories you find at a weekend craft market.
The result is a lovely floral tote made from individual granny square motifs joined together to create a practical everyday bag. It has a roomy interior, sturdy handles, and a relaxed bohemian personality.
If you love floral crochet and earthy colors, this Terracotta Boho Flower Bag Free Crochet Pattern might become your next favorite project!

About This Terracotta Boho Flower Bag Pattern
This bag is constructed from 14 individual floral granny squares joined together to form a roomy tote.
Each square features a raised flower center, petal stitches, and a terracotta background border. The floral motifs create a beautiful textured surface while the joining method keeps the bag flexible but structured.
The bag is suitable for intermediate crocheters. Confident beginners can also try it if they are comfortable with double crochet, working in rounds, and joining motifs.
Finished measurements:
- Width: Approximately 13 inches (33 cm).
- Height: Approximately 13 inches (33 cm).
- Depth: Approximately 6.5 inches (16.5 cm).
- Handle drop: Approximately 10 inches (25.5 cm).
The finished size can vary depending on your yarn, hook, and tension.
The bag is designed for everyday essentials such as a wallet, phone, sunglasses, small notebook, and a light cardigan. For heavier items, consider adding a fabric lining.
Materials You’ll Need
Yarn
Choose cotton or a cotton-blend yarn for better durability and stitch definition.
| Color | Purpose | Approximate Amount |
|---|---|---|
| A – Terracotta | Square borders and bag construction | 300 yards |
| B – Cream | Flower petals and joining | 180 yards |
| C – Mustard Yellow | Flower centers | 70 yards |
| D – Dusty Pink | Accent petals | 90 yards |
| E – Sage Green | Leaves and details | 60 yards |
Yarn weight: Worsted weight (Category 4), approximately 200–220 meters per 100 grams.
Allow 15% extra yarn for gauge variation and adjustments.
Crochet Hooks
- 4.5 mm crochet hook for granny squares.
- 4 mm crochet hook for handles and firmer edging.
Additional Supplies
- Tapestry needle.
- Scissors.
- Stitch markers.
- Measuring tape.
- Blocking mats and pins.
- Optional cotton fabric for lining.
- Sewing needle and matching thread.
Abbreviations and Terminology
This pattern uses US crochet terminology.
- MR: Magic ring – an adjustable loop used to begin crocheting in the round.
- ch: Chain stitch – yarn over and pull through the loop.
- sl st: Slip stitch – insert hook, yarn over, and pull through both loops.
- sc: Single crochet – insert hook, yarn over, pull up a loop, yarn over, and pull through both loops.
- hdc: Half double crochet – yarn over, insert hook, pull up a loop, yarn over, and pull through all three loops.
- dc: Double crochet – yarn over, insert hook, pull up a loop, yarn over and pull through two loops twice.
- tr: Treble crochet – yarn over twice, insert hook, pull up a loop, then work through two loops three times.
- sk: Skip – leave the specified stitch unworked.
- sp: Space.
- st(s): Stitch(es).
- rep: Repeat.
- RS: Right side.
- WS: Wrong side.
- FO: Fasten off.
Special Stitches
- Puff stitch: Yarn over, insert hook into the indicated space, pull up a loop. Repeat this process three times in the same space, then yarn over and pull through all loops.
- Cluster: Work the specified number of incomplete double crochet stitches into the same space, then yarn over and pull through all remaining loops.
- Picot: Ch 3, then sl st into the first chain to create a small decorative bump.
Important: Turning chains do not count as stitches unless a step explicitly says they do.
Gauge
Gauge is important because all 14 granny squares need to be approximately the same size.
Make one complete floral granny square using the 4.5 mm hook.
Gauge target:
- 4 rounds of the floral motif should measure approximately 6.5 inches (16.5 cm) square after blocking.
- Keep your stitches relaxed but consistent.
- The finished square should lie flat without curling or ruffling.
If your square measures smaller than expected, try a 5 mm hook. If it is too large, switch to a 4 mm hook.
Make a second square if necessary to check that your tension remains consistent.
Main Pattern Instructions
Part 1: Making the Floral Granny Squares
You will need 14 matching floral squares for the full-depth bag.
Each square begins with a mustard flower center, followed by textured petals and a terracotta granny square border.
Keep the yarn tails long enough to weave in securely.
Round 1: Flower Center
Using Color C (Mustard Yellow):
- Make a magic ring.
- Ch 2 (does not count as a stitch).
- Work 12 dc into the ring.
- Sl st into the first dc.
- Pull the magic ring closed.
Count: 12 dc.
FO and change to Color B (Cream).
Round 2: Flower Petals
Join Color B into any dc.
- Ch 1.
- Work 1 puff stitch into the same stitch.
- Ch 1.
- Skip the next stitch.
- Work 1 puff stitch into the following stitch.
- Ch 1.
Repeat around until you have 6 puff stitches separated by chain spaces.
Sl st into the first puff stitch to close.
Count: 6 puff stitches and 6 chain spaces.
FO.
The six raised puff stitches form a soft flower with a lovely dimensional center.
Round 3: Creating the Square
Join Color A (Terracotta) into any chain-1 space between petals.
- Ch 3 (counts as first dc).
- Work 2 dc into the same space.
- Ch 2.
- Work 3 dc into the next chain-1 space.
- Ch 2.
Repeat around, placing 3 dc in each petal space and ch 2 between groups.
Sl st into the top of the beginning ch 3.
You should have six groups of 3 dc.
Round 4: Square Border
- Sl st into the next two dc and into the first corner space.
- Ch 3, 2 dc, ch 2, 3 dc into the same corner.
- Work 3 dc into the next chain-2 space.
- At the following corner, work 3 dc, ch 2, 3 dc.
- Continue around, placing 3 dc into each side space and 3 dc, ch 2, 3 dc into every corner.
- Sl st to join.
Count: 4 corner spaces, each containing ch 2, with granny clusters along all four sides.
FO and weave in the ends.
Your finished square should have four clearly defined corners.
Repeat for All 14 Squares
- Make 14 floral squares in total.
- Keep the color placement consistent.
- Block all squares to the same measurements before assembly.
You can use different flower colors if you want a more colorful bohemian look. Just keep the terracotta border consistent to create a coordinated finish.
Part 2: Arranging the Bag Panels
Before joining, arrange your squares on a flat surface.
You will create:
- Front panel: 4 squares arranged in a 2 × 2 layout.
- Back panel: 4 squares arranged in a 2 × 2 layout.
- Left side panel: 2 squares arranged vertically.
- Right side panel: 2 squares arranged vertically.
- Bottom panel: 2 squares joined side by side.
Total: 14 squares.
Part 3: Joining the Granny Squares
Lay the squares with their right sides facing upward.
Use Color B (Cream) for a decorative joining seam or Color A (Terracotta) for a more subtle finish.
I recommend the mattress stitch because it creates a neat seam without adding too much bulk.
Mattress Stitch Joining:
- Place two squares side by side.
- Thread your tapestry needle with the joining yarn.
- Pick up the outer loops of corresponding stitches along both edges.
- Pull the yarn gently after every few stitches.
- Continue until the entire edge is joined.
- Secure the yarn at the end.
Join the four front squares and four back squares first.
Then attach the side panels to the front and back panels.
Finally, join the bottom panel to the lower edges of the bag body.
Take your time with this step. Neat joining makes a huge difference in the finished appearance.
Part 4: Creating the Bag Opening
With the bag body assembled, attach Color A to the top edge.
Work one round of sc evenly around the entire opening.
Place approximately one sc into each stitch or row-end space. Add or decrease stitches slightly where needed to keep the edge flat.
Sl st to join.
Next round:
- Ch 1.
- Work 1 sc in each stitch around.
- Sl st to join.
Repeat for 2 additional rounds.
FO.
The terracotta top border creates a clean, sturdy finish and beautifully frames the colorful floral motifs.
Part 5: Crocheting the Handles
The handles should feel comfortable on your shoulder while remaining firm enough to support the bag.
Make two identical handles using Color A.
Handle Foundation:
- Ch 9.
- Row 1: Sc in the second ch from hook and in every remaining chain. (8 sc)
- Row 2: Ch 1, turn, sc across. (8 sc)
Repeat Row 2 until the handle measures approximately 20 inches (51 cm).
Work sc evenly around all four sides of the handle, placing 3 sc into each corner.
Sl st to join and FO, leaving a long tail for sewing.
Repeat for the second handle.
Handle placement:
- Place one handle at the front and one at the back.
- Position each handle approximately 3 inches from the nearest side seam.
- Allow approximately 10 inches of handle drop.
- Sew each handle securely using several passes of the tapestry needle.
For extra strength, reinforce the handle attachment points with additional yarn stitches.
Special Techniques and Additional Elements
Optional Crochet Flower Appliqués
If you want your bag to have an extra handmade touch, add small flowers to the terracotta border or near the handles.
Using Color D (Dusty Pink):
- Make a magic ring.
- Ch 1.
- Work 5 sc into the ring.
- Sl st into the first sc.
- Ch 2.
- Work 2 dc into the next stitch.
- Ch 2 and sl st into the same stitch.
- Repeat around to create five petals.
FO, leaving a long tail for sewing.
Make two or three flowers in different colors and sew them onto selected squares or near the top corners.
Optional Crochet Leaves
Using Color E (Sage Green):
- Ch 7.
- Sc in the second ch from hook.
- Hdc in the next ch.
- Dc in the next 2 ch.
- Hdc in the next ch.
- Work 3 sc into the final chain.
- Working along the opposite side of the foundation chain, hdc, dc, dc, hdc, and sc.
- Sl st to finish.
FO and leave a sewing tail.
Attach leaves beside the small decorative flowers.
Assembly and Finishing
Once all your pieces are joined, handles are attached, and decorative details are complete, give the bag a final inspection.
Finishing Checklist
- Weave in all loose yarn ends securely.
- Check every joining seam for gaps.
- Reinforce the handle attachment points.
- Check that both handles have equal lengths.
- Add optional decorative flowers and leaves.
- Gently stretch the bag into its intended rectangular shape.
Adding a Fabric Lining (Optional)
A fabric lining is a wonderful addition if you plan to carry small items that might slip through the crochet stitches.
Choose a lightweight cotton fabric in cream, beige, or a subtle floral print.
- Measure the inside dimensions of the finished bag.
- Cut two rectangular fabric pieces for the front and back, plus side and bottom pieces if making a structured lining.
- Sew the fabric pieces together with the right sides facing inward.
- Fold the top edge under twice and press.
- Place the lining inside the crochet bag.
- Hand-sew it carefully around the top opening, just beneath the crochet edging.
Avoid pulling the crochet fabric too tightly while attaching the lining.
Blocking and Care
Blocking helps the floral squares settle into their proper shape and makes the finished bag look much more polished.
For cotton yarn, I recommend gentle wet blocking.
Wet-Blocking Instructions
- Fill a basin with cool or lukewarm water.
- Add a small amount of gentle detergent.
- Submerge the bag briefly.
- Remove it and gently press out excess water. Never twist or wring it.
- Place it between clean towels and press gently.
- Lay it flat on blocking mats.
- Shape the corners and straighten the sides.
- Allow it to dry completely.
Avoid hanging the bag while wet because the weight of the water can stretch the handles and seams.
Care Recommendations
- Hand wash whenever possible.
- Use mild detergent.
- Avoid bleach.
- Dry flat away from direct sunlight.
- Store in a cool, dry place.
- Avoid carrying excessively heavy objects.
If your yarn label allows machine washing, use a gentle cycle and a laundry bag.
Fit and Troubleshooting Tips
Even experienced crocheters occasionally run into little problems. Here are a few things to watch for.
1. My Granny Squares Are Curling
Your tension may be too tight. Try a larger hook and make sure the corner chain spaces are not being skipped.
2. My Squares Are Different Sizes
Check your gauge before making the remaining motifs. Block every square to the same measurements before joining.
3. My Bag Looks Floppy
Cotton yarn usually provides better structure than soft acrylic. You can also use a smaller hook for the joining seams and top edging.
4. My Handles Are Stretching
Handles naturally stretch under weight. Reinforce them with a second layer of stitches or sew a cotton tape inside each handle.
5. My Bag Opening Looks Uneven
Count the stitches around the opening and distribute your sc stitches evenly. Avoid adding too many stitches around the corners.
6. My Floral Motifs Look Crowded

Keep your puff stitches consistent and avoid pulling the joining yarn too tightly.
Easy Customization Ideas
- Use mustard, rust, and cream for a traditional autumn palette.
- Choose dusty pink and sage green for a softer romantic look.
- Add wooden buttons for a rustic finish.
- Make longer handles for an oversized shoulder bag.
- Add a small interior pocket for your phone or keys.
- Use contrasting cream seams to highlight every floral square.
Final Thoughts
There is something special about carrying a bag you made with your own hands. Every flower, every stitch, and every little detail makes it feel personal.
I especially love how the terracotta borders bring all the different flower colors together. The finished bag has that relaxed bohemian look that works beautifully with summer dresses, jeans, casual outfits, and even cozy autumn layers.
Don’t worry if your first few granny squares aren’t perfectly identical. Take your time, enjoy the process, and remember that handmade projects are allowed to have personality!
I hope you enjoy making this Terracotta Boho Flower Bag Free Crochet Pattern as much as I enjoyed designing it.
If you make one, experiment with your favorite flower colors and share your finished creation with other crochet lovers. I’d love to see the beautiful color combinations you come up with!
Happy crocheting! 🌼



Leave a Reply
You must be logged in to post a comment.