


I still remember the exact afternoon this dress started forming in my mind. I was standing on a quiet stretch of coastline, the kind where the tide leaves little ribbons of foam and the air smells like salt and sun-warmed wood. A woman walked past in a simple navy dress that moved with the breeze, and something about the way the fabric caught the light made me stop. I wanted that feeling in crochet—something cool against the skin, a little open so the air could pass through, and deep navy like the water just beyond the shallows.
I sketched on the back of a receipt that evening. Loose shell stitches for movement. A fitted bodice that wouldn’t cling in the heat. A skirt that flared just enough to feel playful when you walk. The result is this Navy Blue Coastal Crochet Mini Dress. It is light, wearable, and quietly elegant in that effortless beach-town way. The openwork panels keep it from feeling heavy, and the cotton yarn gives it a soft drape that softens even more after blocking.
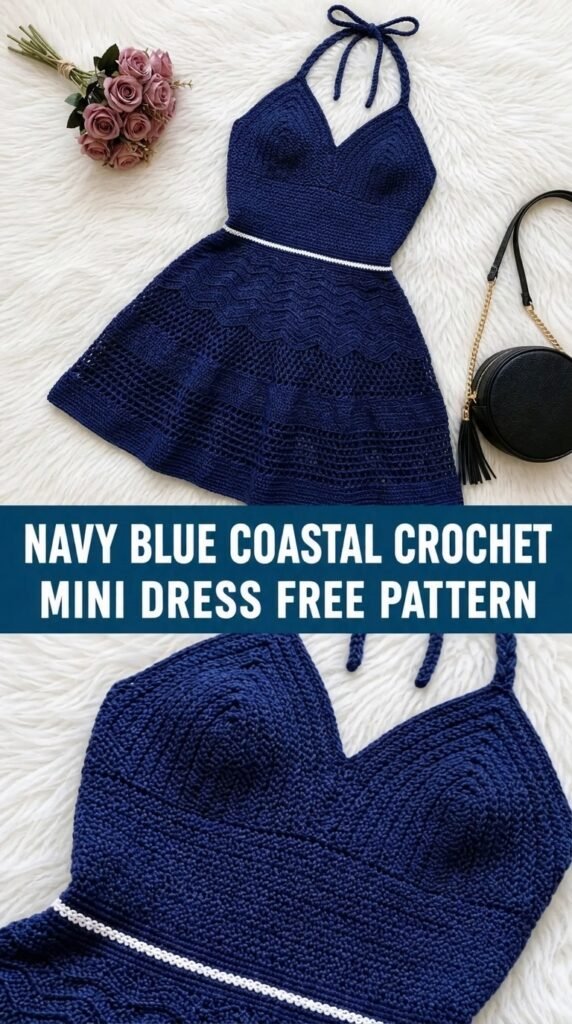
This is the dress I reach for when the day calls for something pretty but practical. I hope it becomes that for you too.
About This Pattern
This is a top-down, seamless mini dress worked in one piece from the neckline to the hem. The bodice is shaped with simple increases and a gentle V-neck, then the skirt is flared with regular increase rounds so it moves freely. Open shell stitches create the coastal texture—think soft waves rather than dense fabric. The dress sits roughly mid-thigh on most body types and has a relaxed, breathable fit.
Skill level is intermediate. You should be comfortable with working in the round, increasing, decreasing, and reading a pattern that switches between solid and openwork sections. Nothing here is overly complicated, but attention to stitch counts will keep the shape clean.
Finished measurements (after blocking):
- Bust: 34–36 (38–40, 42–44, 46–48) inches
- Length from shoulder: approximately 33–35 inches depending on size and personal preference
- Designed with 2–4 inches of positive ease at the bust for comfortable movement
The fabric has beautiful drape once blocked. Expect it to soften and open slightly with wear, which only adds to the coastal feel.
Materials You’ll Need
Yarn
- Color A (Main): Approximately 900 (1000, 1150, 1300) yards of DK-weight cotton or cotton-blend yarn in deep navy blue. I used a soft mercerized cotton that gives clear stitch definition and a slight sheen.
- Optional Color B (Accent): 50–80 yards of the same weight in soft white or natural for a thin neckline and hem trim, if desired.
Allow 15% extra for gauge variation and personal length adjustments.
Hooks
- 4.0 mm (G/6) for the main body
- 3.5 mm (E/4) for the neckline and any denser edging work
Notions
- Tapestry needle
- Stitch markers (at least 4, preferably locking)
- Scissors
- Blocking mats and pins (or rust-proof T-pins)
- Optional: thin elastic thread for the underbust if you prefer extra support
Abbreviations and Terminology
All terms are US crochet terminology.
- ch – chain
- sc – single crochet (insert hook, yarn over, pull up loop, yarn over, pull through both loops)
- hdc – half double crochet (yarn over, insert hook, yarn over, pull up loop, yarn over, pull through all three loops)
- dc – double crochet (yarn over, insert hook, yarn over, pull up loop, yarn over, pull through two loops, yarn over, pull through remaining two)
- tr – treble crochet (yarn over twice, insert hook, yarn over, pull up loop, [yarn over, pull through two loops] three times)
- sl st – slip stitch
- sp – space
- st(s) – stitch(es)
- sk – skip
- rep – repeat
- beg – beginning
- RS – right side
- WS – wrong side
Shell stitch (used throughout the openwork sections): (2 dc, ch 1, 2 dc) in the same stitch or space.
Turning chains do not count as a stitch unless a step explicitly says they do. When working in the round, the beginning chain is usually not counted as a stitch unless noted.
Gauge
Work a gauge swatch in the main shell pattern:
Chain 30.
Row 1: Dc in 4th ch from hook and in each ch across. Turn.
Row 2: Ch 3 (counts as dc), *sk 2 sts, shell in next st, sk 2 sts, dc in next st; rep from * across. Turn.
Row 3: Ch 3, *shell in ch-1 sp of next shell, dc in next dc; rep from * across. Turn.
Repeat Row 3 until the piece measures at least 4 inches tall.
Blocked gauge: 4 shell repeats and 8 rows = approximately 4 inches square using the 4.0 mm hook.
If your swatch is smaller than 4 inches, go up a hook size. If larger, go down. Cotton can relax with blocking, so check both before and after blocking your swatch.
Main Pattern Instructions
The dress is worked top-down in joined rounds. Place a stitch marker in the first stitch of every round and move it up as you go.

Neckline Foundation
With 3.5 mm hook and Color A, ch 96 (104, 112, 120). Being careful not to twist, join with sl st to first ch to form a ring.
Round 1: Ch 1, sc in each ch around. Join with sl st to first sc. (96, 104, 112, 120 sc)
Round 2: Ch 1, sc in each st around. Join.
Switch to 4.0 mm hook.
Bodice Setup
Round 3: Ch 3 (does not count as a stitch), dc in first st and in each st around. Join with sl st to first dc.
Round 4 (begin shaping): Ch 3, dc in first 23 (25, 27, 29) sts, 2 dc in next st, dc in next 24 (26, 28, 30) sts, 2 dc in next st, dc in next 23 (25, 27, 29) sts, 2 dc in next st, dc in remaining sts to end, 2 dc in last st. Join.
You have increased 4 stitches. These increases will sit roughly at the shoulders and underarms as the bodice grows.
Continue working even in dc for 2 more rounds, then begin the front V-neck shaping and armhole separation.
Separating for Armholes and Creating the V-Neck
Mark the center front stitch. You will work the back and fronts separately for a short section to create armhole depth, then rejoin.
Work the back panel first across the designated stitches, leaving the underarm chains, then work each front. The exact stitch counts depend on size; the goal is roughly 2–2.5 inches of armhole depth before rejoining for the underbust.
Once the armhole depth is reached, rejoin the fronts and back at the underarms with chains (usually 4–6 chains per underarm) and continue in the round.
Underbust and Transition to Skirt
Work 3–4 rounds of solid dc or hdc to create a gentle underbust band. This section helps the dress sit nicely at the waist without needing a separate belt.
Then transition into the main shell pattern for the skirt.
Skirt – Open Shell Pattern
Setup Round: Ch 3, *sk 2 sts, shell in next st, sk 2 sts, dc in next st; rep from * around, adjusting slightly if needed so the number of shells is even. Join.
Shell Round: Ch 3, *shell in ch-1 sp of next shell, dc in next dc; rep from * around. Join.
Repeat the Shell Round, increasing every 4th or 5th round by working an extra shell or by placing two shells in the same space at regular intervals. This gradual increase creates the soft flare.
Continue until the skirt measures approximately 16–18 inches from the underbust (or desired length). End with a Shell Round.
Optional Color Accent at Hem
If using Color B, switch for the final 2 rounds. Work one round of sc, then one round of reverse single crochet (crab stitch) for a neat, slightly raised edge.
Special Techniques
Shell Placement Consistency
Always work the shell into the ch-1 space of the previous shell. This keeps the columns of openwork straight and prevents the fabric from drifting.
Invisible Join (optional but recommended)
For a cleaner finish at the end of rounds, cut the yarn leaving a 6-inch tail, pull the tail through the last stitch, then use a tapestry needle to mimic the path of a slip stitch into the first stitch of the round and back into the last stitch. Weave in ends securely.
V-Neck Shaping
At the center front, you will decrease 1 stitch on each side of the V every other round until the desired depth is reached (usually 3–4 inches from the neckline). Then work even.
Assembly and Finishing
Because the dress is seamless, assembly is minimal.

- Weave in all ends carefully, especially at the underarms and neckline.
- Try the dress on before blocking and mark any length adjustments with locking stitch markers.
- If the neckline feels too wide, add a simple round of sc or a thin surface-crochet chain along the edge using the smaller hook.
- Optional: Thread a length of matching yarn or thin elastic through the underbust band for adjustable fit.
No seaming is required.
Blocking and Care
Wet blocking is essential for this design. The open shells open beautifully once blocked and the cotton softens.
- Fill a basin with lukewarm water and a small amount of gentle wool wash or mild detergent.
- Submerge the dress and let it soak for 15–20 minutes. Do not agitate.
- Gently squeeze out excess water (never wring). Roll in a clean towel to remove more moisture.
- Lay flat on blocking mats. Pin the neckline, armholes, and hem to the finished measurements, opening the shells evenly.
- Allow to dry completely away from direct sunlight and heat.
Care: Hand wash in cool water, roll in a towel, and dry flat. Never hang a wet cotton garment—it will stretch. Store folded rather than on a hanger for long periods.
Fit and Troubleshooting Tips
- If the bodice feels tight: Go up a hook size for the solid dc sections only, or add an extra increase round early on.
- If the skirt cups or pulls inward: You need more frequent increases. Add an increase round every 3–4 rounds instead of every 5.
- If the fabric looks dense: Your tension may be tighter than the sample. Try a larger hook and re-check gauge.
- Armhole too deep or shallow: Adjust the number of rows worked before rejoining the underarms. Try the dress on as you go if possible.
- Length adjustments: The easiest place to add or remove length is in the solid underbust band or by adding extra shell rounds before the final edge.
Remember that cotton relaxes with wear and washing, so a slightly snugger fit before blocking often becomes perfect after.
FAQ’s
Can a confident beginner make this dress?
This pattern is written for intermediate crocheters because of the top-down construction, V-neck shaping, and regular increases in the shell pattern. A beginner who is already comfortable working in the round, counting stitches, and reading basic increase/decrease instructions can certainly try it, especially if they take their time and use plenty of stitch markers. If you are brand new to garments, I recommend practicing the shell stitch and a small top-down project first.
Can I substitute a different yarn?
Yes, but choose carefully. A DK-weight cotton or cotton-blend gives the best drape and breathability for a coastal mini dress. Linen-blend yarns also work beautifully and soften with washing. Avoid heavy acrylics or wool if you want a cool summer garment—they will feel warmer and may not open as nicely when blocked. Always make a gauge swatch with your chosen yarn.
How do I make the dress longer or shorter?
The easiest place to adjust length is in the skirt. Simply work more or fewer shell rounds before the final edge. You can also add or remove 1–2 rounds in the solid underbust section. Keep in mind that extra length will require additional yarn (roughly 50–70 yards per extra inch of skirt).
What if I prefer a higher or lower neckline?
The V-neck depth is adjustable. For a higher neckline, begin the center-front decreases later or decrease less frequently. For a deeper V, start the decreases earlier and continue them a few more rounds. Try the dress on as you work the bodice if possible so you can fine-tune the depth to your preference.
Do I really need to block this dress?
Yes. Blocking is not optional for this design. The open shell stitches only reach their full, soft, wave-like appearance after wet blocking. Blocking also evens out tension, opens the fabric for better drape, and sets the final measurements. Skipping it will leave the dress looking denser and less refined than intended.
Can I add sleeves?
The current design is sleeveless for a breezy coastal feel. If you would like short sleeves, you can pick up stitches around the armholes after the bodice is complete and work a few rounds of shells or simple dc, decreasing slightly for a gentle sleeve shape. This will require additional yarn and some on-the-fly shaping.
How should I care for the finished dress?
Hand wash in cool water with a mild detergent, gently squeeze out water (never wring), roll in a towel, and dry flat. Avoid hanging the dress while wet, as cotton can stretch under its own weight. Store folded rather than on a hanger for long-term care. With proper care, the dress will soften beautifully over time and hold its shape well.
Is the sizing inclusive?
The pattern includes four size ranges covering approximately 34–48 inches at the bust with 2–4 inches of positive ease. Because the fabric has good drape and the skirt is flared, many body types find it flattering. If you fall between sizes or prefer a different fit, use the larger size and adjust the underbust band or add elastic for a more custom feel.
Final Thoughts
There is something deeply satisfying about wearing a garment you made with your own hands, especially one that feels like a small piece of the coast. Every time I put this dress on, I remember that quiet afternoon and the way the light moved across the water. I hope this Navy Blue Coastal Crochet Mini Dress brings you the same sense of ease and quiet joy.
When you finish yours, I would love to see it. Leave a comment, share a photo, or tag your makes so others can find a little inspiration too. Happy stitching—may your yarn run smooth and your stitches stay even.




Leave a Reply
You must be logged in to post a comment.