Sunflower Summer Tote Free Crochet Pattern
Ready for a tote that actually works hard and looks like summer sunshine? This sunflower summer tote does both. It stands up on its own, holds a solid load of market finds or beach gear, and sports three bold 3D sunflowers that make people stop and ask where you bought it. You make it yourself with simple single crochet and a few fun appliques.
The body stays basic. Continuous rounds of single crochet give you a sturdy, boxy shape. The real fun comes from the layered sunflower heads, stems, and leaves you sew on the front. A scallop edge and mustard handles finish the look. Grab your hook. This one is worth every stitch.
What This Tote Looks Like When Finished
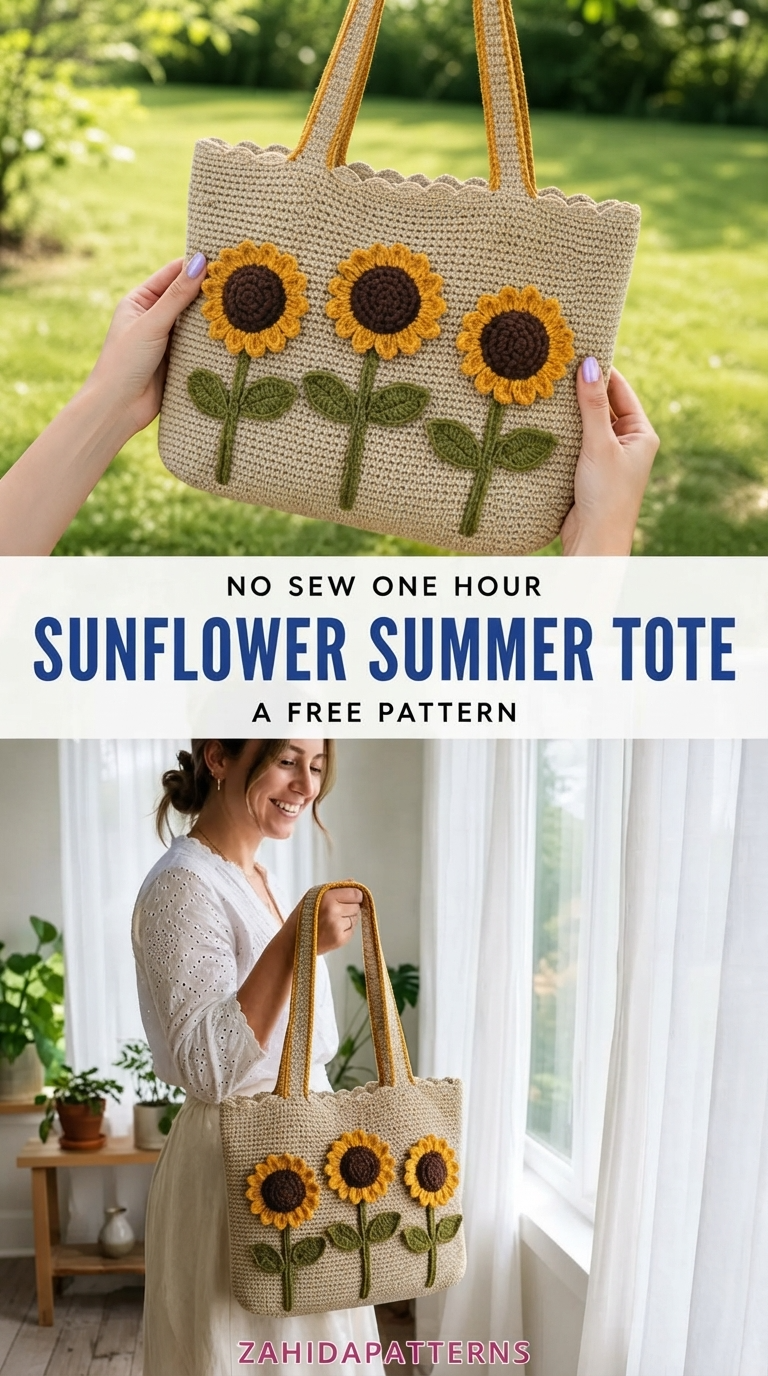
You end up with a structured bag that measures about 15 inches wide by 12 inches tall by 4 inches deep. The handles drop another 12 inches, so the total carry height hits around 24 inches. Plenty of room for groceries, a couple of books, or your current yarn project.
The flat rectangular base keeps the tote standing upright. No floppy sides here. The back stays plain so the three sunflowers on the front stay the star of the show. Scallop edging runs along the top opening for a soft, finished look. Double-stranded mustard yellow handles add a pop of color and solid strength.
This bag works as a beach tote, farmers market carrier, or thoughtful handmade gift. It feels substantial without weighing you down.
Skill Level and Time You’ll Need
Call this one intermediate. The bag body uses only single crochet in continuous rounds. That part stays beginner-friendly. The intermediate label comes from the magic ring, color changes, and the 3D sunflower appliques. You shape two layers of petals, make leaves, and sew everything neatly.
If you have finished a couple of small projects and feel okay changing colors and sewing pieces together, you can handle this. The pattern walks you through every step.
Plan on 12 to 18 hours total. Break it down like this:
- 6 to 8 hours for the bag body
- 4 to 6 hours for the three complete sunflower appliques (centers, petals, stems, leaves)
- 2 hours for handles, edging, and finishing
Work on it over a week of evening sessions. Put on a show and let the rows fly by.
Materials List
You need worsted weight yarn (category 4) in five colors:
- Main Color (MC): Natural linen or oatmeal cotton – about 650 yards
- Color A (CA): Golden yellow – about 80 yards
- Color B (CB): Dark brown – about 30 yards
- Color C (CC): Olive or medium green – about 50 yards
- Handle Color (HC): Mustard yellow – about 100 yards
Good yarn options include 100% mercerized cotton that holds its shape and washes well. Cotton, cotton blends, linen blends, or jute-cotton blends work best. Skip high-elasticity wools or acrylics. They stretch and the bag loses its boxy shape. Always swatch first.
Hooks:
- US G/6 (4.0 mm) for the bag body and appliques
- US H/8 (5.0 mm) for the double-stranded handles
Notions:
- Yarn needle
- At least 4 stitch markers
- Scissors
- Row counter (optional but helpful)
- Straight pins for blocking the appliques
Gauge Check
Gauge matters for the finished size. With MC and the G/6 hook you want 18 sc and 20 rows = 4 inches in single crochet worked in rounds. For the handles (HC held double with H/8 hook) aim for 14 sc and 16 rows = 4 inches.
If your swatch runs larger than 4 inches for 18 stitches, drop one hook size. If it runs smaller, go up one size.
Abbreviations and Special Stitches
Here are the stitches you will use:
- ch: Chain
- sl st: Slip stitch
- sc: Single crochet
- hdc: Half double crochet
- dc: Double crochet
- tr: Treble crochet
- sc2tog: Single crochet two together (decrease)
- magic ring: Adjustable loop that closes tightly
- BLO / FLO: Back loop only / Front loop only
- pm: Place marker
- rnd: Round
- sk: Skip
- yo: Yarn over
Scallop Stitch for the Top Edge
Skip 2 stitches, work 5 dc into the next stitch, skip 2 stitches, slip stitch into the next stitch. Repeat around. Each scallop uses 6 stitches.
Leaf Construction
With CC, chain 10. Starting in the second chain from the hook work: 1 sc, 1 hdc, 1 dc, 1 tr, 1 dc, 1 hdc, 1 sc, and 1 sl st into the last chain. Rotate the work and crochet along the opposite side of the foundation chain the same sequence. Fasten off and leave a long tail for sewing. This makes one pointed oval leaf.
Pattern Instructions
Part 1: Bag Base
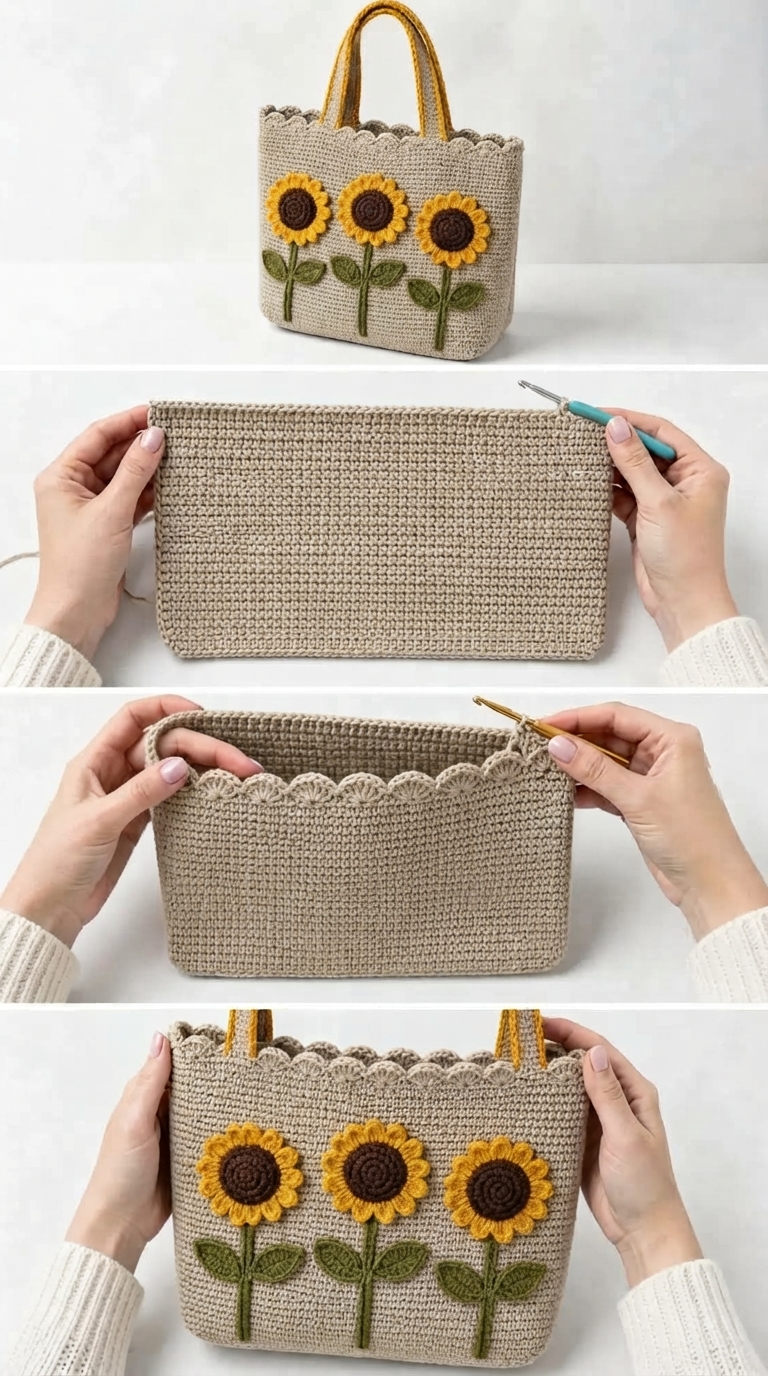
Work the base flat in rows with MC. This rectangular bottom helps the bag stand up.
Foundation chain: Chain 69.
Row 1 (RS): Sc in the second chain from the hook and in each chain across. Turn. (68 sc)
Rows 2 through 18: Ch 1, sc in each st across. Turn. (68 sc each row)
After Row 18 do not turn and do not fasten off.
Checkpoint: The base should measure about 15 inches along the long edge and 4 inches along the short edge. Recheck gauge if your numbers differ a lot.
Part 2: Bag Body (Sides)
Now work continuously around all four edges of the base.
Setup Round: Do not turn after Row 18. Work 18 sc evenly across one short end (about 1 sc per row end). Work 68 sc across the foundation chain edge. Work 18 sc evenly across the other short end. You are back at the long edge that already has 68 stitches. Place a marker in the first stitch of this round. Join with sl st to the first sc. (172 sc total)
The 172 stitches break down as 68 front + 18 right side + 68 back + 18 left side.
From here work in continuous rounds. No joining and no turning chains unless noted. Move the stitch marker up each round.
Rounds 1 through 60: Sc in each st around. (172 sc each round)
After Round 60, sl st to join. Do not fasten off. Move on to the scallop edging.
Checkpoint: After 60 rounds the sides should measure about 12 inches tall from the base.
Part 3: Scallop Edging
The stitch count needs to divide by 6. Adjust 172 down to 168.
Adjustment Round: Ch 1 (does not count as a stitch). Work sc 42, sc2tog, sc 42, sc2tog, sc 42, sc2tog, sc 42, sc2tog. Join with sl st. (168 sc)
Scallop Round: Continue with MC. Ch 1. (Sk 2 sts, 5 dc in next st, sk 2 sts, sl st in next st) 28 times. Join with sl st to first sl st. (28 scallops)
Fasten off and weave in the end.
Part 4: Handles (Make 2)
Work each handle as a flat sc strip with HC held double and the H/8 hook.
Foundation chain: With HC held double, chain 55.
Row 1: Sc in the second chain from the hook and in each chain across. Turn. (54 sc)
Rows 2 through 6: Ch 1, sc in each st across. Turn. (54 sc each row)
Do not fasten off. Work a slip stitch edging along both long edges and the short ends for a neat rolled edge. Join and fasten off.
Each handle measures about 12 inches long and 1 inch wide. Make two.
Handle placement: Attach the ends of each handle 4 inches in from each side edge of the front and back panels, measured from the top. Overlap each end about 2 inches down the inside of the bag. Sew securely with HC and a box stitch (rectangle then an X through the middle) for strength.
Part 5: Sunflower Center Disk (Make 3)
Start each sunflower with a center disk in CB.
With CB and G/6 hook, make a magic ring.
Rnd 1: Ch 1, work 6 sc into the ring. Pull closed. Do not join; continue in continuous rounds. (6 sc)
Rnd 2: 2 sc in each st around. (12 sc)
Rnd 3: (Sc in next st, 2 sc in next st) 6 times. (18 sc)
Rnd 4: (Sc in next 2 sts, 2 sc in next st) 6 times. (24 sc)
Rnd 5: (Sc in next 3 sts, 2 sc in next st) 6 times. (30 sc)
Sl st to join at the end of Rnd 5. Do not fasten off. The disk measures about 2 inches across.
Part 5A: Inner Petal Round
Working into the front loops only of Round 3 of the center disk (18 stitches), join CA.
(Work sc in first FL, 2 dc in next FL, sc in next FL) 6 times. Sl st to join. (6 inner petals)
Fasten off CA.
Part 5B: Outer Petal Round
Join CA into the back loops only of Round 4 of the center disk (24 stitches).
(Sc in next BL, hdc in next BL, 3 dc in next BL, hdc in next BL, sc in next BL, sl st in next BL) 4 times. Join with sl st. (4 large outer petals)
Fasten off CA. Leave a long tail for sewing.
Make 3 sunflower heads total.
Part 6: Sunflower Stems (Make 3)
Each stem is a narrow strip in CC.
With CC and G/6 hook, chain 4.
Row 1: Sc in second chain from hook and in each chain across. Turn. (3 sc)
Rows 2 through 20: Ch 1, sc in each st across. Turn. (3 sc each row)
Fasten off and leave a long tail. Each stem measures about 4 inches tall. Make 3.
Part 7: Leaves (Make 6)
Follow the Leaf special stitch instructions. Make 6 leaves total (2 per sunflower).
Part 8: Assembly
Step 1: Block all sunflower pieces by dampening them lightly and pinning them to shape. Let them dry completely before sewing.
Step 2: Position the three stems on the front panel. Place the leftmost about 3 inches from the left edge, the center one at about 7.5 inches from the left edge, and the rightmost about 3 inches from the right edge. The bottom of each stem sits about 1.5 inches above the base seam. Pin them in place.
Step 3: Sew each stem to the front panel with CC using a whip stitch along both long edges.
Step 4: Attach one leaf to each side of each stem at a slight diagonal, about halfway up the stem.
Step 5: Center one sunflower head over the top of each stem so the flower overlaps the stem by about 0.5 inches. Pin and sew securely.
Step 6: Weave in all remaining ends on the bag body.
Finishing, Blocking, and Care
Fill the finished bag with crumpled tissue or a plastic bag stuffed with towels to hold the rectangular shape. Lightly mist the outside with water. Press and shape the sides and base so they lie flat and square. Let it dry completely. This step gives you that clean, self-standing look.
Hand wash in cool water with gentle detergent. Do not wring. Press between towels to remove water. Reshape and air dry flat. Skip the dryer and do not iron directly on the appliques.
Quick Tips for Smooth Stitching
Make one complete sunflower first. Get comfortable with the petal rounds before you commit to all three. Adjust tension on the rest if needed.
Keep stitch markers moving every round on the bag body. Sixty rounds of single crochet can blur together fast.
The box stitch for the handles is worth the extra minutes. This tote carries weight. You want those handles locked down tight.
IMO this project hits the sweet spot between useful and pretty. You get a bag you will actually use and a set of 3D flowers that feel special. FYI the cotton yarn choice makes all the difference for structure. Choose low-stretch yarn and the tote keeps its shape for seasons.
Related Articles:
- Lavender Dreams Flower Square Tote Free Crochet Pattern
- Lavender Fields Granny Square Bag Free Crochet Pattern
- Coral Peony Granny Square Bag Free Crochet Pattern
Ready to Start Your Own?
You now have everything you need for a sturdy, cheerful sunflower summer tote. The single crochet body goes quickly once the base is done. The appliques add the fun and the wow factor. Take your time with the assembly and the blocking. Those two steps turn a good bag into a great one.
Pick up your hook, choose your colors, and make one. When you finish, you will have a tote that looks like summer and works like a workhorse. Happy stitching from the Sumara Patterns crew!