


I still remember the morning that started this design. It was one of those sharp, clear winter days when the temperature had dropped overnight and every surface outside my window was covered in the most delicate frost. The blue shadows under the trees looked almost painted, and the ice crystals on the glass formed tiny, perfect flowers that caught the light like glass beads. I stood there longer than I meant to, coffee going cold in my hands, thinking how much I wanted to wear that feeling.
I pulled out a few balls of fingering-weight yarn in the blues I keep for exactly these moods—deep midnight, soft sky, and a silvery white that almost disappears against snow—and began experimenting with small floral motifs. The first attempts were too heavy. The next were too stiff. Eventually the petals started behaving the way frost does: open, a little irregular, and just translucent enough to feel magical. That is how the Winter Frost Blue Crochet Flower Bracelet was born.
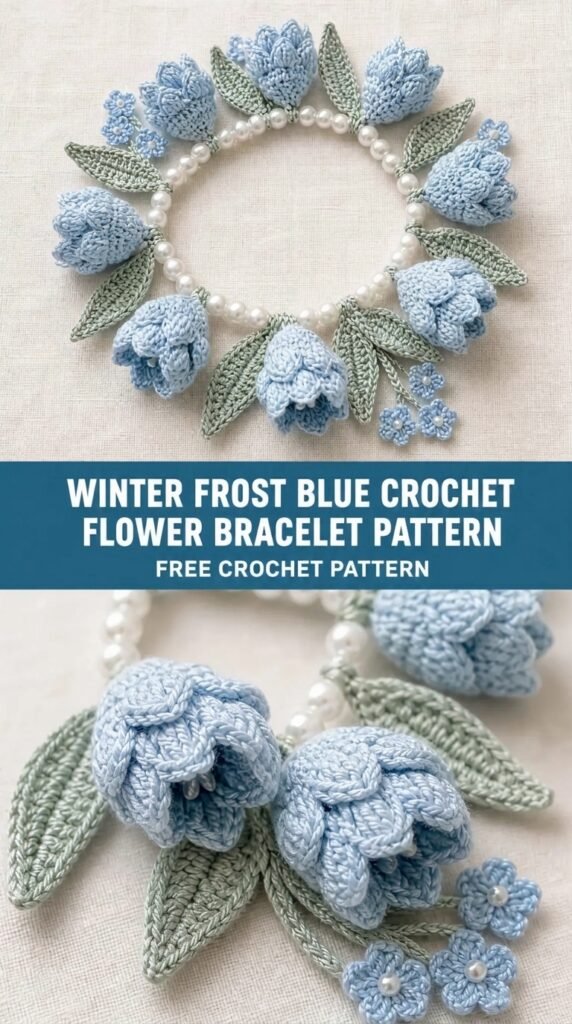
This is a small project with a big atmosphere. A string of delicate blue flowers joined into a soft, flexible band that sits lightly on the wrist. It is the sort of piece you can wear every day under a coat sleeve or dress up for an evening. I hope it brings a little of that quiet winter light into your hands.
About This Pattern
This bracelet is built from individual flower motifs that are joined as you go into a continuous band. Each flower has six slightly cupped petals with picot tips that create a soft, frosted edge. A small center is worked in a contrasting icy white or silver-toned yarn, and you can add a tiny seed bead if you want extra sparkle.
The finished bracelet is adjustable. The sample measures approximately 7 inches (18 cm) in circumference when closed and sits comfortably on an average adult wrist. You can easily add or remove motifs to change the length. The fabric has nice drape and a little stretch, so it does not feel rigid.
Skill level is intermediate. You should be comfortable with working in the round, picots, joining motifs, and reading stitch counts. The individual motifs are not difficult once you settle into the rhythm, but the joining and finishing require attention. I will walk you through every step.
Materials You’ll Need
Yarn (fingering weight / 4-ply, approximately 400–450 m per 100 g)
- Color A (main petal blue – deep icy blue): 25–30 yards / 23–27 meters
- Color B (secondary petal blue – lighter sky or periwinkle): 20–25 yards / 18–23 meters
- Color C (frost centers and joining – soft silver-white or pale ice blue): 15–20 yards / 14–18 meters
Allow 15 % extra for gauge variation and swatching. I used a smooth merino-silk blend for the sample because it gives the petals a soft sheen that looks like frost, but any fingering-weight yarn with good stitch definition will work.
Hooks
- 2.75 mm (C) for the flower motifs
- 2.5 mm (B/1) for the final edging and button loop (optional but recommended for a neater finish)
Notions
- Tapestry needle
- Stitch markers (at least 6–8)
- 8–12 small seed beads in silver, clear, or pale blue (optional)
- One small button, 8–10 mm, in a matching or contrasting metal or pearl tone
- Blocking pins and a foam board or towel
- Scissors
Abbreviations and Terminology
All terms are US crochet terminology.
- ch – chain
- sc – single crochet: insert hook, yarn over, pull up a loop, yarn over, pull through both loops
- hdc – half double crochet: yarn over, insert hook, yarn over, pull up a loop, yarn over, pull through all three loops
- dc – double crochet: yarn over, insert hook, yarn over, pull up a loop, yarn over, pull through two loops, yarn over, pull through remaining two loops
- tr – treble crochet: yarn over twice, insert hook, yarn over, pull up a loop, (yarn over, pull through two loops) three times
- sl st – slip stitch: insert hook, yarn over, pull through both the stitch and the loop on the hook
- picot – ch 3, sl st into the first of those three chains (or into the stitch indicated)
- sp – space
- st(s) – stitch(es)
- rep – repeat
- beg – beginning
Turning chains do not count as a stitch unless a step explicitly says they do. When working into a picot, work into the ch-3 space created by the picot itself.
Gauge
Work one complete flower motif following the instructions below.
The finished motif should measure approximately 1.25–1.4 inches (3.2–3.5 cm) from picot tip to opposite picot tip after light blocking.
If your motif is larger, drop to a 2.5 mm hook. If it is smaller and feels stiff, try a 3.0 mm hook. The exact size is less critical than consistency between motifs, because the bracelet length is controlled by the number of flowers rather than precise gauge.
Main Pattern Instructions
Flower Motif (make 8 for a standard 7-inch bracelet; adjust number as needed)
With Color A and 2.75 mm hook
Round 1: Make a magic ring. Ch 1, work 6 sc into the ring. Pull the ring closed. Join with sl st to first sc. (6 sc)
Round 2: Ch 1, 2 sc in each st around. Join with sl st to first sc. (12 sc)
Round 3: Ch 1, *sc in next st, 2 sc in next st; rep from * around. Join with sl st to first sc. (18 sc)
Round 4 (petal setup): Ch 1, *sc in next st, ch 3, skip 2 sts; rep from * around. Join with sl st to first sc. (6 sc, 6 ch-3 sps)
Round 5 (petals): Sl st into first ch-3 sp. *(Sc, hdc, dc, tr, picot, tr, dc, hdc, sc) all in the same ch-3 sp, sl st in next sc; rep from * around. Fasten off Color A. (6 petals)
Center (Color C):
Join Color C with a standing sc (or ch 1 and sc) in any sc between petals from Round 4. Work 1 sc in each of the 6 sc that sit between the petals. Join with sl st to first sc. Fasten off, leaving a 6-inch tail if you plan to sew a bead in place later.
Weave in the center tail on the wrong side, or use it to sew a seed bead firmly into the middle of the flower. The bead sits on top of the six sc of the center.
Make 7 more motifs the same way. For visual interest I alternated Color A and Color B for the petals on successive flowers (four of each). You can keep them all the same color if you prefer a more uniform look.
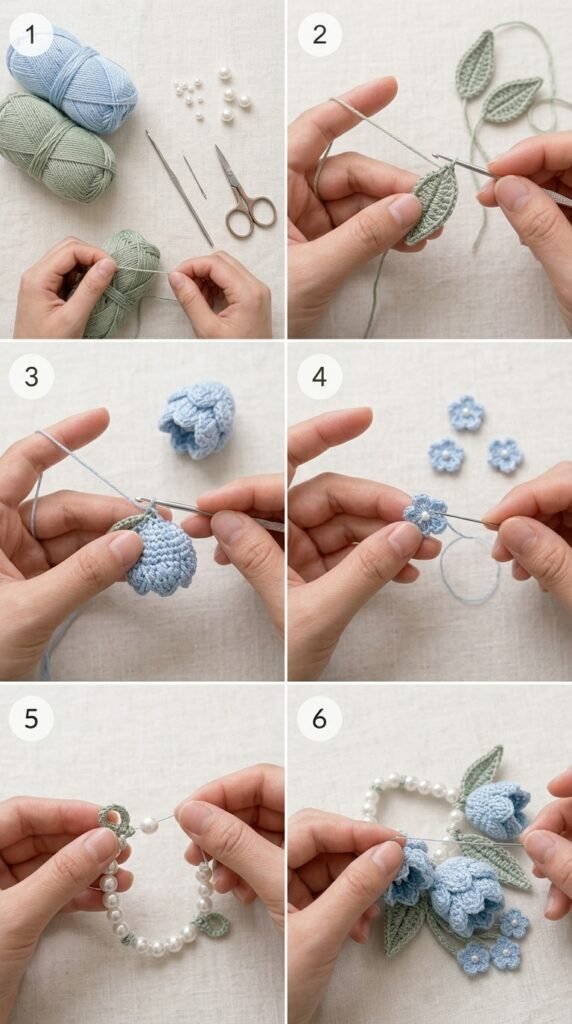
Joining the Motifs
Lay the motifs right side up in a gentle curve so you can see how they will sit on the wrist. You will join them with short connecting chains worked in Color C.
With Color C and 2.75 mm hook, join with a standing sc (or ch 1 and sc) into the picot tip of one petal of the first flower.
Ch 5, sc into the corresponding picot tip of the next flower (the petal that will face the previous flower). Ch 1, sc into the next free picot tip of the same flower (this creates a small “bridge” so the flowers sit slightly offset and look more natural).
Repeat from * until all flowers are joined into a strip. Do not join the first and last flowers yet.
You now have a flexible strip of flowers connected by short chains. Try it around your wrist. The open ends should meet comfortably with a little ease. If it feels short, make one more motif and insert it. If it feels long, remove a motif or shorten the joining chains to ch-4.
Closing the Bracelet and Adding the Button Loop
Once the length is right, join the first and last flowers the same way you joined the others, but leave a small gap for the button.
On the end that will hold the button, work a short chain loop:
Join Color C in the outer picot of the end flower, ch 8 (or enough to fit snugly over your button), sl st back into the same picot. Fasten off.
Sew the button securely to the opposite end, centering it on the outer petal or on the joining chain so it sits flat against the wrist.
Optional Simple Edging (for a more finished look)
With the smaller 2.5 mm hook and Color C, work a light sc edging along the top and bottom edges of the bracelet. Work 1 sc into each available stitch or chain space, placing 2 sc into any larger gaps so the edge stays smooth. This step is optional but gives the bracelet a polished outline and helps it hold its shape.
Special Techniques
Magic ring: Wrap the yarn around two fingers to form a loop, insert the hook under the short end, yarn over with the working yarn, and pull up a loop. Chain 1 to secure, then work the required stitches into the ring. Pull the short end to close.
Standing single crochet: Make a slip knot on the hook, insert the hook into the indicated stitch, yarn over and pull up a loop, yarn over and pull through both loops. This starts a new color cleanly without a chain.
Picot: Chain 3, then insert the hook into the first of those three chains (or into the stitch at the base of the chain-3 if the pattern directs) and work a slip stitch. Keep the picot loose enough that it does not pull the petal tip tight.
Adding a seed bead: Thread the bead onto the yarn before you begin the center, or sew it on afterward with the yarn tail. If sewing, take several small stitches through the bead and the center stitches so it cannot pull free.
Assembly and Finishing
- Weave in all ends securely on the wrong side, taking care not to distort the petals.
- Sew the button in place if you have not already done so.
- Check that the button loop fits comfortably over the button without stretching the fabric.
- Optional: lightly steam or wet-block the bracelet (see next section) before wearing.
There is no traditional seaming. The motifs are joined as you go, so the only sewing required is the button and any beads.

Blocking and Care
Because the petals are open and the fabric is light, blocking makes a noticeable difference. Pin each flower gently into a soft hexagon shape on a foam board or thick towel, stretching the picots just enough to open them. Mist lightly with water or use a steam iron held several inches above the work. Allow to dry completely.
Care: Hand wash in cool water with a mild wool wash. Do not wring or twist. Roll in a towel to remove excess water, then reshape and dry flat. Never hang the bracelet while wet; the weight of the water can stretch the joining chains. Store flat or loosely coiled to protect the petals.
Fit and Troubleshooting Tips
- Bracelet feels stiff: You may be working too tightly or using a denser yarn. Try a slightly larger hook for the motifs and block more aggressively.
- Petals cup too much: This is often caused by tight picots or dense stitches in Round 5. Loosen the tension on the petal stitches and make the picots a little taller (ch 4 instead of ch 3 if needed).
- Joining chains show too much: Shorten them to ch-4 or work a sc into the middle of the chain on the next round of optional edging to pull them in.
- Length is wrong: The easiest adjustment is the number of motifs. Each additional flower adds roughly ¾–1 inch of circumference depending on your gauge.
- Beads keep falling off: Sew them with the yarn tail rather than relying on a pre-strung bead, and take at least four small stitches through the bead hole.
Final Thoughts
There is something quietly satisfying about finishing a small piece that carries a whole winter mood. When I wear my sample, the soft blues catch the light in a way that still reminds me of that frosty morning. I hope your version does the same for you.
Make one for yourself, then another for a friend who needs a little brightness in the colder months. If you share photos, I would love to see how your frost flowers turned out—tag them or leave a note in the comments. Happy stitching, and may your winter be full of soft blues and quiet light.
FAQ’s
Can I make this bracelet in a different size?
Yes. Add or remove motifs to change the circumference. For a child-sized bracelet, start with 6 motifs. For a larger wrist or a looser fit, use 9 or 10.
What yarn substitutes work well?
Any fingering-weight yarn with good stitch definition. Cotton or cotton blends will give a crisper petal shape; wool or wool-silk blends give a softer, more frost-like drape. Avoid very fuzzy yarns because they hide the petal details.
Do I have to use beads?
No. The center worked in Color C already looks finished. Beads simply add extra sparkle if you want it.
Is this suitable for beginners?
It is best for intermediate crocheters who are comfortable with magic rings, working in the round, and picots. Confident beginners who have made a few motifs before should be able to follow along with careful attention to the stitch counts.
Can I turn this into a matching necklace or earrings?
Absolutely. Make additional motifs and join them into a longer chain for a necklace, or make single motifs with a jump ring for earrings. The same flower works beautifully at a smaller scale with a 2.25 mm hook.
How long does one bracelet take?
Once you have the motif memorized, each flower takes about 10–15 minutes. The full bracelet, including joining and finishing, usually takes 2–3 hours.


Leave a Reply
You must be logged in to post a comment.