


I still remember the exact afternoon this dress was born. I was sitting on the porch with a basket of leftover cotton yarn — soft coral, warm sunshine yellow, and a creamy natural — watching my niece toddle around in a plain white onesie. The light hit her just right and I thought, “She needs something that looks like pure summer.” Not a heavy sweater. Not a stiff formal dress. Something light, a little lacy, and full of happy color.
That evening I started sketching. I wanted a simple top-down construction so there would be almost no seaming, a yoke that felt soft against a baby’s neck, and a skirt that flared just enough to catch the breeze. The shell stitches came next — they reminded me of little sunbursts. By the time I finished the first sample, I knew I had to share it.
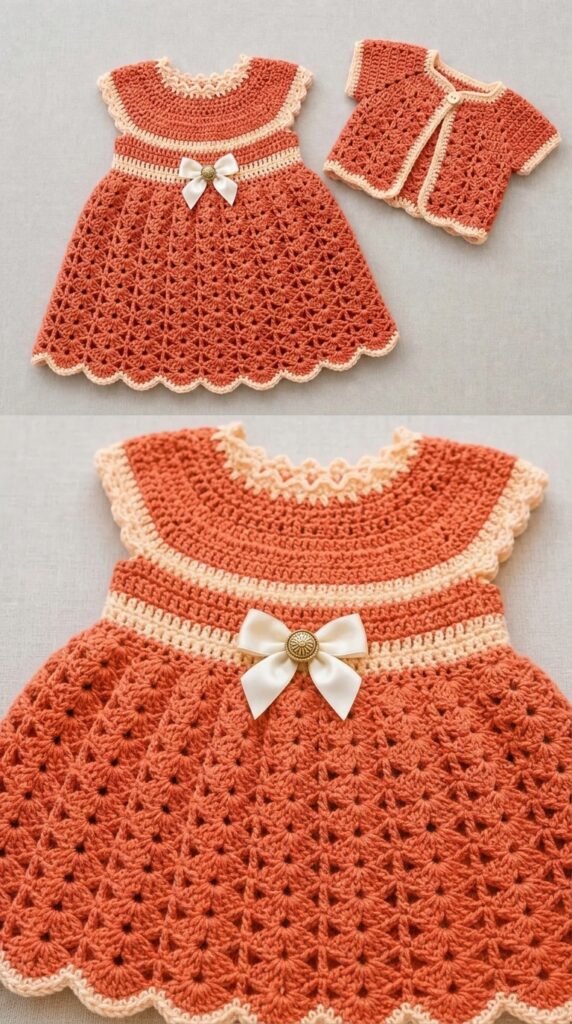
This is the Coral Sunshine Baby Dress free crochet pattern. It is light, cheerful, and designed to be worn on warm days or layered over a long-sleeve onesie when the air turns cool. The colorwork is simple enough that you never have more than two strands active at once, and the lace skirt works up faster than you expect.
About This Pattern
The dress is worked top-down in one piece. You begin with a round yoke, increase for the armholes, then continue the body and skirt in joined rounds. The skirt uses a repeating shell pattern that creates gentle flare and a soft, open texture. A short row of contrasting color near the hem and a matching trim at the neck and armholes pull the whole design together.
Skill level is intermediate. You should be comfortable with working in the round, changing colors, and reading basic stitch counts. The shell pattern itself is straightforward once you complete the first two repeats.
Finished sizes range from 0–3 months through 12–18 months. The measurements are designed with a little positive ease so the dress can be worn over diapers and onesies without feeling tight. The cotton yarn gives beautiful drape and is gentle against baby skin.
Materials You’ll Need
Yarn (DK / light worsted weight cotton or cotton blend recommended)
- Color A (Coral): approximately 220 (250, 280, 320) yards / 200 (230, 255, 290) meters
- Color B (Sunshine Yellow): approximately 90 (100, 115, 130) yards / 80 (90, 105, 120) meters
- Color C (Cream or Natural): approximately 60 (70, 80, 90) yards / 55 (65, 75, 80) meters
Allow 15% extra for gauge variation and tension differences.
Hooks
- 3.5 mm (E) for the yoke and body
- 4.0 mm (G) for the skirt if you prefer a softer, more open fabric (optional)
Notions
- Stitch markers (at least 4)
- Tapestry needle
- Scissors
- Blocking mats and pins (highly recommended)
- Optional: 3 small buttons (½ inch / 12 mm) if you prefer a buttoned back opening instead of the seamless version
Abbreviations and Terminology (US Terms)
- ch – chain
- sc – single crochet
- hdc – half double crochet
- dc – double crochet
- tr – treble crochet
- sl st – slip stitch
- st(s) – stitch(es)
- sk – skip
- sp – space
- rep – repeat
- beg – beginning
- FO – fasten off
Special stitches
- Shell: (2 dc, ch 1, 2 dc) in the same stitch or space
- V-st: (dc, ch 1, dc) in the same stitch or space
Turning chains do not count as a stitch unless a step explicitly says they do. Always join rounds with a slip stitch to the first stitch of the round unless otherwise noted.
Gauge
Work a swatch in the main body stitch (dc in the round) with the 3.5 mm hook.
After blocking: 18 dc and 10 rounds = 4 inches (10 cm).
If your swatch is tighter, go up a hook size. If it is looser, go down. The skirt is intentionally a little more open, so a slightly larger hook there is fine if you like a softer drape.
Main Pattern Instructions
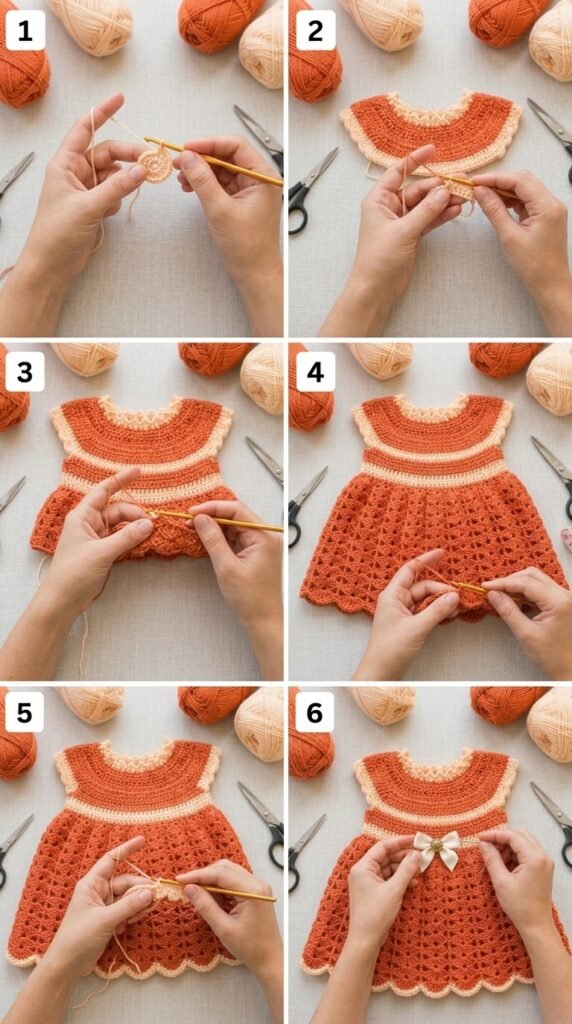
Yoke
With Color A and 3.5 mm hook, ch 60 (64, 68, 72). Join with sl st to first ch, being careful not to twist. Place marker for beginning of round.
Round 1: Ch 2 (does not count as st), dc in each ch around. Join. — 60 (64, 68, 72) dc
Round 2: Ch 2, *dc in next 4 sts, 2 dc in next st; rep from * around. Join. — 72 (76, 81, 86) dc
Round 3: Ch 2, *dc in next 5 sts, 2 dc in next st; rep from * around. Join. — 84 (88, 94, 100) dc
Round 4: Ch 2, *dc in next 6 sts, 2 dc in next st; rep from * around. Join. — 96 (100, 107, 114) dc
Round 5: Ch 2, *dc in next 7 sts, 2 dc in next st; rep from * around. Join. — 108 (112, 120, 128) dc
Round 6: Ch 2, *dc in next 8 sts, 2 dc in next st; rep from * around. Join. — 120 (124, 133, 142) dc
Continue increasing in the same manner (adding one more stitch between increases each round) until the yoke measures approximately:
- 0–3 mo: 3.5 inches (9 cm) deep
- 3–6 mo: 4 inches (10 cm)
- 6–12 mo: 4.5 inches (11.5 cm)
- 12–18 mo: 5 inches (12.5 cm)
You should have roughly 132 (144, 156, 168) stitches at the end of the yoke. Exact count is less important than the depth measurement.
Divide for Armholes
Next Round: Ch 2, dc in next 20 (22, 24, 26) sts (back), ch 6 (6, 7, 8) for underarm, sk next 26 (28, 30, 32) sts (armhole), dc in next 40 (44, 48, 52) sts (front), ch 6 (6, 7, 8) for underarm, sk remaining sts for second armhole. Join.
You now have the body stitches plus the underarm chains.
Body
Round 1: Ch 2, dc in each dc and each underarm chain around. Join. Place a marker in the center of each underarm section if desired.
Work even in dc for 1.5 (2, 2.5, 3) inches, or until the body reaches the desired length before the skirt begins. Change to Color B in the last stitch of the final body round.
Skirt – Shell Pattern
Switch to 4.0 mm hook if you prefer more drape (optional).
Round 1 (setup): With Color B, ch 1, sc in first st, *sk 2 sts, Shell in next st, sk 2 sts, sc in next st; rep from * around, adjusting the last few stitches if needed so the pattern ends evenly. Join to first sc.
Round 2: Sl st into the ch-1 space of the first Shell, ch 3 (counts as dc), (dc, ch 1, 2 dc) in same ch-1 sp, *sc in next sc, Shell in next Shell ch-1 sp; rep from * around, ending with sc in last sc. Join to top of beg ch-3.
Round 3: Sl st into the ch-1 sp of the first Shell, ch 1, sc in same sp, *Shell in next sc, sc in next Shell ch-1 sp; rep from * around. Join.
Repeat Rounds 2 and 3 for the skirt pattern, alternating the placement of shells and sc stitches so the shells stack in a gentle diagonal.
Continue until the skirt measures approximately:
- 0–3 mo: 6–7 inches (15–18 cm)
- 3–6 mo: 7–8 inches (18–20 cm)
- 6–12 mo: 8–9 inches (20–23 cm)
- 12–18 mo: 9–10 inches (23–25 cm)
Change to Color C in the last stitch of the final pattern round.
Hem Contrast Band
With Color C, work 2 rounds of sc around the entire bottom edge, joining each round. FO and weave in ends.
Neck and Armhole Edging
With Color C and 3.5 mm hook, join at the center back of the neck edge. Work 1 round of sc evenly around the neckline, placing 2 sc in each increase point if needed for smoothness. FO.
Join Color C at the underarm of one armhole and work 1 round of sc around. Repeat for the second armhole. FO and weave in all ends.
Special Techniques
Color changes
When changing color at the end of a round, work the last yarn-over of the final stitch with the new color. Carry the unused color loosely up the inside of the dress only if the color will be used again within 4–5 rounds; otherwise cut and rejoin later.
Shell placement tip
After the first two rounds of the skirt, the shells will naturally stack. If a shell looks slightly off-center, simply adjust by one stitch on the next round. The open nature of the stitch hides small adjustments.
Assembly and Finishing
Because the dress is worked in one piece, there is almost no assembly. Simply weave in every end securely on the wrong side. If you prefer a buttoned back opening, leave a 2-inch (5 cm) slit at the center back of the yoke during the early rounds and add three small button loops and buttons after the edging is complete.
Blocking and Care
Wet-block the finished dress. Soak in lukewarm water with a little mild soap, gently squeeze out excess water (do not wring), and pin to shape on blocking mats. Pay special attention to the shell pattern so the open spaces are even. Allow to dry completely.

Care: Hand wash in cool water, reshape while damp, and dry flat. Never hang a wet cotton dress — the weight can stretch the yoke. Cotton softens beautifully with washing and will only get better with use.
Fit and Troubleshooting Tips
- If the yoke feels tight around the neck, go up a hook size for the first 3–4 rounds only.
- If the skirt cups or pulls inward, you may need a larger hook or fewer skipped stitches between shells.
- If the dress seems short, simply add extra pattern repeats to the skirt before the hem band.
- Heavy motifs or thick yarn can make the skirt droop; stick to DK cotton for the best balance of drape and structure.
- Always measure the baby (or the intended recipient) if possible. Baby sizes vary widely.
Final Thoughts
There is something deeply satisfying about watching a little one spin around in a dress you made with your own hands. The Coral Sunshine Baby Dress is meant to be lived in — grass stains, ice-cream drips, and all. I hope it becomes one of those pieces that gets packed into the “keep forever” box when the baby outgrows it.
If you make one, I would love to see it. Leave a comment, tag me on social media, or pin your finished photos. Happy crocheting, and may your yarn always run smooth.
FAQ’s
Can I make this dress in a different yarn weight?
Yes, but you will need to adjust hook size and stitch counts. Fingering weight will create a more delicate look and require more increases; worsted weight will make a heavier, warmer dress. Always swatch.
Is the pattern written for left-handed crocheters?
The instructions are written in standard US terms and work the same for both right- and left-handed crocheters. Simply work in the opposite direction if that feels more natural.
Can I add sleeves?
Absolutely. After dividing for the armholes, you can pick up stitches around each armhole and work short sleeves in dc or the same shell pattern for 1–2 inches.
How do I adjust the length for a longer dress?
Simply continue the shell pattern repeats until you reach the desired skirt length before adding the Color C hem band.
What if I run out of yarn mid-round?
Join a new ball of the same color by overlapping the ends for a few stitches and weaving both tails securely on the wrong side. Avoid joining in the middle of a shell if possible.
Is this pattern suitable for beginners?
It is best for intermediate crocheters who are comfortable with color changes and working in the round. Confident beginners who have completed a few projects in the round can also succeed with careful reading.
Can I sell finished dresses made from this pattern?
Yes. You may sell finished items made from this free pattern. Please credit the designer and do not sell or distribute the written pattern itself.


Leave a Reply
You must be logged in to post a comment.