

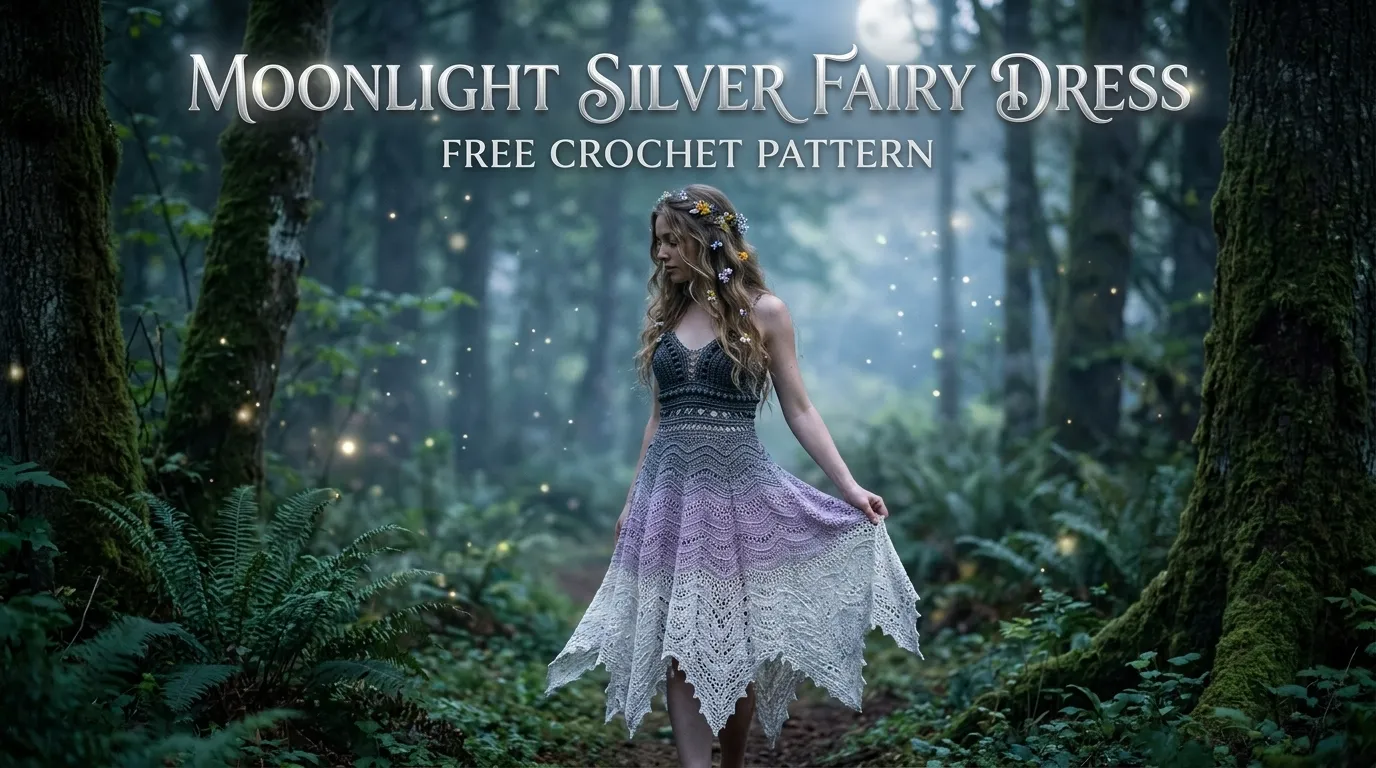
There is something magical about silver yarn. It catches the light, creates a soft moonlit glow, and makes even a simple crochet stitch look like something straight out of a fairy tale. I wanted to capture that feeling in a dress with delicate lace, a fitted bodice, and a flowing skirt that moves beautifully.
Let’s gather our silver yarn and create something enchanting!

About This Moonlight Silver Fairy Dress Pattern
The dress is worked in three main sections: a fitted bodice, a flared skirt, and a delicate decorative edging. The bodice is crocheted in joined rounds from the top down, with a simple neckline and armhole openings. The skirt grows from the lower edge of the bodice using alternating solid stitches and open lacework.
A soft silver yarn gives the dress its moonlit appearance. You can choose a subtle metallic blend or a smooth, nonmetallic yarn for a gentler shimmer.
- Skill level: Intermediate
- Construction: Top-down bodice with a skirt worked downward
- Terminology: US crochet terms
- Sample size: Approximately 4–6 years
- Finished chest circumference: Approximately 24 inches
- Bodice length: Approximately 6 inches from shoulder to waist
- Skirt length: Approximately 12 inches from waist to hem
- Total length: Approximately 18 inches from shoulder to hem
- Design features: Textured bodice, lace skirt, flutter sleeves, and scalloped hem
These are target measurements, not guaranteed finished dimensions. Your gauge, yarn, and stitch tension will affect the final fit.
Materials You’ll Need
Yarn
Choose a soft, washable yarn that drapes well without becoming too heavy.
- Color A — Moonlight Silver: Approximately 650–750 yards (595–686 meters) of sport-weight yarn.
- Color B — Frost White: Approximately 50–75 yards (46–69 meters) of sport-weight yarn for optional edging and decorative accents.
For a subtle look, use one silver shade throughout. For a more celestial finish, add a few rows of white around the sleeves and hem.
Yarn allowance: Allow 15% extra yarn if your gauge varies or you plan to add additional edging.
Crochet Hooks
- 3.5 mm (E/4) hook: Main bodice and skirt.
- 3.0 mm (D/3) hook: Neckline and sleeve edging, if you prefer a firmer finish.
Other Supplies
- Tapestry needle
- Stitch markers
- Measuring tape
- Scissors
- Blocking mats and rust-resistant pins
- Optional lightweight lining fabric
- Optional small, securely attached decorative beads for older children or adult versions
For a child’s dress, I recommend skipping loose beads and small embellishments that could become choking hazards.
Abbreviations and Terminology
This pattern uses standard US crochet terminology.
- ch — Chain: Yarn over and pull through the loop on your hook.
- sl st — Slip stitch: Insert the hook, yarn over, and pull through both the fabric and the loop on your hook.
- sc — Single crochet: Insert the hook, yarn over and pull up a loop, then yarn over and pull through both loops.
- hdc — Half double crochet: Yarn over, insert the hook, pull up a loop, then yarn over and pull through all three loops.
- dc — Double crochet: Yarn over, insert the hook, pull up a loop, yarn over and pull through two loops, then yarn over and pull through the remaining two loops.
- sk — Skip: Leave the specified stitch unworked.
- sp — Space: A gap created by chains or stitches.
- st(s) — Stitch(es): Individual crochet stitches.
- rep — Repeat: Work the stated instructions again.
- rnd — Round: A complete circuit of stitches.
- RS — Right side: The intended outside of the finished fabric.
- WS — Wrong side: The inside of the finished fabric.
- inc — Increase: Work two specified stitches into one stitch or space.
- BLO — Back loop only: Work through the back loop of the stitch.
- FO — Fasten off: Cut the yarn and pull the tail through the final loop.
Special Pattern Terms
- Shell: Work 5 dc into the same stitch or space.
- V-stitch: Work 1 dc, ch 1, and 1 dc into the same stitch or space.
- Lace repeat: Work the specified chain spaces and double crochet stitches to form openwork.
- Join: Connect the end of a round to its beginning with a slip stitch.
Important: Turning chains do not count as stitches unless a step explicitly says they do.
Gauge
Gauge is particularly important for a fitted bodice. If your stitches are too loose, the neckline and armholes may stretch. If they’re too tight, the dress may feel stiff and the skirt may lose its lovely drape.
Target gauge: 20 dc stitches and 10 rows = 4 inches square after gentle blocking.
How to Make a Gauge Swatch
- Using the 3.5 mm hook, chain 22.
- Work dc in the third chain from the hook and in each remaining chain.
- Ch 2 and turn.
- Work dc across each row until you have at least 10 rows.
- Block gently, allow the swatch to dry, and measure the center.
If you have more than 20 stitches across 4 inches, try a larger hook. If you have fewer stitches, try a smaller hook.
For the lace skirt, prioritize a soft, flowing fabric rather than an overly dense texture.
Main Pattern Instructions
Part 1: Crochet the Bodice
The bodice is worked from the neckline downward in joined rounds. This version is designed around a sample chest measurement of approximately 24 inches.
Foundation: With Color A and the 3.5 mm hook, ch 72. Join with a sl st to the first chain, taking care not to twist the chain.
Round 1: Ch 2. Work 1 hdc in each chain around. Join with a sl st to the first hdc. (72 hdc)
Round 2: Ch 2. Work 1 hdc in each stitch around. Join. (72 hdc)
Round 3: Ch 2. Work 1 dc in each stitch around. Join. (72 dc)
Round 4: Ch 2. Work 1 dc in each stitch around. Join. (72 dc)
Round 5 — Textured Detail: Ch 1. Work 1 sc in each stitch around. Join. (72 sc)
Rounds 6–9: Ch 2. Work 1 dc in each stitch around. Join each round. (72 dc per round)
This creates a simple, softly textured bodice. For a more decorative finish, you can work Round 5 in Color B.
Important fit check: The neckline circumference is determined by the foundation chain and your actual gauge. Measure the opening before continuing. If it is too tight to pass comfortably over the intended wearer’s head, increase the foundation chain in multiples of 4 and recalculate the bodice.
Part 2: Create the Armhole Openings
The following rounds establish the armhole openings while maintaining the bodice’s circumference.
Round 10: Ch 2. Work 12 dc, ch 8, skip 12 stitches, work 24 dc, ch 8, skip 12 stitches, work 12 dc. Join to the first dc.
Round 11: Ch 2. Work 1 dc in each dc and 1 dc in each chain around. Join. (64 dc, excluding the chains used to create the openings in the previous round; the 8-chain openings are each worked into across their full length.)
The chain spaces create the armholes. Before continuing, check that the openings are comfortable and that the bodice sits smoothly over the chest.
Rounds 12–15: Ch 2. Work 1 dc in each stitch around. Join each round.
Try the bodice on the intended wearer, if practical. The bottom edge should sit at the natural waist or slightly below it. Add or remove plain rounds to adjust the bodice length.
Part 3: Begin the Flared Skirt
The skirt begins at the lower edge of the bodice. It uses a combination of double crochet and chain spaces to create a light lace effect.
Round 16 — Increase Round: Ch 2. Work 1 dc in each stitch around, increasing evenly by working 2 dc in every eighth stitch. Join. (72 dc if starting with 64 stitches.)
Round 17: Ch 2. Work 1 dc in each stitch around. Join.
Round 18 — Lace Foundation: Ch 1. Work 1 sc in the first stitch. *Ch 3, sk 2 stitches, sc in the next stitch.* Rep from * around. Join with a sl st to the first sc.
Round 19: Sl st into the first ch-3 space. Ch 2, work 3 dc into the same space. *Work 4 dc into the next ch-3 space.* Rep from * around. Join. This forms a softly ruffled shell round.
Round 20: Ch 1. Work 1 sc in each dc around. Join.
Round 21 — V-Stitch Lace: Ch 3 (counts as first dc). *Sk 2 stitches, work (1 dc, ch 1, 1 dc) into the next stitch, sk 2 stitches, dc in the next stitch.* Rep from * around, adjusting the final repeat as needed to meet the beginning without bunching. Join.
Round 22: Sl st into the first ch-1 space. Ch 3, work 2 dc into the same space. *Work 3 dc into the next ch-1 space.* Rep from * around. Join.
Round 23: Ch 1. Work 1 sc in each dc around. Join.
Repeat Rounds 18–23 until the skirt reaches approximately 11–12 inches from the waist, or your preferred length. Work the final lace repeat before adding the edging.
Stitch-count note: The bodice increase and lace repeats must be adjusted to the actual stitch count of your chosen size. If the V-stitch repeat does not divide evenly around the skirt, add or remove a small number of stitches during a plain double crochet round. Keep the adjustments evenly spaced.
Special Techniques and Decorative Elements
Flutter Sleeves
The flutter sleeves are worked directly around the armhole edges.
Attach Color A to the center underside of one armhole.
Round 1: Ch 1. Work 1 sc evenly around the armhole edge, placing stitches along the sides of the rows as needed. Join.
Round 2: Ch 3. Work 2 dc in the same stitch. Work 3 dc in each stitch around. Join.
Round 3: Attach Color B if desired. Ch 1. Work *sc in the next stitch, ch 3, sk 1 stitch* around. Join and fasten off.
Repeat for the second sleeve. The double crochet clusters create a soft flutter effect rather than a fitted sleeve.
Scalloped Hem
For the final skirt round, attach Color B at the hem.
Round 1: Ch 1. Work 1 sc in each stitch or space around, distributing stitches evenly. Join.
Round 2: *Sk 1 stitch, work 5 dc in the next stitch, sk 1 stitch, sl st in the next stitch.* Repeat around, adjusting the final repeat to finish neatly.
Fasten off and weave in the ends.
The scallops frame the open lacework and give the dress a delicate, fairy-inspired finish.
Optional Starry Waist Detail
For a simple decorative waist accent, use Color B to work a surface-crochet line along the waist seam.
Insert the hook into the fabric, pull up a loop of Color B, and work slip stitches evenly along the waist. Keep your tension loose enough that the bodice does not pucker.
Avoid tight decorative lines, which can distort the skirt’s shape.
Assembly and Finishing
Because the dress is worked mostly in one piece, assembly is minimal.
- Weave in all loose yarn ends using a tapestry needle.
- Check that the neckline is wide enough for comfortable dressing.
- Inspect both armholes for gaps or uneven edges.
- Lay the dress flat and measure the bodice, waist, and skirt.
- Adjust the hem if needed so the scallops sit evenly.
- Add optional lining if you want more coverage beneath the lace skirt.
For a lined child’s dress, use lightweight, breathable fabric and secure it without pulling on the crochet. The lining should not restrict movement.
Blocking and Care
Blocking helps the lace stitches open and gives the skirt a smoother drape.
For washable acrylic or cotton-blend yarn, follow the yarn label. If wet blocking is appropriate, gently soak the dress in cool water with a mild detergent. Press out excess water without wringing, then roll it in a towel.
Lay the dress flat on blocking mats and arrange the skirt evenly. Shape the scallops with your fingers and pin them gently if needed. Allow the garment to dry completely before removing the pins.
For metallic or novelty yarn, test a small swatch before applying steam. Some fibers can melt, flatten, or lose their sheen under high heat.
Store the dress folded rather than hanging, especially if the skirt is heavy. Hanging can stretch the bodice and lengthen the garment over time.
Fit and Troubleshooting Tips
The Neckline Feels Too Tight
Increase the foundation chain in multiples that preserve the stitch pattern, then check the opening before continuing.
The Bodice Stretches Out
Check your gauge and consider a smaller hook. A lightweight lining may also help support a delicate fabric.
The Skirt Curls Inward
Check whether the fabric is too dense or the lace repeats are pulling. Try a slightly larger hook or add increases in a plain round.
The Skirt Looks Wavy or Ruffled
Too many increases can create excess fullness. Reduce the number of increases and keep them evenly spaced.
The Lace Pattern Does Not Line Up
Check your stitch count before each repeat round. Adjust during a plain round rather than forcing the last repeat into a tight space.
You Want a Longer Dress
Continue the skirt’s six-round lace sequence until you reach the desired length, allowing extra yarn for each additional repeat.
You Want a Wider Dress

Add stitches to the bodice foundation in multiples compatible with your stitch pattern, and rework the armhole placement so both sides remain symmetrical. Check the finished measurements rather than relying on age alone.
You Might Also Like:
Final Thoughts
The Moonlight Silver Fairy Dress Free Crochet Pattern is all about delicate texture, soft movement, and the quiet magic of handmade clothing. The combination of a simple bodice, airy lace skirt, flutter sleeves, and scalloped edging creates a dress that feels special without relying on complicated embellishments.
Take your time with the gauge, check the fit as you work, and let the silver yarn do some of the decorating for you. Every handmade dress has its own personality, and small differences in drape and texture are part of its charm.
I’d love to see how you personalize your Moonlight Silver Fairy Dress. Try a different shade, add a contrasting hem, or make the skirt longer for an extra dreamy silhouette. Share your finished creation with fellow crocheters and save the pattern for your next magical project.



Leave a Reply
You must be logged in to post a comment.