


I don’t know about you, but I have a serious soft spot for home decor that makes people grin the second they see it. These candy-shaped bolster pillows deliver all the whimsy of a giant wrapped sweet without a single sugar crash. They’re basically tubes with ruffled ends, so the wow factor way outpaces the actual effort. Once I finished the first one I immediately started a second—that’s always the mark of a keeper pattern.
Why You’ll Love This Crochet Candy Bolster Pillow Pattern
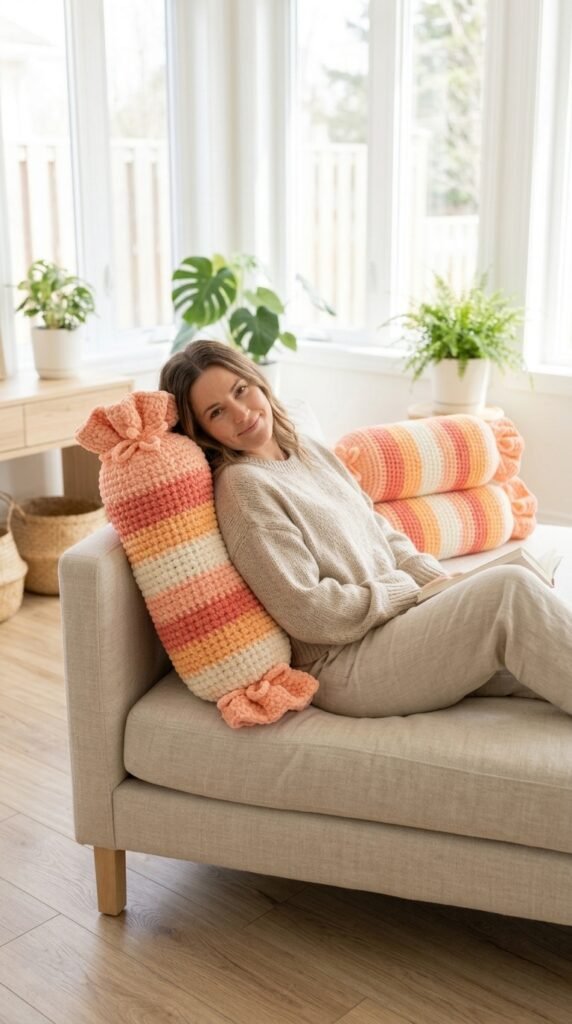
These pillows look exactly like oversized wrapped candies, complete with twisted, ruffled wrapper ends that fan out just like the real thing. The striped body nails that classic candy vibe, and the peachy coral palette feels perfect for a bedroom, nursery, or cozy reading nook.
What keeps this project beginner friendly? You work almost entirely in single crochet in the round. If you can crochet a simple tube, you can make this pillow. Stripes appear the moment you switch colors, and the ruffled ends are just chains worked along the edges. No tricky shaping. No complicated increases. Just steady, satisfying stitches that build into something that looks far more impressive than the work involved.

You get two sizes. The larger bolster shines as a statement piece on a bed or sofa. The smaller one makes a sweet accent or a hug-friendly friend for kids. Make a matching pair and watch the visual impact double.
Materials Needed for Your Candy Bolster Pillow
Yarn:
Worsted weight yarn (medium #4) in these shades:
- Color A: Coral/Salmon (about 200 yards large / 100 yards small)
- Color B: Light Peach (about 150 yards large / 75 yards small)
- Color C: Cream/Off-White (about 150 yards large / 75 yards small)
- Color D: Dusty Rose/Deep Coral (about 150 yards large / 75 yards small)
- Color E: Peach for the ruffle ends (about 100 yards large / 50 yards small)
Soft acrylic or a cotton blend works best. Look for something with clear stitch definition that still feels cozy—think Caron Simply Soft or similar.
Tools:
- 5.0 mm (H/8) crochet hook for the body
- 4.5 mm (G/6) hook optional for tighter end closures
- Yarn needle
- Stitch marker
- Scissors
- Polyester fiberfill (roughly 16 oz large / 8 oz small)
- Measuring tape
Gauge:
14 single crochet stitches and 16 rows = 4 inches in single crochet worked in the round.
Gauge matters here because it sets your final size. Take a quick swatch before you commit.
Finished Dimensions
Large Candy Bolster: About 16 inches long (body only) and 6 inches across.
Small Candy Bolster: About 10 inches long (body only) and 4 inches across.
The ruffle ends add another 3 to 4 inches on each side. Perfect proportions for both statement and accent use.
Skill Level
Beginner to Easy Intermediate.
If you have ever crocheted a hat or a basic amigurumi piece, you already have everything you need. This pattern walks you through every step clearly.
Abbreviations and Stitch Definitions
Here is every abbreviation you will meet, spelled out so nothing trips you up.
ch = chain: Yarn over and pull through the loop on your hook.
sl st = slip stitch: Insert hook, yarn over, pull through the stitch and the loop in one motion.
sc = single crochet: Insert hook, yarn over, pull up a loop, yarn over, pull through both loops. Your main stitch for the whole body.
inc = increase: Two single crochets in the same stitch.
dec = decrease (invisible preferred): Insert through the front loops of the next two stitches, yarn over, pull through both, yarn over, pull through the remaining loops.
FLO = front loop only.
BLO = back loop only.
st(s) = stitch(es)
rnd(s) = round(s)
Keep this list handy while you work.
How to Crochet the Candy Bolster Pillow: Step by Step Pattern
Work everything in continuous rounds. Do not join at the end of each round unless the pattern says so. Use a stitch marker to track the start of every round.
Large Candy Bolster Body
Starting End (Color A):
Rnd 1: Magic ring, 6 sc into the ring. Pull tight. (6 sts)
Rnd 2: Inc in every stitch. (12 sts)
Rnd 3: Sc 1, inc around. (18 sts)
Rnd 4: Sc 2, inc around. (24 sts)
Rnd 5: Sc 3, inc around. (30 sts)
Rnd 6: Sc 4, inc around. (36 sts)
Rnd 7: Sc 5, inc around. (42 sts)
Rnd 8: Sc 6, inc around. (48 sts)
Rnd 9: Sc 7, inc around. (54 sts)
Rnd 10: Sc 8, inc around. (60 sts)
You now have a flat circle roughly 5.5 to 6 inches across. That becomes one candy end.
Tip: If the circle cups or ruffles, check your tension. A good circle lies completely flat.
Body Stripes:
Work even rounds (no increases) and switch colors for the stripe pattern.
Rnds 11–18: Color A, sc around. (60 sts) – 8 rounds
Rnds 19–26: Color B, sc around. (60 sts) – 8 rounds
Rnds 27–34: Color C, sc around. (60 sts) – 8 rounds
Rnds 35–42: Color D, sc around. (60 sts) – 8 rounds
Rnds 43–50: Color B, sc around. (60 sts) – 8 rounds
Rnds 51–58: Color A, sc around. (60 sts) – 8 rounds
Your tube should measure about 12 to 14 inches long.
Clean color changes: On the last stitch of the old color, stop when you have two loops on the hook. Drop the old yarn, yarn over with the new color, and pull through both loops. Carry unused yarn inside or cut and weave later.
Closing End:
Rnd 59: Sc 8, dec around. (54 sts)
Rnd 60: Sc 7, dec around. (48 sts)
Rnd 61: Sc 6, dec around. (42 sts)
Rnd 62: Sc 5, dec around. (36 sts)
Rnd 63: Sc 4, dec around. (30 sts)
Pause and stuff the pillow firmly but not so tight that the stitches stretch. Aim for a plump, even cylinder.
Rnd 64: Sc 3, dec around. (24 sts)
Rnd 65: Sc 2, dec around. (18 sts)
Add a bit more stuffing if needed.
Rnd 66: Sc 1, dec around. (12 sts)
Rnd 67: Dec six times. (6 sts)
Fasten off. Thread the tail through the remaining stitches, pull tight, and weave in securely.
Ruffle Wrapper Ends (Make 2)
This is the part that turns a plain tube into a wrapped candy.
With Color E:
Rnd 1: Join yarn to the edge of one end. Sc evenly around the circumference (about 60 sts). Join with slip stitch.
Rnd 2: Ch 3, skip 1, sc in next, ch 3 around. Join.
Rnd 3: Working into the skipped stitches, ch 4, sc around. Join.
Rnd 4: Ch 5, sl st in next chain space around. Join and fasten off.
The chains curl and twist on their own, creating that perfect crinkled wrapper look.

Thread a length of matching yarn through the base of the ruffle and pull gently to gather it slightly. Tie off. Repeat on the other end.
Small Candy Bolster (Variation)
Use the same construction with these tweaks:
Stop increasing at Rnd 7 (42 sts instead of 60).
Work each stripe for 6 rounds instead of 8.
Shorten the ruffle chains to ch 2, ch 3, and ch 4.
You get a perfectly proportioned mini version.
Finishing Your Crochet Candy Pillow
Weave in every end carefully, running each tail through several stitches in different directions before you trim.
Shape the ruffles by gently pulling and arranging the chain loops so they fan out naturally.
Optional: A light mist of fabric stiffener can help the ruffles hold their shape if they feel too soft. Totally up to you.
Tips for Success with This Crochet Pattern
Keep your tension consistent across the whole body. Uneven tension creates a lumpy cylinder, and nobody wants a sad candy.
Do not understuff. A well-filled bolster looks polished and feels satisfying to hug. Err on the side of more fiberfill.
Color order is completely flexible. I used a soft peachy gradient, but bright rainbow stripes, calm neutrals, or holiday shades all work. Make it yours.

This project makes an incredible gift. Baby showers, housewarmings, birthdays for anyone who loves candy or cute home decor—the presentation factor is huge for the time invested.
Troubleshooting Common Issues
Circle cupping? You might be working too tightly or missing an increase. Rip back and loosen your grip a little.
Tube spiraling? Totally normal with continuous rounds. Once stuffed, the spiral disappears into the shape.
Ruffles too stiff? Switch to a larger hook for those rounds or work the chains more loosely.
Ruffles too limp? Drop a hook size or add one extra chain round for more volume.
Why This Candy Bolster Pillow Pattern Works
The real genius sits in the simplicity. You crochet a stuffed tube and add fancy ends. Those ruffled wrappers completely transform the project into something that looks clever and intentional.
The stripe sequence creates interest without any actual colorwork skill. Every change happens at the end of a round—no carrying yarn, no charts.
And the squish factor? A properly stuffed bolster gives that perfect mix of support and soft give. It is ridiculously satisfying to hug.
FYI, once you make one you will probably start plotting a whole candy shop of them in different colors.
You Might Also Like
- Mint Chocolate Candy Bolster Pillow Free Crochet Pattern
- Baby Blue Elephant Toilet Paper Cozy Free Crochet Pattern
- White and Sage Minimal Monstera Crochet Plant Pattern
- Black Monstera Crochet Plant for Modern Living Room
FAQ’s
How long does one large bolster take?
Most people finish the large size in four to six hours once the rhythm clicks. The first one always takes a little longer while you learn the stripe timing.
Can I use chenille or velvet yarn instead?
You can, but the ruffles behave differently and the stripes may look softer. Stick with worsted acrylic or cotton blend for the crispest candy-wrapper look.
Is the small size good for kids?
Yes. The smaller bolster makes a great accent or cuddle pillow. Just make sure the stuffing is secure and all ends are woven in tightly.
How do I keep the ruffles looking fresh?
A gentle fluff every so often does the job. If they flatten, a light steam (not wet) can revive them. Avoid heavy washing.
Can I make this in one solid color?
Absolutely. Skip the stripe changes and work the whole body in one shade. The ruffled ends still deliver the full candy effect.
What if my gauge is off?
The pillow will still work, just in a slightly different size. Tighter gauge gives a firmer, smaller bolster. Looser gauge makes a softer, bigger one. Adjust stuffing accordingly.
Final Thoughts
There you have it—a peachy keen candy bolster that looks like it came straight from a giant sweet shop and feels even better to hug. Grab your yarn, queue up something good to watch, and start that magic ring. In a few hours you will have a pillow that makes everyone who sees it smile. Happy stitching—your couch (or bed, or nursery) is about to get a whole lot cuter.


Leave a Reply
You must be logged in to post a comment.