


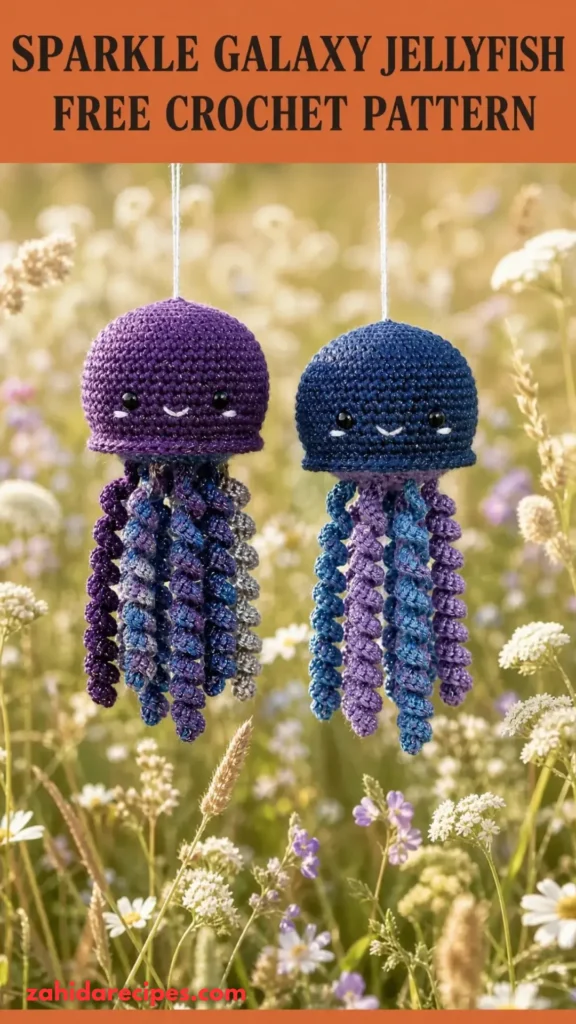
After experimenting with different yarn combinations, I settled on deep purple, midnight blue, lavender, and a little silver sparkle. The result was a sweet jellyfish with a rounded bell, dangling curly tentacles, and a charming little face.
This Sparkle Galaxy Jellyfish Free Crochet Pattern is a fun amigurumi project that makes a lovely handmade gift, desk companion, nursery decoration, or cute addition to a crochet collection. The best part? You can customize the colors to create your own tiny underwater universe!

About This Sparkle Galaxy Jellyfish Crochet Pattern
This jellyfish is crocheted in separate components and assembled at the end. The rounded bell is worked in continuous rounds using single crochet stitches, while the tentacles are made using simple spiral increases that naturally curl into playful shapes.
The galaxy effect comes from combining different shades of yarn and adding subtle metallic details.
Skill Level: Confident beginner to intermediate.
You should be comfortable with:
- Crocheting in continuous rounds.
- Increasing and decreasing stitches.
- Working into front loops and back loops.
- Sewing amigurumi pieces together.
- Attaching small decorative details.
Finished Size: Approximately 6–7 inches (15–18 cm) tall, including the tentacles.
The size will vary depending on your yarn, hook, and tension.
Materials You’ll Need
Yarn
Choose soft DK or light worsted-weight yarn.
- Color A – Galaxy Purple: Approximately 35 yards for the main bell.
- Color B – Midnight Blue: Approximately 15 yards for decorative sections.
- Color C – Lavender: Approximately 20 yards for tentacles.
- Color D – Silver Sparkle: Approximately 15 yards for decorative accents.
- Color E – White: Small amount for eye highlights.
A smooth acrylic or cotton-acrylic blend works beautifully. Metallic yarn can be slightly scratchy, so I recommend using it mainly for decorative details.
Allow approximately 15% extra yarn for gauge variation.
Crochet Hooks
- 3.0 mm crochet hook for the main body.
- 2.5 mm crochet hook for tighter tentacles and small details.
Other Supplies
- 8 mm or 10 mm safety eyes.
- Polyester fiberfill stuffing.
- Tapestry needle.
- Stitch markers.
- Scissors.
- Silver embroidery thread.
- Optional tiny star-shaped sequins for decoration.
Safety note: If making this jellyfish for a young child, replace safety eyes and loose embellishments with securely embroidered details.
Abbreviations and Terminology
All instructions use US crochet terminology.
| Abbreviation | Meaning |
|---|---|
| MR | Magic Ring |
| sc | Single Crochet |
| inc | Increase (2 sc in one stitch) |
| dec | Invisible Decrease |
| sl st | Slip Stitch |
| ch | Chain |
| BLO | Back Loop Only |
| FLO | Front Loop Only |
| st | Stitch |
| sts | Stitches |
| rnd | Round |
| FO | Fasten Off |
Single Crochet (sc): Insert hook into stitch, yarn over, pull up a loop, yarn over again, and pull through both loops.
Increase (inc): Work two single crochet stitches into the same stitch.
Invisible Decrease (dec): Insert hook into the front loop of the next two stitches, yarn over, pull through both loops, yarn over, and pull through the remaining loops.
Slip Stitch (sl st): Insert hook into stitch, yarn over, and pull through both the stitch and the loop on your hook.
Magic Ring (MR): Make an adjustable loop and crochet the required stitches into it before pulling the tail tight.
Turning chains do not count as stitches unless specifically stated.
Work the jellyfish body in continuous rounds without joining unless instructed.
Gauge
Gauge is not extremely important for this project, but tight stitches are essential for a neat amigurumi finish.
Make a small practice swatch using your 3.0 mm hook.
Aim for approximately:
- 24 single crochet stitches across 4 inches.
- 26 rounds across 4 inches.
Your fabric should be dense enough that stuffing cannot easily show through.
If you can see large gaps between stitches, switch to a smaller hook.
Main Pattern Instructions
Part 1: Crochet the Galaxy Jellyfish Bell
The bell is the rounded upper part of the jellyfish. We’ll begin at the top and gradually increase before creating the rounded sides.
Use Color A (Galaxy Purple).
Round 1: Make a magic ring and crochet 6 sc into the ring. (6 sts)
Round 2: Inc in each stitch around. (12 sts)
Round 3: Repeat (1 sc, inc) around. (18 sts)
Round 4: Repeat (2 sc, inc) around. (24 sts)
Round 5: Repeat (3 sc, inc) around. (30 sts)
Round 6: Repeat (4 sc, inc) around. (36 sts)
Round 7: Repeat (5 sc, inc) around. (42 sts)
Round 8: Repeat (6 sc, inc) around. (48 sts)
Round 9–13: Sc in each stitch around. (48 sts)
The bell should now look like a shallow dome.
Adding the Galaxy Color Effect
For a beautiful galaxy appearance, introduce Color B (Midnight Blue).
Round 14: Using Color B, sc in each stitch around. (48 sts)
Round 15: Sc in each stitch around. (48 sts)
Change to Color A (Galaxy Purple).
Round 16: Sc in each stitch around. (48 sts)
This subtle color combination creates a beautiful transition without making the body look too busy.
Shaping the Lower Bell
Round 17: Repeat (6 sc, dec) around. (42 sts)
Round 18: Sc in each stitch around. (42 sts)
Round 19: Repeat (5 sc, dec) around. (36 sts)
Round 20: Repeat (4 sc, dec) around. (30 sts)
Round 21: Repeat (3 sc, dec) around. (24 sts)
Pause here and begin stuffing the bell.
Add small amounts of polyester fiberfill and distribute it evenly. Keep the top rounded and the lower edge slightly flatter.
Round 22: Repeat (2 sc, dec) around. (18 sts)
Round 23: Repeat (1 sc, dec) around. (12 sts)
Finish stuffing.
Round 24: Dec around. (6 sts)
FO, leaving a long tail. Thread the tail through the remaining front loops and pull tightly to close.
We now have the main jellyfish bell!
Part 2: Crochet the Sparkling Tentacles
The tentacles are what give this jellyfish its playful personality.
We’ll make eight tentacles in different lengths and colors. Their natural spiral shape creates a floating underwater appearance.
Tentacle A – Lavender Spiral
Make 2 pieces using Color C.
Row 1: Ch 26.
Row 2: Starting in the second chain from the hook, work 2 sc in each chain across. (50 sts)
FO, leaving a long sewing tail.
The piece will curl naturally. Avoid pulling it flat because the spiral is part of the design.
Tentacle B – Midnight Blue Spiral
Make 2 pieces using Color B.
Row 1: Ch 30.
Row 2: Starting in the second chain from the hook, work 2 sc in each chain across. (58 sts)
FO, leaving a long sewing tail.
Tentacle C – Galaxy Purple Spiral
Make 2 pieces using Color A.
Row 1: Ch 22.
Row 2: Starting in the second chain from the hook, work 2 sc in each chain across. (42 sts)
FO, leaving a long sewing tail.
Tentacle D – Silver Sparkle Spiral
Make 2 pieces using Color D.
Row 1: Ch 18.
Row 2: Starting in the second chain from the hook, work 2 sc in each chain across. (34 sts)
FO, leaving a long sewing tail.
You should now have eight curled tentacles in four different colors.
Designer tip: If your sparkle yarn is difficult to work with, crochet these two tentacles in regular silver yarn and add metallic embroidery afterward.
Part 3: Create the Decorative Star Details
Tiny stars add a little extra galaxy magic.
Use Color D.
Make three small stars.
Round 1: Make a magic ring and work 5 sc into the ring. Join with a sl st. (5 sts)
Round 2: Work the following into each stitch:
- Sl st.
- Ch 3.
- Sl st in the second chain from the hook.
- Sc in the next chain.
- Sl st into the next stitch of the magic ring.
Repeat the star point sequence around until you have five points.
Pull the magic ring tight and FO, leaving a sewing tail.
Gently arrange each point using your fingers.
Make three stars in total.
Part 4: Add the Jellyfish Face
A sweet face makes this little jellyfish instantly adorable.
Before adding the eyes, decide which side of the bell will face forward.
Place two 8 mm safety eyes between Rounds 13 and 15, approximately 9–10 stitches apart.
Secure the backs inside the bell.
For a softer expression, embroider a tiny smile using black embroidery thread.
Bring the needle out below the eyes, make a shallow curved stitch, and secure the thread inside the body.
You can also add two tiny pink blush marks using pink embroidery thread.
I love keeping the expression simple. The sparkly colors already provide plenty of personality!
Assembly and Finishing
Now comes the fun part: bringing all the little pieces together.
Step 1: Arrange the Tentacles
Turn the jellyfish upside down so the lower opening area faces you.
Divide the lower edge into eight approximately equal sections.
Arrange the tentacles in this order:
- Two lavender tentacles near the front.
- Two midnight blue tentacles toward the sides.
- Two purple tentacles toward the back.
- Two silver sparkle tentacles between the other colors.
Pin each piece temporarily before sewing.
This helps you maintain balanced spacing.
Step 2: Sew the Tentacles
Using the long yarn tails, sew each tentacle securely to the lower edge of the bell.
Make several small stitches through the top of each spiral and the body.
Check that the curls hang naturally and do not become flattened during sewing.
Step 3: Attach the Galaxy Stars
Position the three tiny stars across the upper portion of the bell.
One star can sit near the center, with the other two slightly toward the sides.
Sew each star securely using its yarn tail.
Avoid placing decorations too close to the eyes.
Step 4: Add Silver Sparkle Details
Thread a tapestry needle with silver embroidery thread.
Add a few tiny star-like stitches across the purple and blue sections of the bell.
You can create small crosses, dots, and short lines.
Keep the decorations scattered rather than perfectly arranged. This gives the jellyfish a dreamy galaxy appearance.
Step 5: Final Shape Check
Hold the jellyfish upright and check that:
- The bell is evenly rounded.
- The eyes are level.
- The tentacles are securely attached.
- The spiral curls remain visible.
- The stars are firmly sewn.
Trim all loose yarn ends and hide them inside the body.
Blocking and Care
Amigurumi usually requires very little blocking, but a little shaping can improve the final appearance.
Gently reshape the bell using your hands.
If you used cotton or acrylic yarn, avoid applying direct high heat. Metallic fibers can be especially sensitive to heat.
For cleaning, spot-clean with a slightly damp cloth and mild detergent.
If the yarn label allows gentle hand washing, use cool water and avoid twisting or squeezing the jellyfish.
Press excess water out using a towel and allow the toy to dry completely on a flat surface.
Never hang the jellyfish while wet because the tentacles may stretch.
Fit and Troubleshooting Tips
Even small amigurumi projects can have a few frustrating moments. Here are some common problems and easy solutions.
1. My Jellyfish Bell Looks Too Flat
You may have used too few increase rounds or too much stuffing pressure.
Check your stitch counts and distribute stuffing evenly instead of packing it tightly into one area.
2. Stuffing Is Showing Through
Your stitches may be too loose.
Try a smaller crochet hook and maintain consistent tension.
3. My Tentacles Aren’t Curling
Make sure you are working two single crochet stitches into every chain.
If the tentacles are still too loose, use a smaller hook.
4. The Jellyfish Looks Uneven
Check the placement of your tentacles before sewing them permanently.
Using stitch markers to divide the lower edge into eight sections makes placement easier.
5. My Metallic Yarn Keeps Splitting
Metallic yarn can be tricky because it often has a slippery texture.
Use a smooth hook, work slowly, and avoid pulling the yarn too tightly.
You can also use regular silver yarn for the tentacles and reserve metallic thread for embroidery.
Final Thoughts
I absolutely love how this Sparkle Galaxy Jellyfish turned out. The combination of midnight blue, lavender, purple, and silver creates such a dreamy little creature.
What makes this project special is how easy it is to personalize. You can use pastel rainbow shades for a softer look, bright neon colors for a playful jellyfish, or deep blues and purples for a more mysterious galaxy-inspired design.
This Sparkle Galaxy Jellyfish Free Crochet Pattern is also a lovely way to use leftover yarn from previous amigurumi projects.
Take your time with the curls, experiment with the colors, and don’t worry if your jellyfish looks a little different from mine. Handmade creations should have their own personality!
I’d love to see your finished jellyfish. Share your creation, show off your favorite color combination, and inspire another crocheter to make their own tiny galaxy friend.
Happy crocheting! 💜



Leave a Reply
You must be logged in to post a comment.