

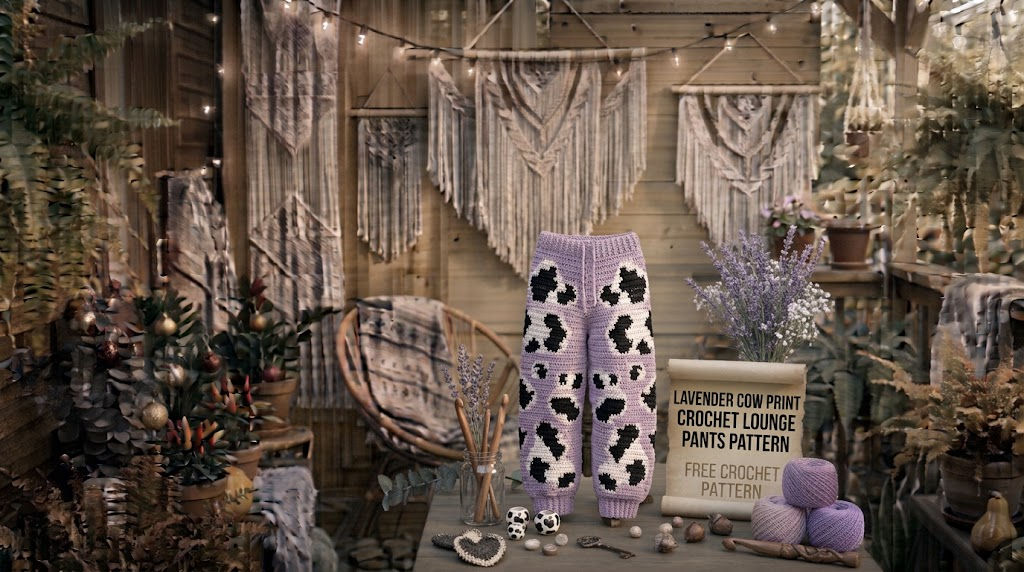
Some crochet projects are simply fun to make, while others become pieces you genuinely look forward to wearing. These Lavender Cow Print Crochet Lounge Pants fall into the second category for me. I wanted to create something comfortable enough for lazy afternoons but stylish enough to wear when heading out for coffee or meeting friends.
I have always loved playful cow print, especially when it appears in unexpected colors. Instead of traditional black and white, this design uses a soft lavender background with irregular charcoal-black patches. The combination feels sweet, modern, and slightly nostalgic without looking too busy.
The best part is that you can customize the placement of every spot. No two pairs need to look exactly alike!
This Lavender Cow Print Crochet Lounge Pants Pattern features a relaxed silhouette, comfortable waistband, roomy legs, and scattered cow-print motifs. It is a wearable crochet project that combines cozy construction with a little personality.

About This Lavender Cow Print Crochet Lounge Pants Pattern
These crochet lounge pants are worked from the waist downward, with the upper section divided into two legs after completing the waistband and hip area.
Each leg is crocheted separately in joined rounds, allowing you to create a comfortable fit while maintaining consistent fabric tension.
The cow-print design is created using separate charcoal-black patches worked into the lavender fabric with controlled color changes. Smaller details can also be added using surface slip stitches or duplicate crochet stitches.
Skill Level: Intermediate
You should already understand basic crochet stitches, working in rounds, changing colors, increasing, decreasing, and joining crochet pieces.
Construction: Waistband first, followed by the body and two separate legs.
Fit: Relaxed, slightly oversized lounge fit.
Finished Length: Approximately 38–40 inches from waistband to hem, adjustable.
Design Features:
- Soft lavender main color.
- Irregular charcoal cow-print patches.
- Comfortable ribbed waistband.
- Optional elastic waistband support.
- Relaxed hips and thighs.
- Straight, slightly wide-leg silhouette.
- Simple single-crochet ankle edging.
The fabric should feel soft and flexible rather than stiff. I recommend using a smooth acrylic or cotton-acrylic blend so the pants remain comfortable and retain their shape.
Materials You’ll Need
Yarn
Choose a soft DK-weight yarn (Category 3). A lightweight yarn creates a more comfortable fabric for lounge pants.
| Color | Purpose | Approximate Amount |
| Color A – Lavender | Main pants fabric | 1,300–1,500 yards |
| Color B – Charcoal Black | Cow-print patches | 250–300 yards |
| Color C – Pale Lavender | Optional decorative details | 50 yards |
Allow approximately 15% extra yarn if your gauge varies or you want additional length.
Crochet Hooks
- 4.0 mm crochet hook: Main fabric and body.
- 3.5 mm crochet hook: Waistband ribbing and ankle edging.
- 4.5 mm crochet hook: Optional swatching if your fabric feels too tight.
Additional Supplies
- Flexible measuring tape.
- Stitch markers.
- Tapestry needle.
- Scissors.
- 1-inch-wide soft elastic (optional).
- Safety pin or elastic threader.
- Blocking mats and rust-resistant pins.
Abbreviations and Terminology
This pattern uses US crochet terminology.
| Abbreviation | Meaning |
| ch | Chain |
| sl st | Slip stitch |
| sc | Single crochet |
| hdc | Half double crochet |
| dc | Double crochet |
| blo | Back loop only |
| flo | Front loop only |
| inc | Increase |
| dec | Decrease |
| st | Stitch |
| sts | Stitches |
| rnd | Round |
| rep | Repeat |
| sk | Skip |
| MC | Main color |
| CC | Contrast color |
Stitch Explanations
Chain (ch): Yarn over and pull through the loop on your hook.
Slip Stitch (sl st): Insert your hook into the indicated stitch, yarn over, and pull through both the stitch and loop on your hook.
Single Crochet (sc): Insert your hook into the stitch, yarn over and pull up a loop, yarn over again and pull through both loops.
Half Double Crochet (hdc): Yarn over, insert your hook, pull up a loop, yarn over and pull through all three loops.
Double Crochet (dc): Yarn over, insert your hook, pull up a loop, yarn over and pull through two loops, then yarn over and pull through the remaining two loops.
Back Loop Only (blo): Work into the back loop of the stitch instead of both loops.
Increase (inc): Work two stitches into one stitch.
Decrease (dec): Work two stitches together to reduce the stitch count.
Important: Turning chains do not count as stitches unless a step explicitly says they do.
Gauge
Gauge is particularly important for crochet pants because small differences can affect the waist, hips, and overall length.
Using a 4.0 mm hook and lavender yarn:
- 18 sc = 4 inches.
- 20 rows = 4 inches.
Make a practice swatch measuring approximately 5 × 5 inches.
Wash and dry your swatch before measuring if you plan to wash your finished pants.
If your swatch has too many stitches per 4 inches, move up to a larger hook.
If you have too few stitches, use a smaller hook.
The finished fabric should have enough flexibility to move comfortably without large gaps between stitches.
Main Pattern Instructions

Step 1: Create the Ribbed Waistband
Begin with Color A and your 3.5 mm hook.
The waistband is worked in rows to create vertical ribbing.
Foundation: Ch 13.
Row 1: Sc in second ch from hook and across. (12 sts)
Row 2: Ch 1, turn. Sc blo in each stitch across. (12 sts)
Row 3–80: Repeat Row 2.
The waistband should measure approximately 34–40 inches when gently stretched, depending on your intended waist size.
For a smaller waist, use fewer rows. For a larger waist, add rows.
Join the short ends together using slip stitches through the corresponding stitches of both edges.
You now have a ribbed waistband ring.
Designer tip: Do not make the waistband excessively tight. It should sit comfortably around your waist without digging into your skin.
Step 2: Work the Upper Pants Section
Switch to your 4.0 mm hook.
Attach Color A along the upper edge of the waistband.
Work single crochet stitches evenly around the waistband.
For the sample size, aim for 160 stitches.
If necessary, adjust the stitch count so it is divisible by 4.
Join with a slip stitch.
Round 1: Ch 1, sc around. Join. (160 sts)
Round 2: Ch 1, hdc around. Join. (160 sts)
Round 3: Ch 1, hdc around. Join. (160 sts)
Round 4: Ch 1, hdc around. Join. (160 sts)
Round 5: Ch 1, hdc around. Join. (160 sts)
Continue working hdc rounds until the fabric measures approximately 7 inches from the lower edge of the waistband.
This creates the upper hip section.
Step 3: Shape the Hip and Crotch Area
The next section adds room for comfortable movement.
Divide the stitches into four sections using stitch markers.
Place markers at the front center, back center, and both side positions.
For this sample, work the following increases:
Round 1: Ch 1, hdc around, working 2 hdc into the stitch immediately before and after each side marker. (164 sts)
Round 2: Hdc around without increases. (164 sts)
Round 3: Repeat Round 1. (168 sts)
Round 4: Hdc around. (168 sts)
Continue until the upper body measures approximately 10–11 inches below the waistband.
The exact depth depends on your waist-to-crotch measurement.
Check the fit before dividing the legs.
Step 4: Divide the Pants Into Two Legs
Lay the pants flat with the front and back centers aligned.
Divide the stitches evenly:
- First leg: 84 sts.
- Second leg: 84 sts.
You will work the legs separately.
The remaining opening between the legs will form the crotch area.
For additional comfort, use a small crotch gusset if needed.
Step 5: Crochet the First Leg
Attach Color A at the inner leg opening.
Join the first 84 stitches into a round.
Round 1: Ch 1, hdc in each stitch around. Join. (84 sts)
Round 2: Ch 1, hdc around. Join. (84 sts)
Round 3: Repeat Round 2.
Round 4: Repeat Round 2.
Continue working even rounds until the leg measures approximately 30 inches from the crotch.
For a wide-leg effect, maintain the same stitch count.
For a slightly tapered ankle, decrease 2 stitches every 8 rounds until you reach your preferred circumference.
Keep the decreases evenly spaced.
Fasten off when the leg reaches your desired length, leaving approximately 1 inch for the ankle edging.
Step 6: Crochet the Second Leg
Attach Color A to the remaining 84 stitches.
Repeat the same instructions used for the first leg.
Measure both legs regularly to ensure they are the same length.
Important: If you added decreases to the first leg, repeat the same number and placement on the second leg.
This keeps the pants balanced.
Adding the Lavender Cow Print Design
This is the part that gives the pants their personality!
Traditional cow-print patterns use irregular dark patches with rounded edges and uneven shapes. For this version, charcoal-black patches are scattered across the lavender background.
I recommend placing the patches asymmetrically rather than creating a repeating grid.
Step 1: Plan Your Spots
Before adding contrast yarn, lay the pants flat.
Mark the desired patch locations using removable stitch markers.
Suggested placement:
- Two medium patches on the front upper thigh.
- One large patch on the outer left thigh.
- Two small patches near the knee.
- Three irregular patches on the lower legs.
- Several scattered patches on the back.
Avoid making both legs identical.
Step 2: Crochet an Irregular Cow-Print Patch
Use Color B and the 4.0 mm hook.
The following small patch is worked in rounds.
Round 1: Make a magic ring. Work 8 sc into the ring. Join. (8 sts)
Round 2: Ch 1. Work 2 sc in each stitch around. Join. (16 sts)
Round 3: Ch 1. Sc in next stitch, 2 sc in next stitch. Repeat around. Join. (24 sts)
Round 4: Ch 1. Work sc around, adding 2 additional increases at uneven positions to create an organic shape. Join.
Fasten off, leaving a long tail for sewing.
Creating Different Patch Sizes
Small patches: Use Rounds 1–2.
Medium patches: Use Rounds 1–3.
Large patches: Continue with another round of increases, placing them irregularly rather than evenly.
To create a more authentic cow-print effect, make some patches slightly elongated or uneven.
You can also work oval patches by starting with a short chain and crocheting around both sides.
Step 3: Attach the Patches
Arrange your patches on the pants.
Use a tapestry needle and charcoal yarn to sew them securely onto the lavender fabric.
Sew around the complete patch edge, keeping the stitches small and discreet.
Do not pull too tightly, as this can cause the fabric underneath to pucker.
Repeat for all remaining patches.
Optional Surface Crochet Details
If you want the cow-print spots to blend more naturally into the pants, surface crochet is another option.
Insert your hook through the finished fabric and pull up a loop of Color B.
Work slip stitches along an irregular outline, then fill the shape with closely spaced stitches.
This technique works particularly well for smaller decorative markings.
Keep the yarn tension relaxed so the pants remain flexible.
Step 7: Add the Ankle Edging
Switch to the 3.5 mm hook.
Attach Color A at the bottom of one leg.
Round 1: Ch 1, sc evenly around the leg opening. Join.
Round 2: Ch 1, sc around. Join.
Fasten off and weave in the ends.
Repeat for the second leg.
The simple edging gives the pants a clean finish without making the ankle opening too tight.
Assembly and Finishing
Although most of the pants are worked continuously, the crotch area may need additional reinforcement.
Close the Crotch Opening
Turn the pants inside out.
Align the front and back crotch sections.
Use a tapestry needle and matching lavender yarn to sew any remaining opening securely.
Work through corresponding stitches without pulling the fabric too tightly.
For a stronger finish, reinforce the seam with a second line of stitching.
Add Elastic to the Waistband (Optional)
If you prefer additional support, insert a soft elastic band.
Cut the elastic to your comfortable waist measurement, allowing approximately 1 inch for joining.
Use a safety pin to guide it through the waistband.
Overlap the elastic ends and sew them together securely.
Close the small opening in the waistband.
The elastic should support the waistband without making it uncomfortable.
Weave in Loose Ends
Check the inside of your pants carefully.
Secure all yarn tails, especially around the cow-print patches and crotch seam.
Trim excess yarn only after securing each end.
Blocking and Care
Crochet lounge pants need gentle blocking because excessive stretching can affect their shape.
I recommend wet blocking for acrylic and cotton-blend yarns when the yarn label permits it.
- Fill a basin with cool or lukewarm water.
- Add a small amount of gentle wool-safe detergent.
- Submerge the pants and allow them to soak for approximately 10–15 minutes.
- Lift carefully and press out excess water without twisting.
- Roll the pants inside a clean towel.
- Lay flat on blocking mats.
- Arrange the legs evenly and smooth the waistband.
- Allow them to dry completely.
Avoid hanging the pants while wet. The weight of the yarn can stretch the legs.
For acrylic yarn, use steam cautiously and follow the manufacturer’s care instructions. Never press a hot iron directly against the crochet fabric.
Care Recommendations
- Wash gently in cool water.
- Use a laundry bag if machine washing is permitted by the yarn label.
- Avoid harsh detergents.
- Dry flat.
- Do not bleach.
- Store folded rather than hanging.
Fit and Troubleshooting Tips
1. My Pants Feel Too Tight Around the Hips
You may need additional increases in the upper section.
Add evenly spaced increases before dividing the legs.
For larger size adjustments, increase the starting waistband circumference and body stitch count rather than relying only on the leg shaping.
2. The Legs Look Uneven
Measure both legs from the crotch seam to the hem.
Count your rounds and compare them.
If one leg is longer, carefully remove the extra rounds before finishing.
3. The Cow-Print Patches Look Too Round
Cow-print spots should not all look like perfect circles.
Create irregular outlines by adding uneven increases and occasional short extensions.
Use a mixture of small, medium, and large patches.
4. The Fabric Feels Too Heavy
Try a lighter DK yarn or a larger hook after checking your gauge.
Avoid adding too many oversized patches.
5. The Waistband Keeps Slipping
Add soft elastic inside the waistband.
You can also shorten the waistband slightly, provided it remains comfortable when worn.
6. The Legs Flare More Than Expected
Check your stitch count every few rounds.
Unintended increases can create extra width.
For a straighter silhouette, maintain an even stitch count throughout the leg section.
Customization Ideas
One thing I particularly enjoy about this pattern is how easily you can change its appearance.
- Soft Pastel Style: Replace charcoal patches with dusty purple.
- Classic Cow Print: Use white yarn for the background and black for the spots.
- Oversized Lounge Fit: Add extra hip width and wider legs.
- Cropped Pants: Shorten both legs to your preferred ankle length.
- Flared Silhouette: Add two evenly spaced increases every 6–8 rounds near the lower legs.
- Matching Outfit: Make a simple lavender crochet crop top using the same yarn colors.
You can also experiment with different patch sizes to create a more natural, scattered pattern.
Final Thoughts
I love how these Lavender Cow Print Crochet Lounge Pants combine comfort with a playful handmade style. The lavender background gives them a soft, dreamy appearance, while the irregular charcoal patches add just enough contrast to make the design stand out.
They are a lovely project for crocheters who want to move beyond basic accessories and try creating something wearable.
Take your time with the waistband, check your measurements as you work, and enjoy arranging the cow-print patches. Remember that handmade clothing does not need to look perfectly identical on both sides. Those little differences are part of its charm.
I hope you enjoy making your own Lavender Cow Print Crochet Lounge Pants Pattern. If you create a pair, share your finished project in the comments or on Pinterest. I’d love to see which colors and patch arrangements you choose!
Happy crocheting!



Leave a Reply
You must be logged in to post a comment.