


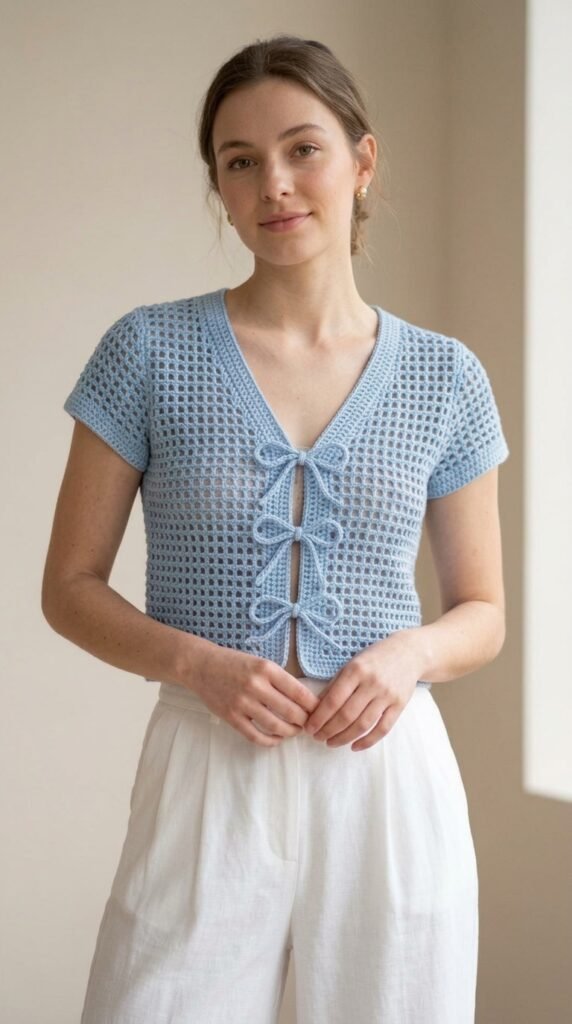
You’ve been hunting for that perfect light-as-air spring cardigan that looks boutique-bought but won’t empty your yarn budget. Meet the baby blue grid stitch tie cardigan—open, breezy, and finished with those sweet little front ties that make it feel a little bit romantic without trying too hard. Grab your hook; this one’s going to become your new go-to layer.
What Makes This Crochet Cardigan Special
The magic sits in that open grid stitch. Those little chain windows let air flow right through, so you get coverage without the sweat. Pair it with the soft V-neck that forms itself while you work the fronts, and you’ve got a piece that flatters almost every body.

Then come the ties. No buttons to wrestle with, no zippers to snag. Just six simple crocheted cords that you knot into bows wherever you want. Instant charm. And because the fabric is so open, the whole thing works up faster than a solid stitch cardigan and uses less yarn. Win-win.
Skill Level
Call this intermediate-beginner friendly. If double crochet and counting stitches already feel natural, you’re golden. You’ll work flat panels, do a little simple decreasing for the neckline, and seam everything together. Nothing here requires advanced shaping or complex stitch patterns. First garment? This is a solid place to start.
Materials Needed
You’ll want roughly 850–1050 yards of DK-weight yarn. Soft cotton or a cotton-bamboo blend gives the best stitch definition and that lovely drape. Baby blue is the classic, but any cool pastel works.
Hook: 4 mm (G/6), or whatever gets you gauge.
Notions: yarn needle, a few stitch markers, scissors, and a measuring tape. That’s the whole list—nothing fancy.
include render_generated_image with prompt is Hyper detailed 8K resolution photograph of a flat lay of crochet materials for a baby blue grid stitch cardigan: skeins of soft baby blue DK cotton yarn, a 4mm wooden crochet hook, silver yarn needle, colorful stitch markers, scissors, and measuring tape arranged neatly on a light marble surface with soft natural morning light, shallow depth of field, professional product photography style orientation is landscape layout is block
Gauge
Please swatch. For garments, gauge is not optional.
Aim for 16 stitches and 8 rows in the grid pattern = 4 inches. Chain 22, work the grid stitch for about 10 rows, and measure the center. Too tight? Go up a hook size. Too loose? Drop down. Adjust now and save yourself a headache later.
Finished Measurements
This version fits a finished bust around 36 inches with a relaxed 2–4 inches of positive ease. Length from shoulder sits at about 18 inches, and the short sleeves measure roughly 6 inches.
Want a bigger size? Add multiples of 6 stitches to the back starting chain and 3 stitches to each front. Every extra 6 stitches gives you about 1.5 inches more width. Easy math.
Abbreviations and Stitch Definitions
Quick reference so you never have to scroll back:

Ch – chain
Sl st – slip stitch
Sc – single crochet
Dc – double crochet
Sk – skip
Rep – repeat
RS – right side
WS – wrong side
That’s everything you’ll need. No fancy stitches hiding in the pattern.
Understanding the Grid Stitch Pattern
This is the heart of the whole cardigan. The grid stitch (sometimes called filet mesh) is simply double crochets separated by chain spaces that stack on top of each other.
Work it over a multiple of 3 + 2 stitches. Foundation chain: any multiple of 3, then add 2.
Row 1: Dc in 4th chain from hook, ch 1, sk 1, dc in next, repeat across. Turn.
Row 2: Ch 3 (counts as dc), sk first dc, dc in the first ch-1 space, ch 1, dc in next ch-1 space, repeat, ending with a dc in the top of the turning chain. Turn.
Keep repeating Row 2. Those chain spaces line up and create the little open windows. Once the rhythm clicks, you’ll fly.
include render_generated_image with prompt is Extreme close-up hyper detailed 8K macro photograph of baby blue cotton yarn worked in open grid stitch pattern, showing perfectly even double crochet stitches and chain-1 spaces forming neat square windows, soft diffused lighting highlighting the texture and slight sheen of the yarn, sharp focus throughout, professional crochet stitch tutorial photography orientation is landscape layout is block
Pattern Instructions
Time to build the pieces.
Back Panel
Chain 74.
Row 1 (RS): Dc in 4th chain from hook, ch 1, sk 1, dc in next, repeat across. Turn.
Row 2: Ch 3, sk first dc, dc in first ch-1 space, ch 1, dc in next ch-1 space, repeat across, ending with dc in top of turning chain. Turn.
Rows 3–36: Repeat Row 2.
You should have a rectangle roughly 18 inches wide and 18 inches long. Fasten off.
Left Front Panel
Chain 38.
Work the same grid pattern for 26 rows.
Row 27: Work in pattern until 2 ch-1 spaces remain unworked. Turn.
Row 28: Slip stitch into the first ch-1 space, ch 3, then continue in pattern across.
Keep decreasing one stitch at the neck edge every other row until about 12 double crochets remain at the shoulder. Fasten off.
Right Front Panel
Mirror the left front. After 26 rows, begin the neck decreases from the opposite edge so the V shapes properly. Same final shoulder stitch count.
Sleeves (Make 2)
Chain 62.
Work the grid stitch for 12 rows. Each sleeve should measure about 15 inches wide and 6 inches long. Fasten off.
include render_generated_image with prompt is Hyper detailed 8K photograph of a crocheter’s hands working a baby blue grid stitch front panel on a wooden table, showing the open mesh fabric growing under the 4mm hook, soft natural window light, yarn ball nearby, realistic skin texture and yarn fibers visible, cozy craft room atmosphere orientation is landscape layout is block
Assembly
- Join the shoulders with mattress stitch or whip stitch, right sides together, leaving the neck open.
- Center each sleeve top at the shoulder seam and sew in place.
- Seam the sides from hem to underarm, then continue down the sleeve undersides.
Turn it right-side out. Already looks like a cardigan, right?
Neckline and Front Band Edging
With right side facing, join yarn at the bottom right front corner. Single crochet evenly up the right front, around the neckline, and down the left front. Aim for about 3 sc for every 2 rows so the edge stays flat. Work a second row of single crochet. Fasten off. This gives the ties a clean place to attach.
Tie Closures (Make 6)
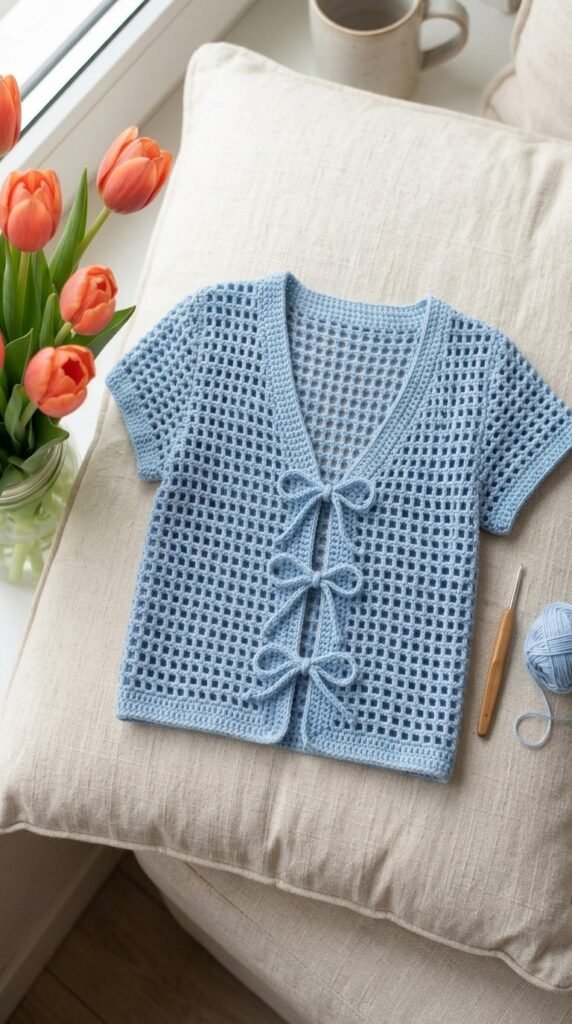
Chain 60. Single crochet in the second chain from the hook and in every chain across. Fasten off, leaving a long tail for sewing. Each tie should measure around 12 inches.
Attaching the Ties
Lay the cardigan flat. Place pairs of ties just below the V, at bust level, and at waist level. Sew one to each front edge at those spots. Tie them into neat bows and admire the effect.
include render_generated_image with prompt is Hyper detailed 8K lifestyle photograph of the finished baby blue grid stitch tie cardigan laid flat on a white bed, three pairs of soft blue ties neatly bowed at the front, open mesh texture clearly visible, soft morning light streaming in, professional fashion flat-lay style with gentle shadows orientation is landscape layout is block
Finishing Touches
Weave in every last end. Then block it. Soak the cardigan in lukewarm water, gently squeeze out the excess, and lay it flat to dry. Pin it to size if needed. Blocking opens those grid windows and makes the whole piece look polished.
Customization Ideas
Longer sleeves? Just keep going for more rows before you fasten off.
Longer body? Add rows to the back and both fronts before you start the neck decreases.
Different color? Cream, soft sage, dusty rose, or even a gentle variegated yarn all look fantastic.
Want a pocket? Crochet a small grid square and sew it on one front panel. Instant extra function.
Tips for Success
Count stitches carefully for the first few rows—those chain spaces can throw you off until your eyes adjust.
Keep your turning chains consistent so the edges stay straight.
If the fabric feels too open or too dense, adjust your hook size rather than fighting your tension.
And take breaks. Openwork can feel slow at first, but the payoff is huge.
You Might Also Like
- Baby Blue Ribbon Crochet Vest Free Crochet Pattern
- Easter Bunny Hooded Poncho Free Crochet Pattern
- Crochet Mint Daisy Baby Dress Free Pattern
- Fox Woodland Hooded Baby Poncho Free Crochet Pattern
FAQ’s
Can a true beginner make this cardigan?
If you know double crochet and can follow row-by-row instructions, yes. The construction stays simple, and the grid stitch is forgiving once you get the hang of it.
How much yarn do I really need?
Plan on 850–1050 yards of DK weight, depending on your size and tension. Better to have a little extra than to run short mid-sleeve.
Will the open grid stitch stretch out of shape?
Not if you block it properly and choose a yarn with good recovery. Cotton blends hold their shape surprisingly well after blocking.
Can I make the sleeves longer?
Absolutely. Just keep repeating the grid stitch rows until you reach the length you want before seaming.
Is this warm enough for cooler weather?
It’s more of a light layering piece. Perfect for spring, summer evenings, or air-conditioned offices. For real warmth, pair it over a long-sleeve tee.
Why You’ll Love This Pattern
This cardigan proves that openwork can look expensive and still feel approachable. You get a flattering shape, minimal seaming drama, and those adorable ties that make the whole thing feel special. Wear it over a sundress, with jeans, or as a soft cover-up on breezy days. Once you finish one, you’ll already be planning the next color.



Leave a Reply
You must be logged in to post a comment.