


I still remember the exact moment the idea settled in. I was walking past a small garden bed after a late spring rain, and a patch of forget-me-nots had opened fully overnight. Those tiny blue petals with their sunny yellow eyes looked almost too delicate to be real. I stood there longer than I meant to, thinking about how something so small could feel so lasting.
That same week I pulled out my softest baby-weight yarn in a clear, cool blue and started experimenting. I wanted the flower itself to sit right in the heart of each granny square, not as an appliqué but as the natural center of the motif. After a few false starts with different petal shapes, the raised forget-me-not finally bloomed the way I had pictured it. The rest of the square grew around it almost without effort.
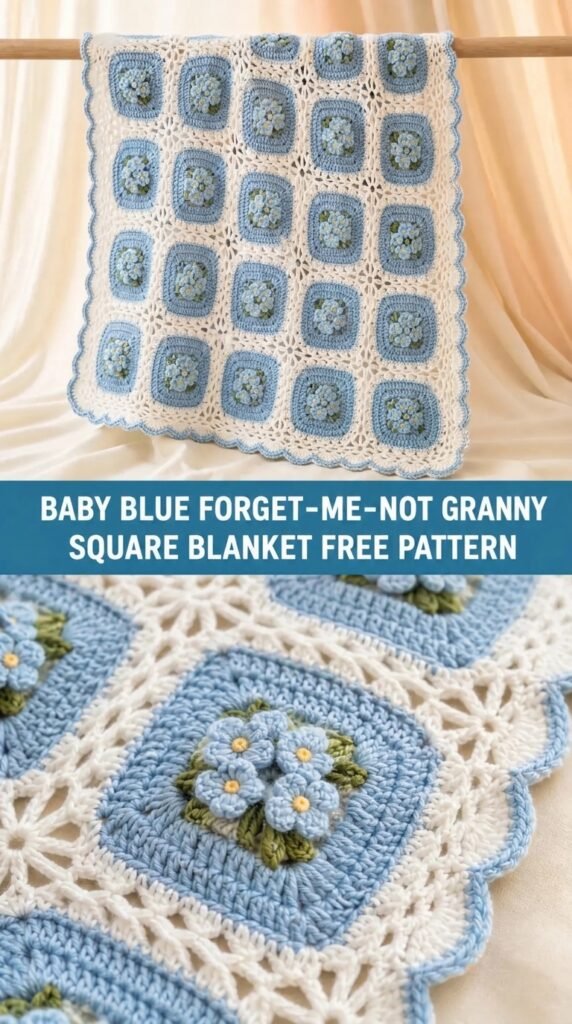
The result is this Baby Blue Forget-Me-Not Granny Square Blanket. It is soft enough for a newborn yet structured enough to become a keepsake that lasts for years. Every square carries its own little flower, and when they are joined the overall effect is a quiet field of blue.
About This Pattern
This is a modular granny-square blanket built from individual motifs that feature a dimensional forget-me-not flower at the center. The petals are worked in the round with short post stitches so they stand slightly proud of the square. A simple classic granny border frames each flower, and the squares are joined as-you-go or seamed later, depending on your preference.
Skill level is intermediate. You should be comfortable working in the round, changing colors cleanly, and reading basic stitch counts. The flower itself uses a few post stitches and picots, but nothing that cannot be mastered with a patient first square.
Finished size after blocking is approximately 36 by 42 inches when made with 48 squares (6 by 8 layout) and a simple border. You can easily scale the blanket larger or smaller by changing the number of squares. The fabric has a soft drape with just enough body to keep its shape.
Materials You’ll Need
Yarn (DK weight, approximately 100 g / 250 m per skein)
- Color A (soft baby blue): 5 skeins (about 1,250 m / 1,370 yds) – main petal and border color
- Color B (warm yellow): 1 skein (about 80 m / 90 yds) – flower centers
- Color C (cream or soft white): 3 skeins (about 700 m / 765 yds) – square backgrounds and joining
- Optional Color D (pale sage green): 1 skein (about 60 m / 65 yds) – tiny leaf accents if desired
Allow 15 % extra for gauge variation and tension differences.
Hooks
- 3.5 mm (E) – for the flower centers and petals (keeps them firm)
- 4.0 mm (G) – for the granny rounds and joining
Notions
- Tapestry needle
- Stitch markers (at least 8)
- Scissors
- Blocking mats and pins or wires
- Optional: small amount of matching sewing thread if you prefer to sew the final border instead of crocheting it
Abbreviations and Terminology
All terms are US crochet.
- ch – chain
- sc – single crochet: insert hook, yarn over, pull up loop, yarn over, pull through both loops
- hdc – half double crochet: yarn over, insert hook, yarn over, pull up loop, yarn over, pull through all three loops
- dc – double crochet: yarn over, insert hook, yarn over, pull up loop, (yarn over, pull through two loops) twice
- tr – treble crochet: yarn over twice, insert hook, yarn over, pull up loop, (yarn over, pull through two loops) three times
- sl st – slip stitch: insert hook, yarn over, pull through stitch and loop on hook
- bpdc – back post double crochet: yarn over, insert hook from back to front around the post of the indicated stitch, yarn over, pull up loop, complete as regular dc
- fpdc – front post double crochet: yarn over, insert hook from front to back around the post of the indicated stitch, yarn over, pull up loop, complete as regular dc
- picot – ch 3, sl st into the first of those 3 chains
- sp – space
- st(s) – stitch(es)
- rnd – round
- rep – repeat
Turning chains do not count as a stitch unless a step explicitly says they do. When joining a new color, leave a 6-inch tail for weaving later.
Gauge
Work one complete motif through Round 5 using the 4.0 mm hook for the granny rounds.
Blocked motif should measure 5 inches square from corner to corner.
If your square is smaller, move up half a hook size for the granny rounds. If it is larger, move down half a size. The flower center itself should stay firm, so keep the 3.5 mm hook for the first three rounds even if you adjust the outer rounds.
Main Pattern Instructions
Forget-Me-Not Center (make 48)
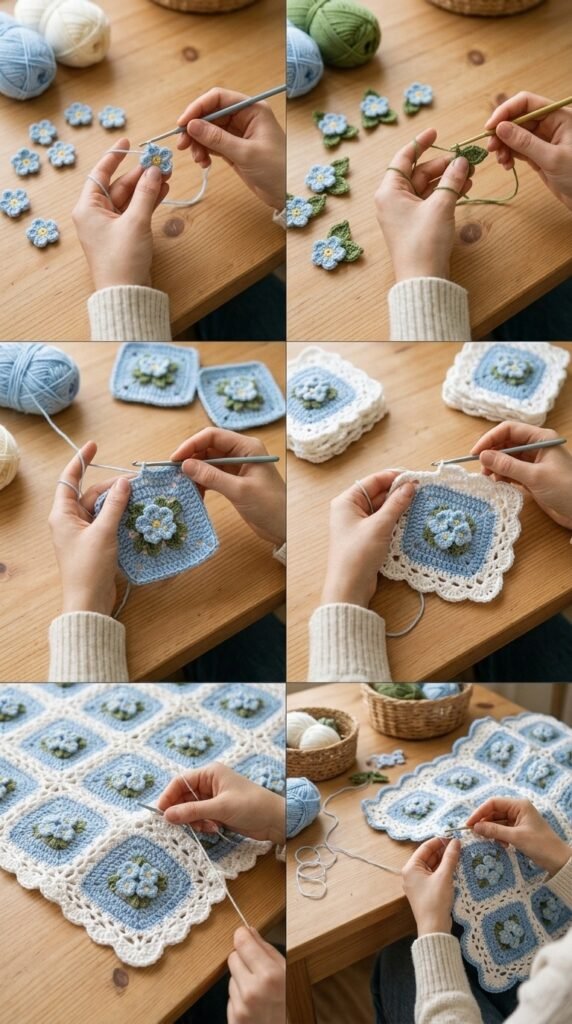
With Color B and 3.5 mm hook, make a magic ring (or ch 4 and join with sl st to form a ring).
Rnd 1: Ch 1, work 8 sc into the ring. Join with sl st to first sc. (8 sc)
Pull the ring tight.
Rnd 2: Ch 1, *sc in next st, ch 2; rep from * around. Join with sl st to first sc. (8 sc, 8 ch-2 sps)
Fasten off Color B. Weave in the center tail carefully so it does not show through the petals.
Petals
Join Color A in any ch-2 space with 3.5 mm hook still in use.
Rnd 3: Ch 1, *(sc, hdc, 2 dc, hdc, sc) in next ch-2 sp, skip next sc; rep from * around. Join with sl st to first sc. (8 petals)
You now have eight small petals. The next round will give them height and a slight cup.
Rnd 4: Ch 1, working into the stitches of each petal: *sc in first sc, hdc in hdc, dc in each of next 2 dc, hdc in hdc, sc in last sc of petal, ch 1; rep from * around. Join with sl st to first sc. (8 petals with ch-1 between)
Fasten off Color A. The petals should stand slightly raised.
Granny Square Background
Switch to 4.0 mm hook and join Color C in any ch-1 space between petals.
Rnd 5: Ch 3 (counts as first dc), 2 dc in same ch-1 sp, ch 1,
*(3 dc, ch 2, 3 dc) in next ch-1 sp (this creates a corner), ch 1, 3 dc in next ch-1 sp, ch 1;
rep from * around, ending with (3 dc, ch 2, 3 dc) in last corner space, ch 1.
Join with sl st to top of beginning ch-3.
You should now have four corner ch-2 spaces and the flower sitting neatly in the center.
Rnd 6: Sl st into next 2 dc and into the first ch-1 sp.
Ch 3, 2 dc in same sp, ch 1,
*(3 dc, ch 2, 3 dc) in next corner ch-2 sp, ch 1, 3 dc in next ch-1 sp, ch 1, 3 dc in next ch-1 sp, ch 1;
rep from * around. Join with sl st to top of beginning ch-3.
Rnd 7: Work as established: 3 dc in each ch-1 space, (3 dc, ch 2, 3 dc) in each corner ch-2 space, with ch 1 between side groups.
Join and fasten off Color C, leaving a 12-inch tail if you plan to seam the squares later.
Your finished motif should measure approximately 5 inches after light blocking. Make 48 identical motifs.
Special Techniques
Optional Tiny Leaves (if using Color D)
After completing Rnd 4 of the flower, before joining Color C, you may add two small leaves.
With Color D and 3.5 mm hook, join in the base of any petal.
Ch 6, sc in 2nd ch from hook, hdc in next, dc in next, hdc in next, sc in last.
Sl st into the base of the same petal.
Repeat once more, spacing the second leaf two or three petals away.
Fasten off. These leaves sit under the petals and add a quiet green note.
Raised Petal Texture Note
The combination of the taller stitches in Rnd 4 and the post-like placement of the petals creates a soft dimensional flower. If your petals look flat, try working the dc stitches of Rnd 4 a little more loosely so they can cup upward when the square is blocked.
Assembly and Finishing

Joining the Squares
You have two clean options.
Option A – Continuous Join-as-You-Go (recommended)
Arrange the squares in 6 columns of 8 rows.
Work the final round of each new square while attaching it to its neighbors on the right and bottom edges using slip stitches into the corresponding spaces of the already-joined squares. Keep the join loose enough that the fabric remains flexible.
Option B – Seam after all squares are complete
Lay the squares out in the 6 × 8 grid.
Using the long Color C tails and a tapestry needle, whip-stitch through the back loops only of corresponding stitches and chains. This creates a nearly invisible join on the right side.
Once all squares are joined, the blanket body measures roughly 30 by 40 inches before the border.
Border
Join Color A in any corner ch-2 space with 4.0 mm hook.
Border Rnd 1: Ch 3, 2 dc in same corner, ch 1,
*3 dc in each side space or join seam, (3 dc, ch 2, 3 dc) in each corner;
continue around. Join with sl st to top of beginning ch-3.
Border Rnd 2: Ch 1, sc in each dc and each ch-1 space around, working (sc, ch 2, sc) in each corner ch-2 space. Join with sl st to first sc.
Border Rnd 3 (optional picot edge): Ch 1, *sc in next 3 sts, picot; rep from * around, adjusting slightly at the corners so the picots sit evenly. Join and fasten off.
Weave in every remaining end carefully on the wrong side.
Blocking and Care
Wet-block the finished blanket.
Fill a clean basin with lukewarm water and a small amount of wool wash or mild soap.
Submerge the blanket, press gently to saturate, and let it soak 15–20 minutes.
Lift without wringing, roll in a large towel to remove excess water, then pin or wire the blanket to the finished measurements (36 × 42 inches) on blocking mats.
Allow to dry completely flat, away from direct heat or sunlight.
Care notes:
Hand wash in cool water.
Never hang a wet blanket; the weight of the water can stretch the joins.
Dry flat.
Store folded with tissue between layers if keeping for long periods.
Fit and Troubleshooting Tips
- Cupping or doming of the flower: Usually caused by too-tight tension in Rnds 3–4. Re-work those rounds with a slightly looser hand or go up half a hook size for the petals only.
- Ruffling at the joins: The continuous join was worked too tightly. Steam the joins lightly or open the slip stitches a fraction and re-join more loosely.
- Squares not lying flat: Check that you have the correct number of ch-1 spaces between corner groups. One missing space will cause the square to twist.
- Size adjustment: To make a larger throw, simply add more squares (for example 8 × 10). Recalculate yarn amounts by multiplying the per-square yardage.
- Heavy motifs: If the raised petals feel dense, try a slightly thinner yarn for Color A only, keeping the background yarn the same.
FAQ’s
Can a confident beginner make this pattern?
Yes, if you already know how to work basic stitches in the round and change colors cleanly. The flower center is the only slightly fiddly part. Make one practice motif first; most people find the second and third squares go much faster.
What if I want a different size?
Each finished square is about 5 inches. For a larger throw, work 8 × 10 squares (80 total) or 9 × 12. For a small stroller blanket, 5 × 6 squares works well. Just adjust your yarn quantities accordingly—roughly 25–28 meters of Color A and 15 meters of Color C per square.
Can I use a different weight of yarn?
You can, but the look and drape will change. Sport or light DK keeps the flowers delicate. Worsted weight will make a thicker, warmer blanket and larger squares (expect 6–6.5 inches per motif). Adjust your hook size to match the new yarn and re-check gauge.
Do I have to use the exact colors?
Not at all. The pattern is written for baby blue, yellow, and cream because that combination feels classic and soft. Soft lilac, pale pink, or even a soft grey with ivory centers also look lovely. Just keep good contrast between the flower and the background so the petals stay visible.
How long does one square take?
Once you are familiar with the sequence, most crocheters finish a motif in 20–30 minutes. The first few will take longer while you learn the petal shaping.
Is the join-as-you-go method required?
No. Many people prefer to make all the squares first and seam them later. Both methods are fully written out so you can choose what feels more comfortable.
Will the raised petals catch on little fingers?
The petals are only gently dimensional. After blocking they soften and lie flatter. If you are making the blanket for a very young baby, you can work the petal rounds a little tighter or skip the optional leaves for an even smoother surface.
Can I add a different border?
Absolutely. The simple three-round border is designed to frame the flowers without competing with them. Feel free to replace the final picot round with a shell border, a crab-stitch edge, or a wider granny border if you prefer.
Final Thoughts
There is something quietly satisfying about watching a field of tiny blue flowers grow under your hands, square by square. When the last border stitch is worked and the blanket is blocked, the forget-me-nots settle into a soft, even texture that feels both delicate and sturdy.
I hope this Baby Blue Forget-Me-Not Granny Square Blanket becomes one of those pieces that travels from crib to toddler bed to the back of a favorite chair years later. If you make one, I would love to see how your flowers turned out—leave a comment or share a photo with the tag #ForgetMeNotBlanket so others can find inspiration too.
Happy stitching.



Leave a Reply
You must be logged in to post a comment.