


I still remember the night I first sketched this design. It was late, the house quiet, and I was sitting by the window with a cup of tea that had long gone cold. Outside, the sky was perfectly clear—no city haze, just a deep velvet black scattered with stars that looked close enough to touch. One small cluster near the horizon caught the light just so, and for a moment it felt like the whole galaxy had decided to sit still for me.
I wanted something that could carry that feeling in a small, wearable way. Not a big shawl or a statement piece, but something quiet and personal—an anklet that would catch the light when you walked and remind you of that open-sky feeling. Beads seemed the natural choice for stars, and a fine, drapey yarn would keep it light against the skin. After a few false starts (and one completely over-beaded sample that felt more like armor than jewelry), the Midnight Galaxy Beaded Celestial Anklet settled into place: delicate lace shells, carefully placed beads that catch light like distant stars, and a soft, flexible band that sits comfortably against the ankle.
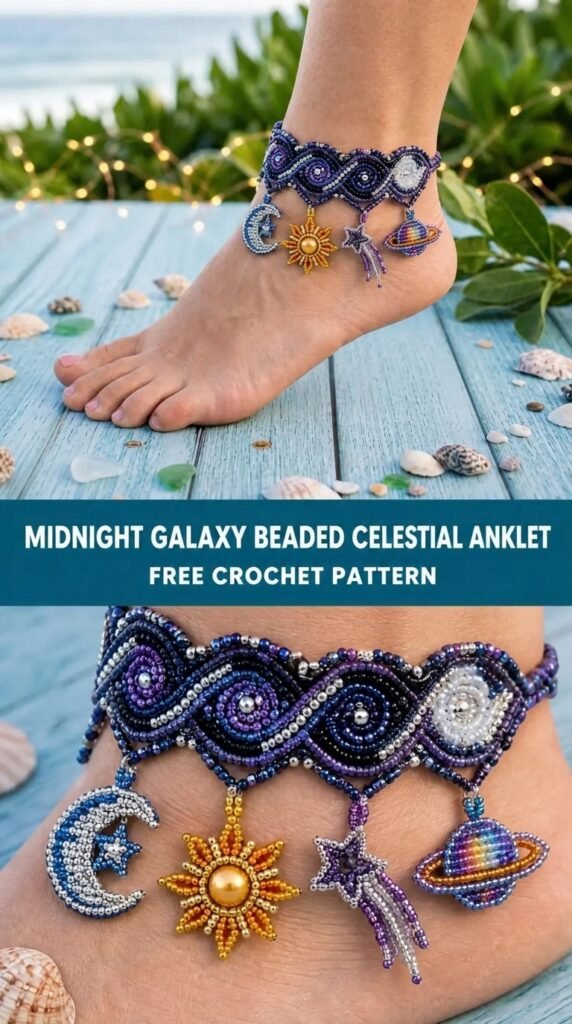
This is the finished pattern—light enough for everyday wear, pretty enough for evenings, and just intricate enough to feel special while you make it.
About This Pattern
The Midnight Galaxy Beaded Celestial Anklet is worked as a flat rectangular band in rows, then joined into a circle. The body features repeating lace shell motifs with strategic bead placement in the centers and along the edges, creating a scattered starry effect against a deep navy or black background. A simple beaded picot edging finishes both long sides, and optional short beaded dangles can be added at the join for extra movement.
Skill level is intermediate. You should be comfortable with basic lace stitches, counting, and working beads into your fabric (I explain the bead method fully below). The finished band measures approximately 9–10.5 inches (23–27 cm) in circumference before joining, designed to fit most adult ankles with a little stretch and drape. The width is about 1.25 inches (3 cm). Because the fabric is open and fine, it has beautiful drape and will mold gently to the ankle rather than sitting stiffly.
Materials You’ll Need
Yarn
- Color A (main): approximately 40–50 yards (37–46 meters) of fingering-weight yarn in deep navy, midnight blue, or near-black. I used a smooth merino-nylon blend with a slight sheen.
- Optional Color B (accent): 10–15 yards of a slightly lighter or silver-toned fingering yarn for the edging if you want contrast.
Allow 15% extra for gauge variation and tail weaving.
Hooks
- 2.75 mm (C) crochet hook for the main fabric
- 2.5 mm hook (optional) for tighter bead work or a denser edging if preferred
Notions
- Size 6/0 or 8/0 seed beads: 80–120 beads in a mix of silver, iridescent blue, clear, and soft gray (or any galaxy-inspired palette). Pre-string about 60–70 of them onto the yarn before starting if you prefer the pre-string method.
- Tapestry needle
- Stitch markers
- Small button or clear jewelry clasp (optional, for adjustable closure)
- Blocking mats and pins
- Beading needle or dental floss threader (helpful for stringing beads)
Abbreviations and Terminology
All terms are US crochet terminology.
- ch – chain
- sc – single crochet: insert hook, yarn over, pull up loop, yarn over, pull through both loops
- hdc – half double crochet: yarn over, insert hook, yarn over, pull up loop, yarn over, pull through all three loops
- dc – double crochet: yarn over, insert hook, yarn over, pull up loop, (yarn over, pull through two loops) twice
- tr – treble crochet: yarn over twice, insert hook, yarn over, pull up loop, (yarn over, pull through two loops) three times
- sl st – slip stitch
- sp – space
- sk – skip
- rep – repeat
- beg – beginning
- RS – right side
- WS – wrong side
- bead – place a bead (see Special Techniques)
- shell – (2 dc, ch 1, 2 dc) in same stitch or space
- picot – ch 3, sl st in first ch
Turning chains do not count as a stitch unless a step explicitly says they do. When a bead is placed, it sits on the yarn and is pushed up against the stitch just made.
Gauge
Work a small swatch in the main shell pattern:
Chain 20.
Row 1: Sc in 2nd ch from hook and each ch across. Turn.
Row 2: Ch 3 (counts as dc here), sk 2, shell in next st, *sk 3, shell in next st; rep from * across, ending with dc in last st. Turn.
Row 3: Ch 1, sc in each st and ch-sp across. Turn.
Repeat Rows 2–3 twice more.
Blocked gauge should measure approximately 4 shell repeats = 3 inches (7.5 cm) across and 6 rows = 1.5 inches (4 cm) in height. If your swatch is tighter, go up a hook size. If looser, go down. Exact gauge is not critical for an anklet, but consistent tension keeps the bead placement looking even.
Main Pattern Instructions
Notes before you begin
- Pre-string 60–70 beads onto Color A if using the pre-string method. Leave the remaining beads free for the edging and optional dangles.
- The band is worked flat. The first and last rows form the short ends that will be joined.
- Place a stitch marker in the first and last stitch of each row for the first few rows to keep edges clean.
- Beads are worked on the right-side rows only in the main body.
Foundation
With Color A and 2.75 mm hook, ch 62 (or multiple of 6 + 2 for a different circumference—see sizing notes in Troubleshooting).
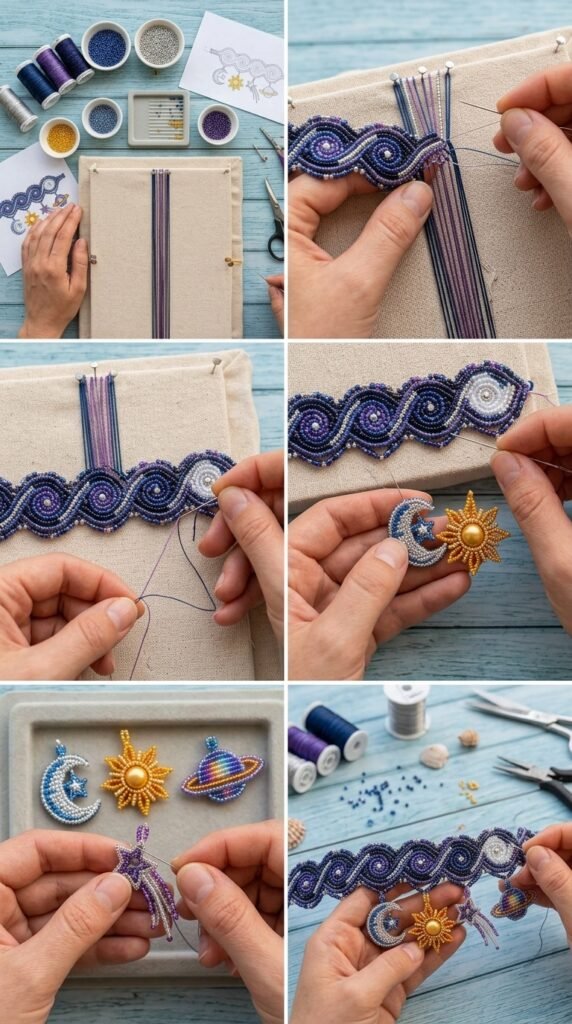
Row 1 (WS): Sc in 2nd ch from hook and in each ch across. (61 sc) Turn.
Row 2 (RS): Ch 3 (counts as first dc), sk 2 sc, shell in next sc, *sk 3 sc, shell in next sc; rep from * across until 3 sc remain, sk 2 sc, dc in last sc. (10 shells + 2 dc) Turn.
Row 3 (WS): Ch 1, sc in first dc, *sc in next 2 dc, sc in ch-1 sp, sc in next 2 dc; rep from * across, sc in top of turning ch. (61 sc) Turn.
Row 4 (RS – first beaded row): Ch 3, sk 2 sc, (2 dc, slide bead up, ch 1, 2 dc) in next sc, *sk 3 sc, (2 dc, slide bead up, ch 1, 2 dc) in next sc; rep from * across until 3 sc remain, sk 2 sc, dc in last sc. Turn.
(You have now placed one bead in the center of each shell.)
Row 5 (WS): Repeat Row 3.
Row 6 (RS): Repeat Row 2 (no beads).
Row 7 (WS): Repeat Row 3.
Row 8 (RS – second beaded row): Repeat Row 4, but this time place beads only in every other shell (shells 1, 3, 5, 7, 9). This creates a more scattered, galaxy-like distribution.
Row 9 (WS): Repeat Row 3.
Row 10 (RS): Repeat Row 2.
Row 11 (WS): Repeat Row 3.
Row 12 (RS – third beaded row): Repeat Row 4, placing beads in all shells again.
Row 13 (WS): Repeat Row 3.
Row 14 (RS): Repeat Row 2.
Row 15 (WS): Repeat Row 3. Fasten off Color A, leaving a 12-inch tail for joining later.
You should now have a delicate lace band approximately 9–10.5 inches long and just over 1 inch wide, with three rows of bead placement creating a soft constellation effect.
Special Techniques / Additional Elements
Adding Beads as You Crochet
Two reliable methods:
- Pre-string method (recommended for the main body)
Thread the required number of beads onto the yarn before starting, using a beading needle or dental floss threader. As you work a beaded shell, slide the next bead up the yarn so it sits snugly against the last stitch before you make the ch-1 of the shell. The bead will rest in the center of the shell. - Hook method (useful for edging and dangles)
Insert hook into the stitch, pull up a loop, remove the loop from the hook, slide a bead onto the loop, reinsert the hook into the loop, and complete the stitch as usual. This method lets you add beads without pre-stringing.
Beaded Picot Edging
With RS facing and Color A (or optional Color B), join yarn with sl st in the side edge of the foundation row.
Round/Edging Row: Working along the long side, *ch 2, sk the side of the next row, (sc, slide bead, ch 3, sl st in first ch of the ch-3 to form picot, sc) in the side of the next row; rep from * evenly along the entire long edge (aim for a bead every 2 rows). Work the same beaded picot treatment along the second long edge. Fasten off.
Optional Beaded Dangles (make 3–5)
Cut three 10-inch lengths of yarn. On each length, string 5–7 beads, then tie an overhand knot at the end to secure them. Fold the strand in half and use a lark’s head knot to attach the dangle to the short end of the band near the eventual join. These hang softly and move when you walk.
Assembly and Finishing
Lay the band flat with RS facing you. Bring the two short ends together. Using the long tail left at the end of Row 15, whip-stitch or mattress-stitch the ends together, matching stitches carefully so the lace pattern continues smoothly around the circle. Weave in all ends securely on the wrong side.
If you prefer an adjustable fit, leave a small gap (about ½ inch) and sew a small button to one end and a chain loop or buttonhole to the other.

Attach the optional beaded dangles evenly around the join or spaced along one edge if you want them more visible.
Blocking and Care
Wet-block the finished anklet for the best drape and even bead placement. Soak in lukewarm water with a drop of gentle wool wash for 15–20 minutes. Gently squeeze out excess water (do not wring). Pin the anklet into a gentle oval shape on blocking mats, opening the lace shells slightly and making sure the beads sit flat. Allow to dry completely.
Care: Hand wash only in cool water. Do not agitate vigorously—beads can catch. Roll in a towel to remove moisture and dry flat. Never hang the anklet while wet, as the weight of the beads can stretch the fine fabric. Store flat or loosely coiled when not wearing.
Fit and Troubleshooting Tips
- Too tight or too loose: The foundation chain is the main sizing control. For a smaller ankle, start with ch 56 (multiple of 6 + 2). For a larger ankle, ch 68 or 74. The fabric has some natural give once blocked.
- Beads sliding out of place: Make sure you push the bead firmly against the previous stitch before completing the ch-1 of the shell. A slightly tighter tension on the ch-1 helps lock it.
- Cupping or ruffling along the edges: This usually means the edging was worked too tightly or too many picots were placed. Redo the edging with a larger hook or fewer repeats.
- Uneven bead distribution: Count your shells carefully on beaded rows. Mark the first shell of each row so you don’t accidentally skip or double a placement.
- Yarn splitting while adding beads: Switch to a smoother fingering yarn or use the hook method instead of pre-stringing if your yarn is particularly sticky.
FAQ’s
Can I use a different yarn weight?
You can, but the character of the anklet will change. Sport weight will make a slightly wider, less delicate band. Lace weight will be finer and more fragile. Stick with fingering for the intended drape and bead proportion.
Do I have to use seed beads?
No. You can substitute small glass beads, metal beads, or even tiny crystals as long as the hole is large enough for your yarn. Avoid heavy beads that will pull the lace downward.
Is this pattern suitable for beginners?
The basic shell stitch is accessible, but managing bead placement and keeping an even lace tension makes it better suited to intermediate crocheters. Absolute beginners may find the bead rows frustrating at first.
How many beads do I really need?
Plan on 80–120 total. You will use roughly 30 in the main body (three beaded rows) and the rest for the picot edging and optional dangles. Extra beads are always useful for practice.
Can I make this as a bracelet instead?
Yes. Simply start with a shorter foundation chain that fits your wrist (usually ch 44–50) and work fewer rows if you want a narrower band. The same stitch pattern and bead placement work beautifully at the wrist.
What if I don’t want any beads?
Omit the bead instructions entirely and work plain shells. The lace still looks celestial and airy, just without the starry sparkle.
How long does this project take?
Most makers finish the band in 3–5 hours, with another hour for edging, joining, and blocking. Bead stringing adds a little extra time at the beginning.
Final Thoughts
There is something quietly satisfying about watching the beads settle into the lace as the band grows. Each shell becomes a tiny constellation, and by the time you join the ends you have a small piece of night sky that travels with you. I hope this Midnight Galaxy Beaded Celestial Anklet brings you the same calm, open-sky feeling that started the whole design.
If you make one, I would love to see how your galaxy turned out—share a photo in the comments or tag your work so others can find a little extra inspiration under the same stars. Happy crocheting.



Leave a Reply
You must be logged in to post a comment.