

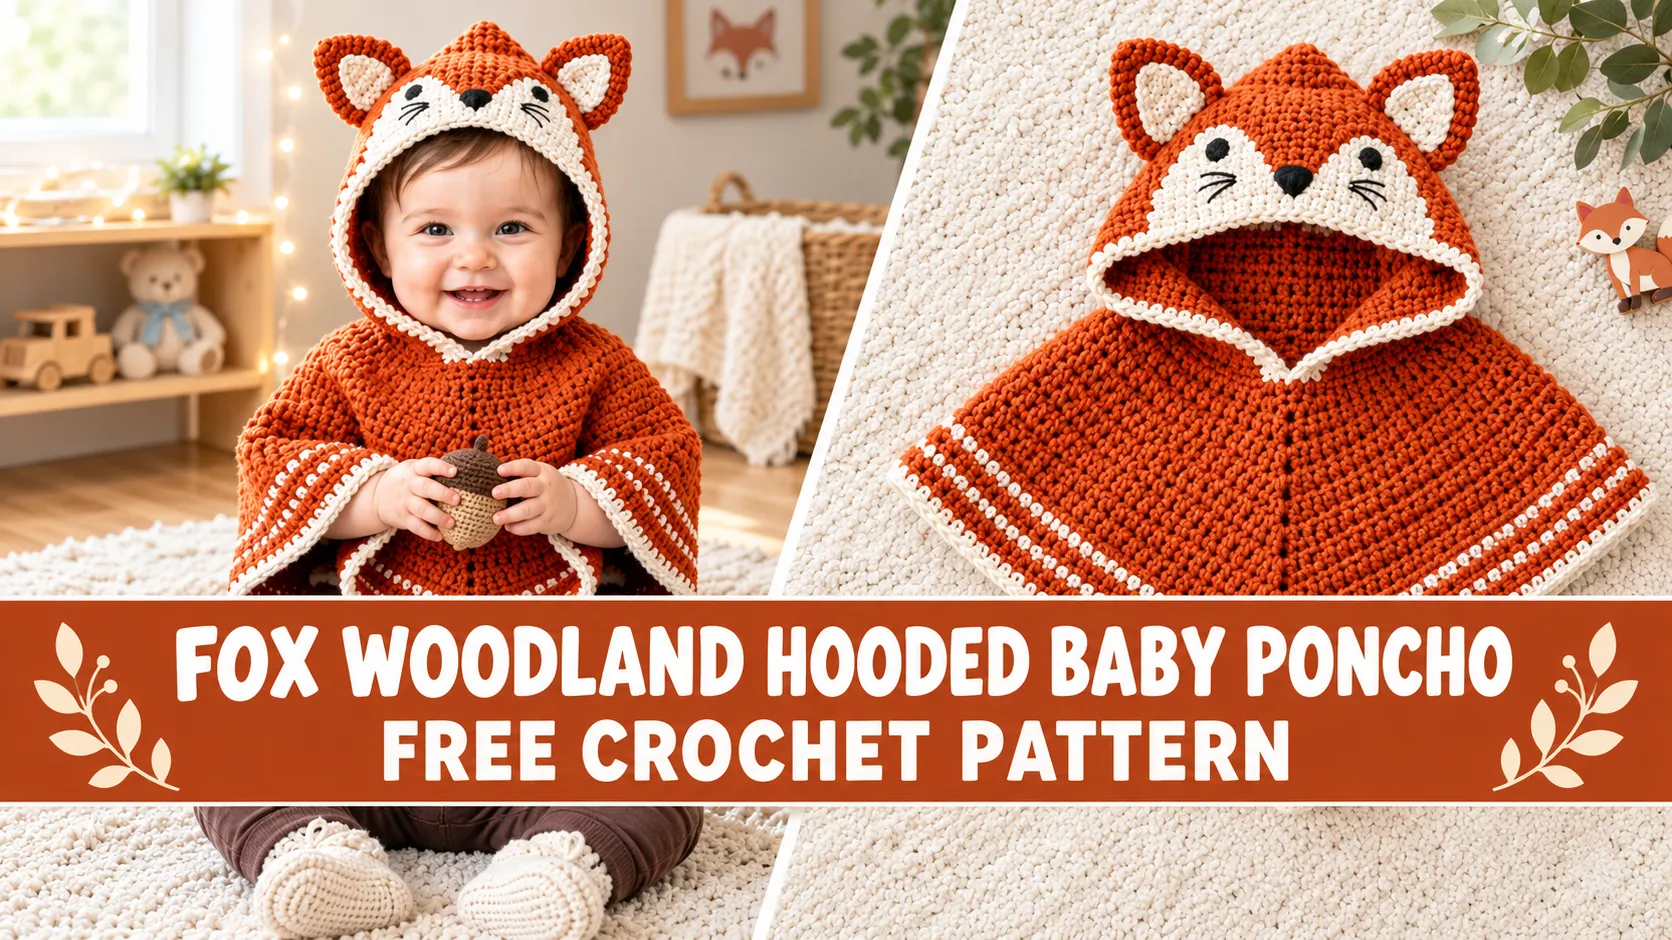
I have a serious soft spot for baby items that double as adorable costumes. This fox hooded poncho delivers all the cozy warmth of a blanket with the irresistible charm of a forest friend—no complicated pieces to wrestle onto a wiggly baby. Just slip it over their head and watch the cuteness unfold. The rust-orange body, cream face panel, and perky pointed ears come together into something that looks boutique-level but is surprisingly approachable.

Why You’ll Love This Crochet Pattern
This woodland fox poncho hits the sweet spot between impressive and achievable. The construction uses basic single crochet throughout, so if you can chain and single crochet, you already have the core skills.
What makes it look so professional is the assembly. You create separate simple pieces—two flat rectangles for the body, a hood built in rounds, tiny triangle ears—then bring them together into something special. The finished poncho fits babies aged 6 to 18 months and works beautifully as a baby-shower gift, first-birthday present, or fall photo prop.
Finished Measurements
Size: 6 to 12 months (with notes for 12 to 18 months)
- Poncho body width (flat, each panel): 13 in / 33 cm
- Poncho body length (shoulder to hem): 11 in / 28 cm
- Neck opening: approximately 5 in / 12.5 cm diameter
- Hood height (back of head to face opening): 7 in / 18 cm
- Hood circumference at face opening: approximately 16 in / 40.5 cm
These measurements give a comfortable, drapey fit that still looks polished.
Materials Needed
Yarn:
Color A (Rust Orange): approximately 280 yards worsted weight
Color B (Cream/Off-White): approximately 90 yards worsted weight
Color C (Dark Brown or Black): approximately 5 yards for embroidery
Hook: US Size J-10 / 6.0 mm
Notions: Yarn needle, two 9 mm black safety eyes (or embroider), stitch markers, scissors, straight pins, optional fiberfill for ears, small brown felt circle or embroidery for the nose.
Yarn Suggestions
Any worsted weight yarn works, but for baby items I always recommend machine-washable acrylics. Parents will thank you.
Lion Brand Pound of Love in Butterscotch and Fisherman gives excellent stitch definition and softness. Paintbox Yarns Simply Aran in Burnt Orange and Champagne White is another strong choice. Caron Simply Soft in Autumn Red and Off White offers lovely drape at a friendly price.
Whatever you pick, make a gauge swatch first. Trust me on this one.
Gauge
15 sc x 18 rows = 4 in / 10 cm worked flat in single crochet with a 6.0 mm hook, blocked.
Gauge matters because the neck opening needs to fit over a baby’s head comfortably. Too tight and it won’t go on; too loose and it looks sloppy. Make a swatch at least 5 inches square, wash and dry it the way you’ll care for the finished poncho, then measure. Adjust your hook size up or down as needed.
Abbreviations and Stitch Definitions
Here are the abbreviations you’ll see:
- ch = chain
- sl st = slip stitch
- sc = single crochet
- sc2tog = single crochet two together (decrease)
- inc = increase (2 sc in same stitch)
- st(s) = stitch(es)
- rnd(s) = round(s)
- RS = right side
- WS = wrong side
- pm = place marker
- rep = repeat
Skill Level
This pattern is rated intermediate. You should feel comfortable working in both rows and rounds, changing colors, seaming pieces together, and doing basic embroidery. The individual pieces are straightforward, but the construction involves multiple components that need thoughtful assembly.
If you’re an ambitious beginner who has completed a few projects, you can absolutely tackle this. Just take it one section at a time.
Pattern Notes Before You Begin
Read these notes first—they’ll save you confusion later.
- The poncho body is two identical flat rectangles seamed at the shoulders, leaving a centered neck opening.
- All single crochet rows begin with chain 1, turn. The chain 1 does not count as a stitch.
- When changing colors for the hem border, complete the last pull-through of the final stitch in the new color.
- The hood is worked in joined rounds. Each round ends with a slip stitch, then chain 1 to begin the next.
- Safety eyes must be inserted before the face panel is fully attached. For babies under 3 years, embroider the eyes instead.
- Stitch counts appear in parentheses at the end of each row or round.
- The right side is the smooth side of the single crochet fabric.
Step-by-Step Crochet Pattern Instructions
Poncho Body: Front Panel
Make two identical panels. Chain 50 with Color A. Work 50 rows of single crochet. Your panel should measure about 13 inches wide by 11 inches tall.
Hem Border
Rotate the panel and work a striped border across the foundation-chain edge: alternating rows of Color A and Color B for a total of ten rows. Repeat on the second panel. This little detail gives the poncho a polished finish.
Seaming the Panels
Lay the panels with right sides facing out. Seam the top edges for the shoulders, leaving the center open for the neck. The sides stay open for that classic draped poncho look (or seam a couple of inches down each side if you prefer more coverage).
Hood Construction
Join yarn at the neck opening and work single crochet around to create a clean base. Increase gradually over several rounds, then shape the crown with paired decreases until the top can be seamed closed. The hood builds up into a cozy little cave that frames the face perfectly.
Hood Face Border
With Color B, work two rounds of single crochet around the face opening for a clean cream edge that sets up the fox muzzle.
Fox Ears
Make two outer triangles in rust orange and two smaller inner triangles in cream. Whip-stitch each pair together, leaving the base open. Pin the ears to the top of the hood about two inches apart and sew them securely. A tiny bit of fiberfill gives them a soft stand-up shape.
Fox Face Panel
Crochet a cream oval that becomes the light muzzle area. Sew it inside the face opening of the hood so the cream shows through the border.
Adding Facial Features
Position a small felt or embroidered nose at the bottom center of the face panel. Add safety eyes (or embroidered eyes) about an inch above the nose. Finish with three short whisker stitches on each side of the nose. Instant woodland cuteness.
Blocking Your Finished Poncho
Wet blocking makes a noticeable difference. Hand wash in cool water, press out the excess moisture, and lay flat. Pin the body panels to the finished measurements and shape the hood over a balloon inflated to about 17 inches around. Allow a full day to dry. The fabric softens and the seams settle beautifully.
Size Adjustments for 12 to 18 Months
Chain 57 instead of 50 for the panels and work 56 rows. Leave a wider center neck opening, pick up more stitches around the neck for the hood base, and add one extra plain round before the crown decreases. The rest of the construction stays the same.
Care Instructions
Machine wash cold on gentle cycle inside a mesh bag. Tumble dry low or lay flat. Do not bleach. Before each use, check that any safety eyes are still secure. If they feel loose, switch to embroidered eyes.

You Might Also Like
- Woodland Creatures Bucket Hats Free Crochet Pattern
- Citrus Burst Daisy Granny Square Baby Blanket Free Crochet Pattern
- Classic Red Heart Valentine Baby Blanket Free Crochet Pattern
- Mint Bunny Baby Cocoon Blanket Free Crochet Pattern
- Panda Bear Granny Square Baby Blanket Free Crochet Pattern
FAQ’s
Is this pattern really intermediate?
Yes, mainly because of the assembly and multiple pieces. Every individual section is simple single crochet. Take it one part at a time and you’ll be fine.
Can I embroider the eyes instead of using safety eyes?
Absolutely—and I recommend it for any gift intended for babies under three. Embroidered eyes are just as cute and completely safe.
Do the sides of the poncho have to stay open?
No. Seam two or three inches down each side from the shoulder if you want a more closed silhouette. The open sides give that classic draped look, but both versions work.
How do I keep the ears standing up?
A light bit of fiberfill and firm stitching at the base usually does the trick. You can also steam the ears gently (held above the fabric) to help set the shape.
What if my gauge is off?
Adjust your hook size before you start the panels. The neck opening is the most important measurement—make sure it will fit comfortably over a baby’s head.
Can I make this in different colors?
Of course. Soft gray with white, classic brown with cream, or even a pastel version all look adorable. Just keep the face panel lighter than the body so the fox features pop.
You Did It!
This fox woodland hooded baby poncho looks far more complicated than it actually is. Every piece is simple; the magic happens when they come together. Once you’ve made one, you’ll probably want to make a whole forest of woodland creatures. Grab your rust-orange yarn, settle in, and enjoy the process. The little one who wears this is going to look absolutely irresistible. Happy crocheting!


Leave a Reply
You must be logged in to post a comment.