

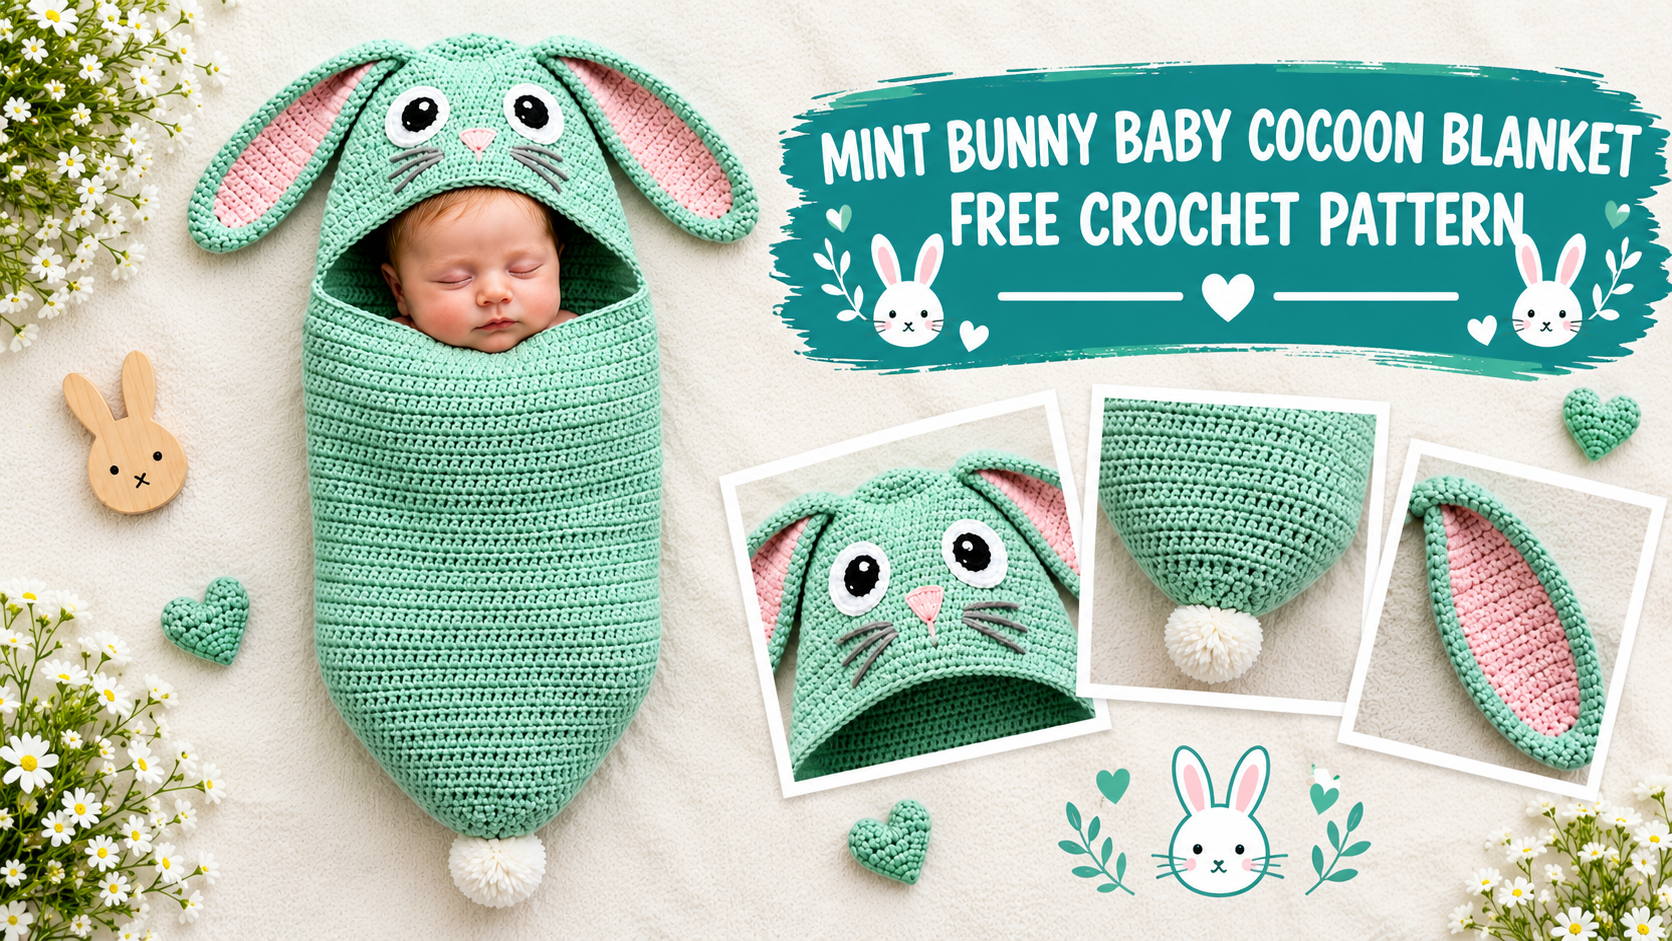

I melt every time I see a newborn wrapped in something handmade. This mint bunny cocoon has been living in my head for months—the floppy ears, the sweet little face, that fluffy pompom tail. It looks complicated, but the whole thing is built on single crochet. If you want a show-stopper baby gift that people actually gasp over, this is it.
About This Crochet Pattern
This mint bunny baby cocoon works from the bottom up in continuous rounds. You start with a small oval base, build a snug cylindrical tube, then widen it gently toward the opening where the hood attaches.
The hood is made separately and features those signature long floppy ears with dusty-rose inner linings. You’ll embroider eyes, a tiny pink nose, and whiskers to bring the face to life. A fluffy white pompom finishes the bottom as the tail.
This cocoon is perfect for newborn photography sessions or everyday snuggling. The dense single-crochet fabric creates a warm, stretchy fabric that’s gentle against baby skin.
Skill Level
I’d call this intermediate. You need to feel comfortable working in continuous rounds, making simple color changes for the ear linings, and shaping with increases and decreases. The embroidery is basic—just straight stitches and filled shapes.
No fancy stitches here. The entire project uses single crochet. Pay close attention to your stitch counts during the shaping sections. A stitch marker will be your best friend.
How Long Does This Take?
Plan for about 12 to 16 hours if you’re an experienced crocheter moving at a comfortable pace. Add a little extra time for the embroidery and finishing details. It’s not a quick weekend project, but the result is absolutely worth the investment.
Finished Measurements
Cocoon body: approximately 20 inches long by 11 inches wide at the widest point (51 cm by 28 cm)
Hood circumference: approximately 14 inches (35.5 cm), sized for newborn to 3 months
Ear length: approximately 4.5 inches (11.5 cm) each
This size fits a newborn up to about 3 months or roughly 12 pounds (5.4 kg).
Materials You’ll Need
Yarn
Main Color (MC): Soft mint or sage green, approximately 600 yards of worsted weight yarn
Color A (CA): Dusty rose or blush pink, approximately 60 yards for the ear linings
Color B (CB): White or cream, approximately 20 yards for the pompom tail
Small amounts of black and gray yarn or embroidery floss for the face
Hook
US size H-8 / 5.0 mm crochet hook
Notions
Stitch markers (at least 4), yarn needle, scissors, optional 20–22 mm black safety eyes, pompom maker or cardboard circles, white yarn or a ready-made 2.5-inch pompom
Yarn Recommendations
Lion Brand Pound of Love works beautifully—soft, machine-washable, and budget-friendly when you need this much yardage.
Paintbox Yarns Simply DK (at a tighter tension) or their worsted Cotton Mix gives excellent stitch definition in both sage and blush tones.
Bernat Softee Baby is another lovely option, though it runs a bit lighter. Swatch carefully and consider dropping a hook size if you use it.
Any smooth, washable worsted weight yarn will work. Avoid fuzzy yarns—they hide stitch definition and make the embroidery harder.
Gauge
17 single crochet stitches by 20 rows = 4 inches by 4 inches, worked in continuous rounds with a 5.0 mm hook and worsted weight yarn, after blocking.
Gauge matters. This cocoon needs to feel cozy but still comfortable. Swatch before you start and adjust your hook if needed.
Abbreviations Used
- blo = back loop only
- ch = chain
- flo = front loop only
- inc = increase (2 sc in same stitch)
- MC = main color (mint)
- CA = color A (blush pink)
- CB = color B (white)
- MR = magic ring
- pm = place marker
- sc = single crochet
- sc2tog = single crochet two together
- sl st = slip stitch
- st(s) = stitch(es)
Special Stitches Explained
Magic Ring: Make a loop, work the required stitches into it, then pull the tail tight. If magic rings stress you out, chain 2 and work into the first chain instead.
Single Crochet Two Together (sc2tog): Insert hook into next stitch and pull up a loop, insert into the following stitch and pull up a loop, yarn over and draw through all three loops. Two stitches become one.
Continuous Rounds: Keep spiraling without joining. Place a marker in the first stitch of each round and move it up as you go.
Color Joining: Complete the last stitch of the old color until two loops remain, then draw the new color through those two loops.
Pattern Notes
The cocoon body works from the bottom up in continuous rounds using the main color. The hood is made separately and seamed to the top opening. Ears are worked in two layers (mint outer, pink inner), joined around the edges, then attached to the hood. The pompom tail attaches to the bottom exterior.
All rounds are worked with the right side facing out. Do not turn at the end of rounds unless directed. Add the facial embroidery after finishing the hood but before attaching it to the body.
Crochet Pattern Instructions
Part 1: Cocoon Body
Start with a magic ring and increase steadily to form a flat oval base. Work even rounds to create the lower tube, then add gradual expansion rounds so the top opening flares gently. The finished body should measure about 18–19 inches tall with a wide circular opening.
Part 2: Hood
Work another magic-ring circle that expands to the same stitch count as the body opening. Continue even rounds to create a deep, rounded cap. Finish with a few rounds that include a back-loop-only ridge—this creates a natural fold line for the facial frame.
Part 3: Ears
Make two outer panels in mint and two inner panels in dusty rose. The outer panels are slightly larger. Hold each pair together and whip-stitch or single-crochet around the edges so the pink lining shows on the front. These floppy ears are pure charm.
Part 4: Facial Embroidery
Before joining the hood, embroider the face. Place safety eyes or embroider filled ovals about 1.5 inches apart. Add a small upside-down triangle nose in blush pink and three long whisker stitches on each side in gray. A tiny white highlight in each eye makes them sparkle.
Part 5: Assembly
Match the 72 stitches of the hood opening to the 72 stitches of the body opening and seam them together with the face centered at the front. Fold the base of each ear slightly and sew them firmly to the top of the hood, angled outward and a little downward. Attach a fluffy white pompom to the very bottom of the cocoon as the tail.
Size Customization Tips
For a 3–6 month size, work extra even rounds in the lower tube and add one more expansion step. Increase the hood to match.
For a smaller newborn or preemie size, stop the bottom oval earlier, skip most of the expansion, and shorten the even rounds. Always adjust the ears proportionally if you change the hood size significantly.
Finishing and Blocking Your Bunny Cocoon
Weave in every end securely. Soak the finished cocoon in cool water with a gentle detergent, press out the excess moisture, and lay it flat. Shape the pod form, smooth the hood into a dome, and position the ears upright. Let it dry completely—usually about 24 hours. Blocking evens the fabric and softens the yarn for baby skin.
Care Instructions
Machine wash on gentle cycle in cold water inside a mesh bag. Tumble dry on low or lay flat. Do not iron or bleach. If you used safety eyes, check the washers periodically and replace them if needed.

You Might Also Like
- Lavender Cottage Babydoll Dress Free Crochet Pattern
- Buttercream Daisy Baby Dress Free Crochet Pattern
- Berry Blush Pompom Crochet Tank Free Crochet Pattern
- Rainbow Sherbet Granny Square Baby Blanket Free Crochet Pattern
- Lilac Ombre Spring Dress Free Crochet Pattern
FAQ’s
Is this pattern suitable for a confident beginner?
If you already know single crochet, increases, decreases, and how to work in continuous rounds, yes. The embroidery and assembly are straightforward once the pieces are made.
Can I use safety eyes on a newborn gift?
Many makers prefer embroidered eyes for very young infants. Safety eyes are fine if they are securely fastened and the gift is for supervised photo sessions only.
How do I keep the ears from flopping the wrong way?
Fold the base of each ear slightly before sewing and stitch through the base several times. A light steam (held above the fabric) can also help set the shape.
What if my stitch count drifts during the long even rounds?
Count every few rounds and use a second stitch marker to mark the halfway point. Continuous rounds make it easy to lose track without markers.
Can I make the cocoon in a different color?
Absolutely. Soft gray, butter yellow, or classic white all look adorable. Just keep the inner ear lining in a contrasting pastel so the ears pop.
Does the pompom have to be crocheted?
No. A store-bought fluffy pompom or one made with a pompom maker works perfectly. Just make sure it’s securely attached.
Final Thoughts
This mint bunny baby cocoon looks incredibly impressive yet stays completely achievable for anyone comfortable with single crochet. The construction is logical, the shaping makes sense once you start, and the finishing details bring the whole character to life. Whether you’re making it for a baby shower, a photography prop, or your own little one, the finished cocoon feels like a handmade hug. Happy stitching—I can’t wait to see the bunnies you create!



Leave a Reply
You must be logged in to post a comment.