


I still remember the exact moment the idea settled in. It was late November, the kind of grey afternoon when the light through the bathroom window feels thin and cold. I was standing there, coffee in hand, staring at the plain white bath mat and the slightly faded tank cover that had seen better days. Outside, the first real snow of the season was starting to stick to the porch railing in soft, lacy patterns. Something about those delicate crystal shapes against the dark wood made me want to bring a little of that quiet winter beauty indoors—something soft, something blue, something that felt both elegant and practical.
I sketched a few snowflake shapes that evening, testing how they might look raised against a solid background or worked as open lace. After a few failed attempts (and one rather stiff experiment that looked more like a frozen doily than a usable mat), the design finally clicked. The Blue Snowflake Bathroom Set was born: a coordinated collection of four pieces that share the same airy snowflake motif, the same cool blue palette, and the same sense of calm winter charm.
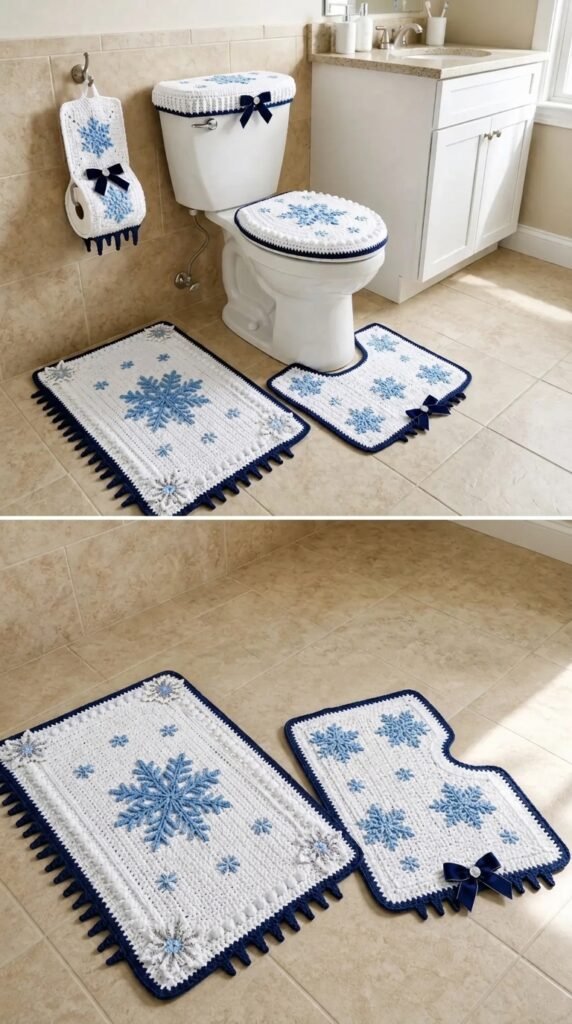
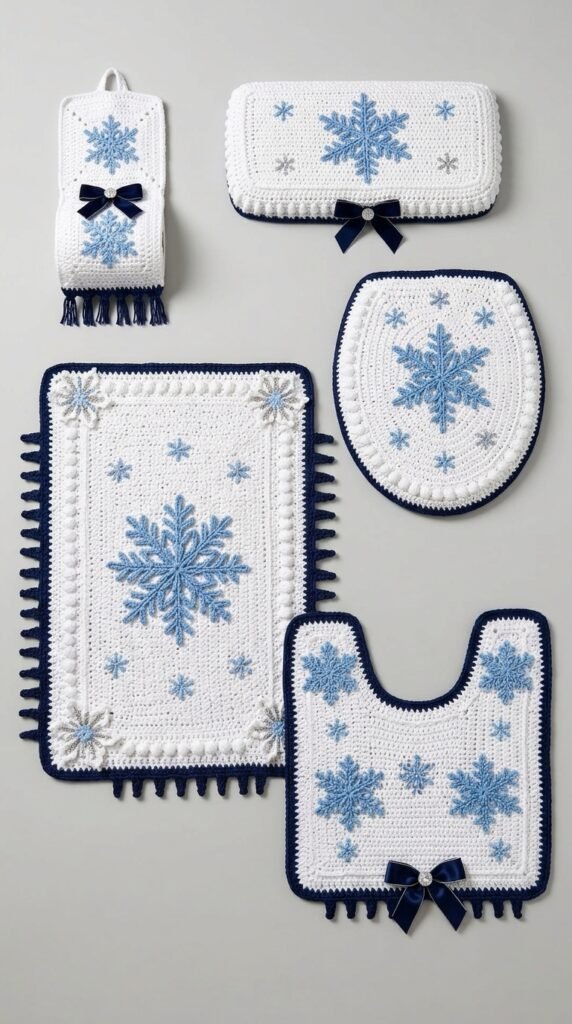
This free pattern gives you everything you need to make the full set—bath mat, toilet tank cover, toilet lid cover, and tissue box cover. The snowflakes are worked as raised, slightly dimensional motifs that catch the light beautifully, while the solid sections keep the pieces sturdy enough for everyday bathroom use.
About This Pattern
This is an intermediate-level project. You should be comfortable with basic stitches, working in the round, joining motifs, and following multi-part instructions. The snowflake motifs use clusters and chain spaces to create that classic six-pointed lace look, and the background fabric is worked in simple single and half-double crochet so the motifs really stand out.
The finished set is designed for a standard bathroom:
- Bath mat: approximately 24 × 36 inches
- Toilet tank cover: fits most standard tanks (about 16–18 inches wide)
- Toilet lid cover: fits standard elongated or round lids
- Tissue box cover: fits a standard rectangular tissue box
The fabric has a soft drape once blocked, but enough structure to hold its shape. Acrylic yarn is recommended for easy care in a high-moisture environment. The whole set uses roughly 1,200–1,400 yards of yarn depending on exact sizes and tension.
Materials You’ll Need
Yarn (worsted weight / #4 acrylic recommended for durability and easy washing)
- Color A (main blue): approximately 900 yards / 820 meters (I used a medium icy blue)
- Color B (lighter accent blue or soft white): approximately 350 yards / 320 meters
- Allow 15% extra for gauge variation and any size adjustments
Hooks
- 5.0 mm (H-8) – main fabric and most of the mat
- 4.5 mm (G-7) – snowflake motifs and tighter edges
- 4.0 mm (optional) – for a denser tissue-box base if desired
Notions
- Tapestry needle
- Stitch markers
- Scissors
- Blocking mats and pins (or rust-proof T-pins)
- Optional: small amount of matching sewing thread and needle if you prefer to sew the tank-cover ties instead of crocheting them
Abbreviations and Terminology
All instructions use US crochet terminology.
- ch – chain
- sc – single crochet (insert hook, yarn over, pull up loop, yarn over, pull through both loops)
- hdc – half double crochet (yarn over, insert hook, yarn over, pull up loop, yarn over, pull through all three loops)
- dc – double crochet (yarn over, insert hook, yarn over, pull up loop, yarn over, pull through two loops, yarn over, pull through remaining two loops)
- tr – treble crochet (yarn over twice, insert hook, yarn over, pull up loop, [yarn over, pull through two loops] three times)
- cl – cluster (work the indicated number of incomplete stitches into the same space or stitch, then yarn over and pull through all loops on the hook at once)
- ch-sp – chain space
- sk – skip
- st(s) – stitch(es)
- rnd – round
- rep – repeat
- FO – fasten off
Notes
Turning chains do not count as a stitch unless a step explicitly says they do.
When working into a chain space, insert the hook under both strands of the chain unless otherwise directed.
The snowflake motifs are worked in the round and then joined or sewn onto the background fabric.
Gauge
With 5.0 mm hook and Color A:
14 hdc and 11 rows = 4 inches in half-double crochet.
Make a swatch at least 6 × 6 inches. Measure the center 4 inches. If your swatch is smaller than 4 inches, go up a hook size. If larger, go down. The snowflake motifs should measure approximately 4¾–5 inches across after blocking when worked with the 4.5 mm hook. Slight variation is fine as long as all motifs in the set are consistent with each other.
Main Pattern Instructions
Snowflake Motif (make 9 total)
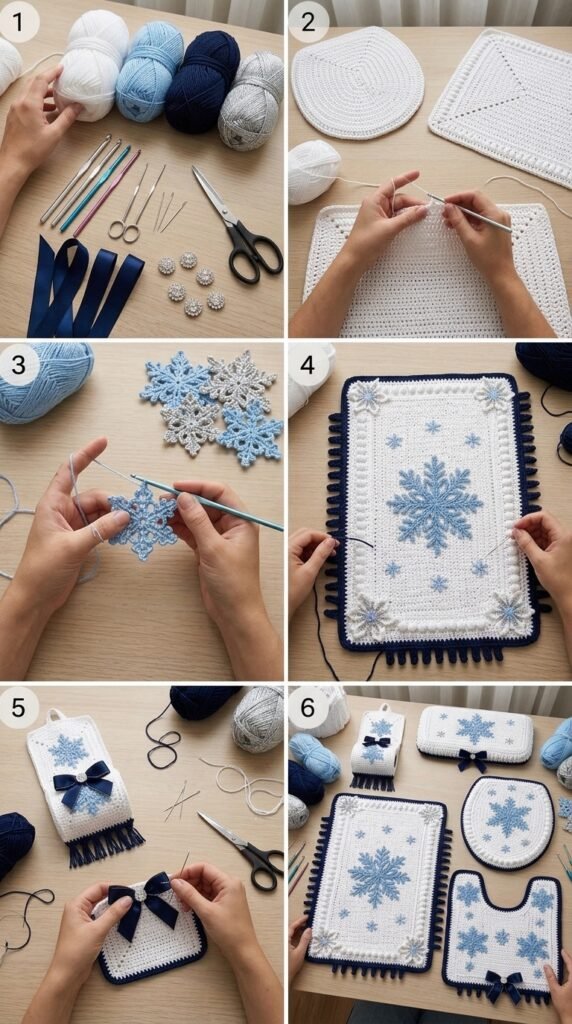
You will need:
- 5 motifs for the bath mat
- 2 motifs for the toilet lid cover
- 1 motif for the tank cover
- 1 motif for the tissue box cover
Use 4.5 mm hook and Color B unless noted.
Rnd 1: Magic ring, ch 3 (counts as dc), 11 dc into ring. Join with slip st to top of ch-3. (12 dc)
Rnd 2: Ch 1, sc in same st, *ch 3, sk 1 dc, sc in next dc; rep from * around, ending with ch 3, join to first sc. (6 ch-3 spaces)
Rnd 3: Slip st into first ch-3 sp, ch 3, (2 dc, ch 2, 3 dc) in same sp (first point made), *ch 1, (3 dc, ch 2, 3 dc) in next ch-3 sp; rep from * around, ch 1, join to top of beginning ch-3.
Rnd 4: Slip st to first ch-2 sp, ch 1, *(sc, ch 3, sc) in ch-2 sp, ch 2, sc in next ch-1 sp, ch 2; rep from * around, join to first sc.
Rnd 5: Slip st into first ch-3 sp, ch 3, (2 dc, ch 2, 3 dc) in same sp, *ch 1, dc in next sc, ch 1, (3 dc, ch 2, 3 dc) in next ch-3 sp; rep from * around, ending with ch 1, dc in last sc, ch 1, join.
Rnd 6: Slip st to first ch-2 sp, ch 1, *(sc, ch 4, sc) in ch-2 sp, ch 2, sc in next ch-2 sp, ch 2, sc in next dc, ch 2, sc in next ch-2 sp, ch 2; rep from * around, join.
Rnd 7 (final): Slip st into first ch-4 sp, ch 1, *(sc, hdc, dc, tr, dc, hdc, sc) in ch-4 sp (point made), ch 1, sc in next ch-2 sp, ch 1, sc in next sc, ch 1, sc in next ch-2 sp, ch 1; rep from * around, join to first sc. FO and weave in ends.
Block each motif lightly so the points lie flat and the diameter is even.
Bath Mat
Background
With 5.0 mm hook and Color A, ch 86.
Row 1: Hdc in 3rd ch from hook and in each ch across. (84 hdc) Turn.
Row 2: Ch 2 (does not count as st), hdc in each st across. Turn.
Repeat Row 2 until piece measures 34 inches (approximately 94 rows). Do not fasten off.
Border
Work 1 rnd of sc evenly around the entire mat, placing 3 sc in each corner. Join, FO.
Attaching Motifs
Arrange five blocked snowflake motifs on the mat: one centered, and four others placed symmetrically toward each corner, leaving roughly 2–2½ inches of solid fabric between motifs and the outer edge. Pin in place. Using Color B and a tapestry needle (or surface-crochet with a smaller hook if preferred), sew each motif securely through the back loops of the final round, catching only the background fabric so the stitches are invisible from the right side. Weave in all ends.
Toilet Tank Cover
Main Panel
With 5.0 mm hook and Color A, ch 62.
Row 1: Hdc in 3rd ch from hook and each ch across. (60 hdc) Turn.
Rows 2–28: Ch 2, hdc across. Turn.
Piece should measure approximately 16½–17 inches wide and 10–11 inches tall (adjust row count if your tank is deeper or shallower). FO.
Side Flaps / Ties
Join Color A at one short end. Work 12 rows of hdc across those 60 stitches to create a flap that will fold over the tank side. FO. Repeat on the opposite short end.
For ties: on each side flap, attach yarn at the outer corner and chain 35–40. Work 1 sc in each chain back to the flap, FO. Make four ties total (two per side).
Motif
Sew one snowflake motif centered on the main panel.
Toilet Lid Cover
Main Piece
This cover is worked from the center outward so it can be adjusted for round or elongated lids.
With 5.0 mm hook and Color A, make a magic ring.
Rnd 1: Ch 2, 12 hdc into ring. Join. (12 hdc)
Rnd 2: Ch 2, 2 hdc in each st around. Join. (24)
Rnd 3: Ch 2, *hdc in next st, 2 hdc in next st; rep from * around. Join. (36)
Rnd 4: Ch 2, *hdc in next 2 sts, 2 hdc in next st; rep from * around. Join. (48)
Continue increasing in this manner (adding one more plain hdc between increases each round) until the piece measures approximately 1 inch smaller than your lid diameter in both directions. For most elongated lids this is around Rnd 12–14.
Edging
Work one round of sc, then one round of *sc, ch 2, sk 1; rep from * around for a light stretch. FO.
Motifs
Sew two snowflake motifs near the front third of the cover, spaced evenly.
Optional elastic: weave a length of thin elastic through the final ch-2 spaces and secure for a snug fit.
Tissue Box Cover
Base
With 5.0 mm hook and Color A, ch 38.
Row 1: Hdc in 3rd ch from hook and across. (36 hdc)
Rows 2–22: Ch 2, hdc across. Turn.
This forms the bottom and long sides. FO.
Short Sides
Join yarn along one short edge and work 12 rows of hdc to create the end panel. FO. Repeat on the opposite short edge.
Fold into a box shape and seam the vertical corners with whip stitch or mattress stitch.
Top Opening
Work a round of sc around the top edge, decreasing slightly at the corners if needed for a neat fit.
Motif
Sew the remaining snowflake motif centered on one long side (or on the top if you prefer a different look).
Special Techniques
Raised Snowflake Texture
The cluster-and-chain construction of the motifs creates a slight three-dimensional effect once blocked. When sewing them down, take care not to pull the yarn too tightly or the points will flatten.
Surface Attachment
If you prefer a fully crocheted look rather than sewing, you can surface-crochet the motifs onto the background using slip stitch or single crochet through both layers, working from the right side with Color B.
Assembly and Finishing
- Block every snowflake motif individually before attaching.
- Pin motifs in place on each piece and check symmetry before sewing.
- Weave in all ends securely on the wrong side.
- For the tank cover, try it on your tank and adjust tie length if needed.
- The lid cover should stretch gently over the lid; add elastic only if your lid is unusually small or the cover feels loose.
Blocking and Care
Wet-block the finished pieces by soaking them in lukewarm water with a drop of mild detergent, gently squeezing out excess water (never wring), and pinning to shape on blocking mats. Allow to dry completely flat.
Because these are bathroom items, acrylic yarn is ideal: it holds up to frequent washing and resists mildew better than many natural fibers. Hand wash or machine wash on gentle in a mesh bag. Lay flat to dry. Never hang the mat or covers while wet, as the weight of the water can stretch the fabric.
Fit and Troubleshooting Tips
- If the bath mat curls at the edges, add an extra round of sc or a simple crab-stitch border.
- Motifs looking flat? Make sure you blocked them before sewing and that you did not pull the joining yarn too tightly.
- Tank cover too short or too long? Adjust the number of rows in the main panel before adding the side flaps.
- Lid cover too tight or too loose? Change the number of increase rounds or add/remove the optional elastic.
- If your snowflakes vary slightly in size, choose the most even ones for the more visible pieces (mat and lid) and use any smaller ones on the tissue box or tank.
FAQ’s
Can I use a different yarn weight?
I designed this set for worsted-weight acrylic because it holds its shape well in a steamy bathroom and washes easily. You can substitute a similar #4 yarn, but I strongly recommend sticking close to the recommended gauge. A lighter yarn will make the pieces smaller and floppier; a heavier yarn will make them bulkier and may change how the snowflakes sit.
How long does the full set take to complete?
Most intermediate crocheters finish the entire set in 25–35 hours, spread over a couple of weeks. The five snowflake motifs take the most focused time (about 45–60 minutes each once you get the rhythm). The bath-mat background is straightforward and works up quickly while watching a show.
Can I sell the finished bathroom sets?
Yes. You are welcome to sell finished items made from this free pattern. I only ask that you credit the design (a simple “Pattern by [your preferred credit]” or a link back to the original post is perfect). Please do not sell or distribute the pattern itself.
My toilet tank is an unusual size. How do I adjust?
Measure the width and height of the front of your tank. The main panel should be about ½–1 inch narrower than the tank width so it sits neatly. Add or subtract rows to match the height. The side flaps can be lengthened or shortened the same way. The ties are intentionally long so you can knot them to fit.
Do I have to sew the motifs on, or can I crochet them in place?
Either works. Sewing gives the cleanest look and keeps the motifs perfectly flat. If you prefer everything crocheted, you can surface-slip-stitch or single-crochet the outer round of each motif onto the background fabric from the right side. Just go slowly so the points stay sharp.
Will the acrylic yarn pill or stretch over time?
Good-quality acrylic holds up surprisingly well in bathroom conditions. The biggest risk is hanging pieces while wet, which can stretch them permanently. Always dry flat. If you notice mild pilling after many washes, a quick pass with a fabric shaver brings them back to looking new.
Can I make just one or two pieces instead of the full set?
Absolutely. Many people start with the bath mat and lid cover, then add the tank and tissue-box covers later. The motif count is written so you can make only what you need.
Is this pattern suitable for beginners?
I would call it solid intermediate. If you are comfortable with magic rings, working in the round, reading multi-round motif instructions, and basic seaming, you will be fine. Absolute beginners may find the snowflake rounds a bit fiddly at first, but the rest of the set is very approachable.
Final Thoughts
There is something quietly satisfying about walking into the bathroom and seeing those soft blue snowflakes catching the morning light. This set has become one of my favorite winter projects—not because it is the most complicated thing I’ve ever designed, but because it brings a little seasonal calm into a space we use every day.
I hope you enjoy making it as much as I enjoyed designing it. When you finish your own Blue Snowflake Bathroom Set, I would love to see it. Share a photo in the comments, tag me on social media, or pin it so other crocheters can find the pattern too.
Happy stitching, and may your bathroom feel a little more like a winter wonderland.


Leave a Reply
You must be logged in to post a comment.