


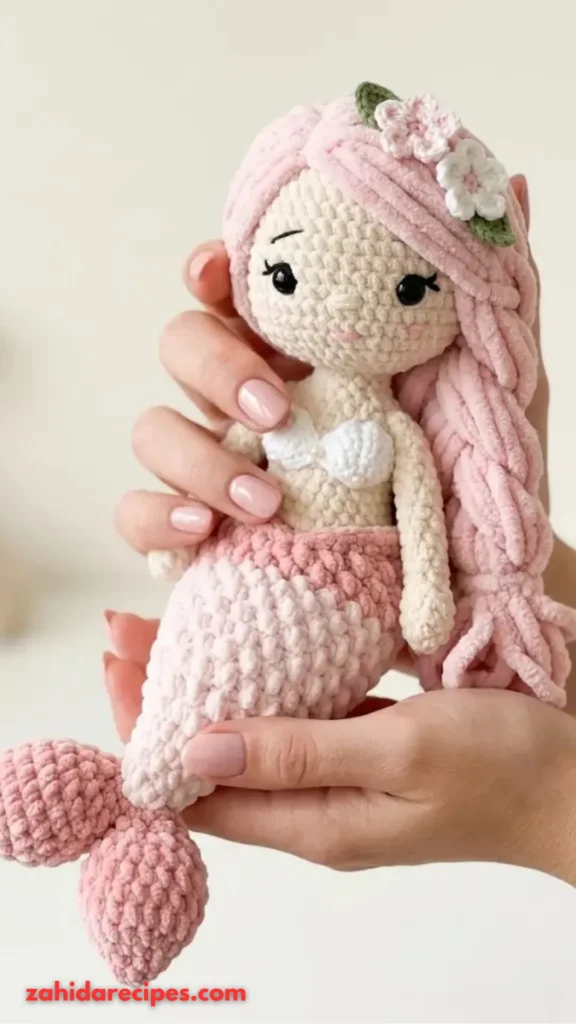
Spring showers bring cherry blossoms — and apparently, adorable mermaids too. If you’ve been searching for a project that screams spring but still has that whimsical ocean vibe, you just hit the jackpot. This Cherry Blossom Spring Mermaid combines everything we love about amigurumi: it’s cute, it’s colorful, and it works up faster than you’d expect.
Grab your hooks, fellow yarn addicts. We’re diving into a pattern that’s basically springtime in mermaid form.
Why This Mermaid Deserves a Spot on Your Hook

Here’s the thing about amigurumi mermaids: most of them lean hard into the whole “under the sea” aesthetic. Blue tails, teal hair, maybe some seashells. Classic, right?
But this Cherry Blossom Spring Mermaid takes a different route. She’s got those delicate springtime colors — think soft pinks, gentle greens, and flower-inspired accents. It’s like someone took a cherry blossom tree and turned it into a mermaid. And honestly? I’m here for it.
This pattern hits that sweet spot between beginner-friendly and interesting enough to keep you engaged. You’re not doing anything too wild here. No complicated lacework. No fiddly thread crochet. Just solid amigurumi basics that come together into something genuinely charming.
Plus, cherry blossom season is short. But a crocheted mermaid? She lasts forever.
What You’ll Need Before You Start
Let’s talk supplies. You probably already own most of this stuff if you’ve made any amigurumi before.
Here’s the breakdown:
- Yarn: Sport weight or DK cotton works best here. Cotton gives you crisp stitches and holds shape beautifully. You’ll want skin tone, soft pink or peach for the tail and hair, plus small amounts of green and darker pink for cherry blossom details.
- Hook: 2.25mm to 2.5mm is the sweet spot. Go smaller than you think — tight stitches mean no stuffing peeking through.
- Safety eyes: 5mm or 6mm depending on your yarn weight. Or embroider them if you’re making this for a little one.
- Stuffing: Polyester fiberfill. The good stuff, not the lumpy kind.
- Tapestry needle: For sewing parts together and weaving in ends.
- Stitch markers: Because counting to 30 and then losing track is a universal crochet experience.
One quick note: gauge isn’t critical for amigurumi, but your tension should be tight enough that you can’t see through the stitches. If you can see light through your swatch, size down.
The Pattern: Step by Step
Alright, let’s get into the actual crochet. This pattern works in continuous rounds — no joining, no turning, just spiral up and move your stitch marker. If you’ve done amigurumi before, this will feel like second nature.
Abbreviations You’ll Need
- sc = single crochet
- inc = increase (2 sc in same stitch)
- dec = decrease (invisible decrease preferred)
- MR = magic ring
- BLO = back loop only
- FLO = front loop only
- sl st = slip stitch
- ch = chain
Starting with the Head and Body
You’ll work from the top of the head down to the waist. This keeps things simple and means fewer pieces to sew later.
Round 1: 6 sc in MR (6)
Round 2: Inc in each stitch around (12)
Round 3: [Sc 1, inc] repeat 6 times (18)
Round 4: [Sc 2, inc] repeat 6 times (24)
Round 5: [Sc 3, inc] repeat 6 times (30)
Round 6: [Sc 4, inc] repeat 6 times (36)
Rounds 7-13: Sc in each stitch around (36)
Now’s the time to add safety eyes if you’re using them. Place them between rounds 10 and 11, about 7-8 stitches apart. Do it now while you still have easy access. Trust me, trying to insert eyes through a stuffed head is a special kind of torture.
Round 14: [Sc 4, dec] repeat 6 times (30)
Round 15: [Sc 3, dec] repeat 6 times (24)
Stuff the head firmly. Don’t be shy — you want a nice round shape, not a deflated balloon.
Round 16: [Sc 2, dec] repeat 6 times (18)
Rounds 17-22: Sc in each stitch around (18)
This section becomes the neck and upper body.
Round 23: [Sc 2, inc] repeat 6 times (24)
Rounds 24-28: Sc in each stitch around (24)
Round 29: [Sc 3, inc] repeat 6 times (30)
Rounds 30-35: Sc in each stitch around (30)
Stuff the body as you go. Fasten off, leaving a long tail for sewing later.
Making the Mermaid Tail
Here’s where the cherry blossom magic happens. You’ll start with the tail fin and work upward.
Use your main tail color — soft pink or peach works beautifully for the spring theme.
Round 1: 6 sc in MR (6)
Round 2: Inc in each stitch around (12)
Round 3: [Sc 1, inc] repeat 6 times (18)
Round 4: Sc in each stitch around (18)
Round 5: [Sc 2, inc] repeat 6 times (24)
Round 6: Sc in each stitch around (24)
Round 7: [Sc 2, dec] repeat 6 times (18)
Round 8: [Sc 1, dec] repeat 6 times (12)
Round 9: Sc in each stitch around (12)
Now you’re shaping the long tail portion. Keep going:
Rounds 10-25: Sc in each stitch around (12)
If you want a color transition — say, from lighter pink at the fin to slightly deeper pink up the tail — switch yarn around round 15. The gradient looks gorgeous.
Round 26: [Sc 2, inc] repeat 4 times (16)
Round 27: [Sc 3, inc] repeat 4 times (20)
Round 28: [Sc 4, inc] repeat 4 times (24)
Round 29: [Sc 5, inc] repeat 4 times (28)
Round 30: [Sc 6, inc] repeat 4 times (32)
Round 31: Sc in each stitch around (32)
Fasten off and stuff the tail firmly. Leave a long tail for attaching to the body.
Arms (Make 2)
Simple and quick. These don’t need stuffing — just crochet them up and sew them on.
Round 1: 6 sc in MR (6)
Rounds 2-10: Sc in each stitch around (6)
Flatten the opening and close with 3 sc through both layers. Fasten off, leaving a tail for sewing.
Hair and Cherry Blossom Details
This is where your mermaid gets her personality. You can go simple or go wild — both work.
For a basic hair cap:
Round 1: 6 sc in MR (6)
Round 2: Inc in each stitch around (12)
Round 3: [Sc 1, inc] repeat 6 times (18)
Round 4: [Sc 2, inc] repeat 6 times (24)
Round 5: [Sc 3, inc] repeat 6 times (30)
Rounds 6-10: Sc in each stitch around (30)
Sew this cap onto the head. Then add hair strands — chain lengths of 10-15, attach around the cap, and you’ve got flowing mermaid locks. Add some curls by working sc back down the chain for a wavy look.
For the cherry blossom accent, crochet small five-petal flowers in pink and attach them to the hair or tail. A tiny flower crown takes this from “cute mermaid” to “spring goddess” real quick.
Assembly Time
Here’s the order that makes life easiest:
- Sew the tail to the bottom of the body. Pin it first to make sure it’s centered.
- Attach arms at the sides, around rounds 25-26 of the body.
- Sew the hair cap onto the head.
- Add hair strands and cherry blossom details.
- Embroider any facial features — eyelashes, a little smile, maybe some blush.
- Weave in all ends and give her a good squish to even out the stuffing.
Tips to Make Your Mermaid Look Amazing
A few things I’ve learned from making way too many amigurumi:
Use the invisible decrease. It’s not harder, and your mermaid won’t have weird bumps. Work through the front loops only of the next two stitches, yarn over, pull through, yarn over, pull through. Clean and smooth.
Don’t overstuff the tail. You want it firm but still slightly squishy. Overstuffed tails look lumpy and stiff.
Play with color placement. The cherry blossom theme doesn’t mean everything has to be pink. Try a mint green tail with pink hair. Or a peach tail with cream accents. Spring colors are pastel and soft — have fun mixing them.
Add a tiny starfish or shell. Because every mermaid needs accessories. A small crocheted starfish pinned in her hair? Adorable.
You Might Also Like:
- Blueberry Couple Amigurumi Free Crochet Pattern
- Icy Blue Winter Frost Bag Free Crochet Pattern
- Forest Jewel Tone Shell Crossbody Free Crochet Pattern
Conclusion
This Cherry Blossom Spring Mermaid is one of those patterns that just makes you happy while you’re making it. The colors are cheerful, the construction is straightforward, and the finished result looks way more complicated than it actually is.
Whether you’re a seasoned amigurumi maker or someone who’s just dipped their toes into the world of crochet dolls, this pattern gives you room to play. Change the colors. Add extra flowers. Give her a little smile or a sassy expression. Make her yours.
So grab that pink yarn you’ve been hoarding and get hooking. Spring won’t last forever, but this mermaid will.


Leave a Reply
You must be logged in to post a comment.