

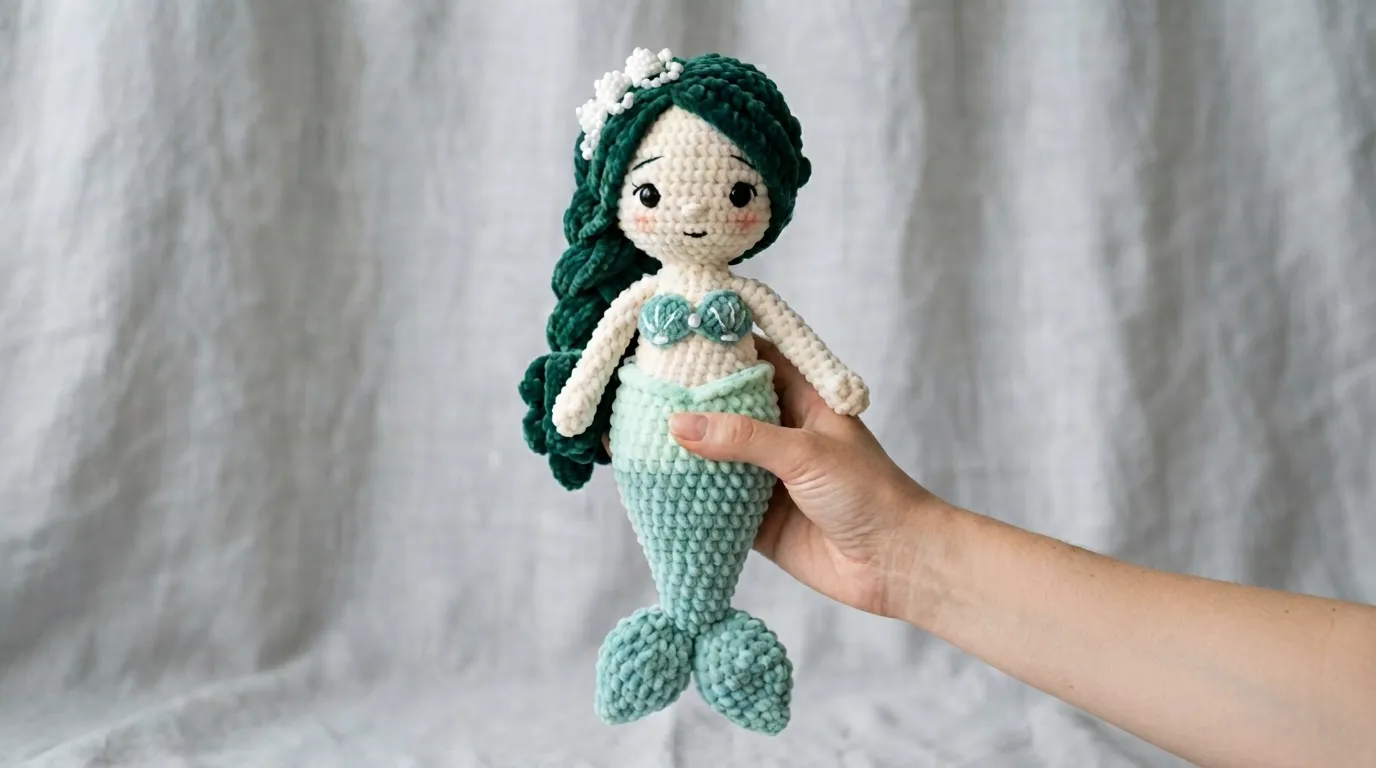
Ever scrolled past a hundred mermaid patterns and felt your eyes glaze over? Same. Most are either too fiddly or too vague. This one? It’s the sweet spot. A mint seafoam mermaid that works up fast, looks adorable, and won’t make you question your life choices halfway through the tail.
I’ve made my fair share of amigurumi, and let me tell you—the mint seafoam color combo is chef’s kiss. It’s calming, ocean-y, and somehow looks good in every yarn weight. If you’ve been hunting for a free crochet mermaid pattern that actually delivers, you’re in the right place.
Why Mint Seafoam Works for Mermaids

Here’s the thing about mermaid colors. You’ve got your classic teal, your deep aqua, your turquoise. All fine. But mint seafoam is the underrated queen.
It sits somewhere between soft green and pale blue. It reminds you of sea glass worn smooth by the waves. And here’s the practical perk: it hides small imperfections better than darker yarns. Even if your stitches aren’t perfectly even, the pastel shade keeps things looking polished.
Plus, mint seafoam photographs beautifully. If you’re posting your finished mermaid on social media (and let’s be honest, you will), this color does half the work for you.
What You’ll Need for This Mermaid Amigurumi
Before we dive in, let’s talk supplies. Amigurumi is forgiving, so you don’t need fancy tools. Here’s the short list:
Yarn:
- Mint seafoam worsted weight cotton for the tail (about 40 yards)
- Peach or light tan worsted cotton for the body (about 30 yards)
- Coral or pale pink scrap yarn for the shell top
- Hair color of choice—I went with a soft sandy blonde, but go wild here (about 25 yards)
Tools:
- 3.25mm crochet hook (US D/3). This is smaller than the yarn label suggests, but that’s intentional. Tight stitches mean no stuffing peeking through.
- 6mm safety eyes (or embroidery floss if making for a baby)
- Polyester fiberfill
- Tapestry needle for sewing
- Stitch marker (a bobby pin works in a pinch)
Gauge check: Don’t stress about this. Amigurumi doesn’t need precise gauge. Just make sure your fabric is dense enough that you can’t see through it when stretched.
Abbreviations (US Terms)
Quick reference before we start:
- MR = Magic Ring
- sc = single crochet
- inc = increase (2 sc in one stitch)
- dec = decrease (I prefer invisible decrease)
- sl st = slip stitch
- ch = chain
- FO = fasten off
- ( ) x N = repeat what’s in parentheses N times
If you’re new to amigurumi, the magic ring is your best friend. It creates a tight, adjustable center that won’t leave a hole. YouTube has a million tutorials if you need one.
Let’s Crochet: The Tail First

We start from the bottom and work up. This means the tail fin comes first, then the body, then the head.
The Seafoam Tail Fin
Using your mint seafoam yarn:
Rnd 1: 6 sc in MR (6)
Rnd 2: inc in each st around (12)
Rnd 3: (sc, inc) x 6 (18)
Rnd 4-6: sc in each st around (18 for 3 rounds)
Now flatten the piece slightly. This creates that classic wide mermaid fin shape. Don’t stuff this part yet—we’ll do that as we go.
Building the Tail Body
Continue with mint seafoam:
Rnd 7: (sc 2, dec) x 4, sc 2 (14)
Rnd 8: (sc, dec) x 4, sc 2 (10)
Rnd 9-12: sc in each st around (10 for 4 rounds)
Switch to peach yarn at the end of Round 12. This is where the tail becomes the body.
Rnd 13: sc in each st around (10)
Rnd 14: (sc, inc) x 5 (15)
Rnd 15: sc in each st around (15)
Start stuffing now. Use small pieces of fiberfill and push them down with the back of your hook or a pencil. Don’t overstuff—you want it squishy, not rock hard.
Rnd 16: (sc 2, inc) x 5 (20)
Rnd 17-20: sc in each st around (20 for 4 rounds)
This is the torso. It’s a simple tube shape. Keep stuffing as you go. I know it’s tempting to wait until the end, but trust me, it’s way harder to stuff through a tiny neck opening later.
Making the Head and Face
The head continues directly from the body. No sewing needed here.
Rnd 21: (sc 3, inc) x 5 (25)
Rnd 22: (sc 4, inc) x 5 (30)
Rnd 23-28: sc in each st around (30 for 6 rounds)
Adding Safety Eyes
Insert your 6mm safety eyes between Rounds 26 and 27. Place them about 6 stitches apart. If you’re making this for a child under 3, skip the safety eyes and embroider the eyes with black yarn instead. Safety first.
Rnd 29: (sc 3, dec) x 6 (24)
Rnd 30: (sc 2, dec) x 6 (18)
Stuff the head firmly now. Make it nice and round.
Rnd 31: (sc, dec) x 6 (12)
Rnd 32: dec x 6 (6)
FO and close. Weave the tail end through the last 6 stitches and pull tight. Hide the yarn inside the head.
Embroidering the Face
This is where your mermaid gets personality. Using black embroidery floss or a scrap of black yarn:
- Make a few tiny stitches for eyelashes just above each eye
- Add a small smile—a simple curved line works great
- Optional: a little blush on the cheeks with pink yarn or actual makeup
Keep it simple. Less is more with amigurumi faces.
Arms, Hair, and Shell Top

Tiny Arms (Make 2)
Using peach yarn:
Rnd 1: 5 sc in MR (5)
Rnd 2-7: sc in each st around (5 for 6 rounds)
FO and leave a long tail for sewing. Don’t stuff the arms—they’re too small.
Sew the arms to the sides of the body, right where the torso meets the tail. About Rounds 15-16.
Hair Cap and Strands
Using your hair color yarn:
Rnd 1: 6 sc in MR (6)
Rnd 2: inc in each st around (12)
Rnd 3: (sc, inc) x 6 (18)
Rnd 4: (sc 2, inc) x 6 (24)
Rnd 5-7: sc in each st around (24 for 3 rounds)
FO and sew the hair cap onto the head, positioning it slightly back so the face is visible.
For hair strands, cut lengths of yarn about 8 inches long. Fold each strand in half and use your hook to pull the loop through a stitch on the hair cap, then pull the ends through the loop to secure. Work around the cap until it looks full.
Trim the ends to your preferred length. Long flowing mermaid hair or a short bob—your call.
Shell Top (Bikini)
Using coral or pink yarn:
Make 2 shells:
Row 1: ch 4, starting in second ch from hook: sc, hdc, sc (3)
Row 2: ch 1, turn, inc, sc, inc (5)
Row 3: ch 1, turn, sc across (5)
- Sew the two shells to the mermaid’s chest, just below the neck. Position them so they sit side by side.
Assembly and Finishing Touches
By now you should have: a completed body with head and tail, two arms, hair, and a shell top.
Attach the arms using your tapestry needle and the long tails you left. Sew them at a slight angle so they rest naturally against the body.
Weave in all remaining yarn ends. This is the boring part, but skipping it means your mermaid will unravel in the wash. Don’t skip it.
Final fluff: Gently squeeze and reshape the stuffing to make sure everything looks even. Smooth down any fuzzy yarn bits.
That’s it. Your mint seafoam mermaid is done.
Styling and Gifting Ideas
This little mermaid works as:
- A nursery decoration on a shelf
- A baby shower gift (embroider the eyes for safety)
- A desk buddy for your inner child
- A craft fair item—people go nuts for mermaids
You can also make a mini version by using sport weight yarn and a 2.25mm hook. She’ll be palm-sized and ridiculously cute.
Want to add extra flair? Sew tiny starfish or shell buttons into her hair. Or use sparkly yarn for the tail fin. This pattern is a canvas—make it yours.
You Might Also Like:
- Ocean Ombre Dragonfly Top Crochet Pattern
- Cosmic Galaxy Avocado Amigurumi Free Crochet Pattern
- Snowberry Woodland Headscarf Crochet Pattern
Final Thoughts
Mermaid amigurumi patterns often look harder than they actually are. This one breaks down into simple parts: a tube body, a shaped tail, and basic accessories. The mint seafoam color scheme keeps it fresh without being complicated.
If you’ve never made a mermaid before, start here. If you’re a seasoned amigurumi maker, you’ll breeze through this in an afternoon.
Either way, you’ll end up with something adorable that didn’t require a hundred dollars of yarn or a PhD in crochet engineering.
Now go make a mint seafoam mermaid. She’s waiting.


Leave a Reply
You must be logged in to post a comment.