


I still remember the afternoon I sketched the first little giraffe on a scrap of paper while my niece played with her wooden animal set. She kept lining them up in a parade across the living-room floor, and I thought, why not wear that same parade right on your ankle? Soft cotton, tiny raised ears, a few carefully placed spots, and suddenly a simple anklet becomes a tiny safari you can take everywhere.
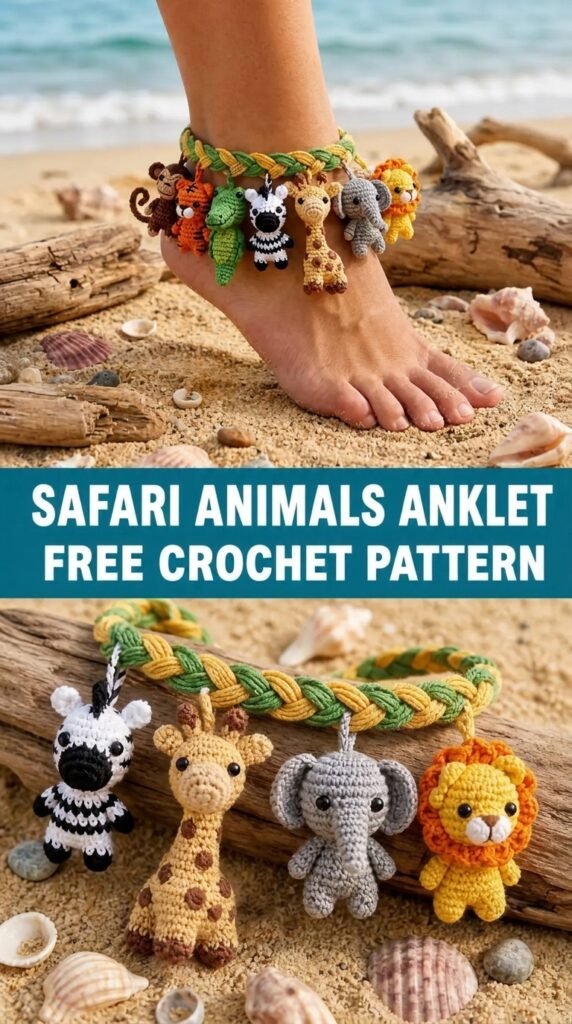
That sketch turned into this Safari Animals Anklet. Four small motifs — giraffe, elephant, zebra, and lion — sit along a comfortable, adjustable band. The pieces are worked flat, sewn on with care, and the whole thing feels light enough for everyday wear yet detailed enough that people always lean in for a closer look. I designed it for intermediate crocheters who enjoy small color changes and neat finishing. If you can work single crochet, half-double crochet, and basic increases, you can make this.
About This Pattern
This anklet is built in two stages. First you crochet a simple rectangular band that wraps the ankle and closes with a small button. Then you make four separate animal motifs and sew them onto the band in a gentle curve so they sit nicely when worn. The finished piece measures approximately 9–10 inches long (adjustable by adding or removing rows on the band) and about 1.25 inches tall at the motifs. It fits most adult ankles comfortably and can be sized down for older children by shortening the band.
The motifs use only a few stitches and small amounts of yarn, so they work up quickly once you get the hang of the shaping. Expect some careful sewing and a bit of patience with the tiny color changes — that is what gives the animals their personality. The finished anklet has a soft, fabric-like drape and lies flat against the skin without twisting.
Skill level: Intermediate. You should be comfortable reading written instructions, changing colors cleanly, and sewing small pieces with a tapestry needle.
Materials You’ll Need
Yarn (sport weight / Category 2, 100 % cotton recommended for comfort and stitch definition)
- Color A (main band & elephant body): soft gray — approx. 25 m / 27 yd
- Color B (giraffe body & lion mane): warm tan or light gold — approx. 20 m / 22 yd
- Color C (zebra body & giraffe spots): soft black or very dark gray — approx. 15 m / 16 yd
- Color D (zebra stripes, lion face accents, elephant ear): cream or off-white — approx. 12 m / 13 yd
- Color E (lion body, giraffe ossicones, zebra details): medium brown — approx. 10 m / 11 yd
- Small scrap of black embroidery floss or thin black yarn for eyes and nostrils
Allow 15 % extra yarn for gauge variation and practice swatches.
Hooks
- 2.75 mm (C) — for the anklet band (gives a firm but flexible fabric)
- 2.25 mm (B) — for the animal motifs (tighter stitches help the tiny shapes hold their form)
Notions
- Tapestry needle
- 2–3 stitch markers
- One small wooden or plastic button (10–12 mm)
- Sharp scissors
- Blocking pins and a small foam board or towel
- Optional: fabric glue (very tiny dots) if you prefer extra security on the motifs before sewing
Abbreviations and Terminology
All instructions use US crochet terminology.
- ch – chain
- sc – single crochet: insert hook, yarn over, pull up a loop, yarn over, pull through both loops
- hdc – half double crochet: yarn over, insert hook, yarn over, pull up a loop, yarn over, pull through all three loops
- dc – double crochet: yarn over, insert hook, yarn over, pull up a loop, (yarn over, pull through two loops) twice
- inc – increase: work 2 stitches in the same stitch
- sc2tog – single crochet two together: insert hook in next stitch, pull up a loop, insert hook in following stitch, pull up a loop, yarn over, pull through all three loops
- sl st – slip stitch
- st(s) – stitch(es)
- sp – space
- BLO – back loop only
- FLO – front loop only
- FO – fasten off
Turning chains do not count as a stitch unless a step explicitly says they do. When changing colors, finish the last yarn-over of the previous stitch with the new color for clean transitions.
Gauge
With 2.75 mm hook and Color A:
10 sc and 12 rows = 2 inches (5 cm) in single crochet.
Make a small swatch of 14 sc for 16 rows. Measure the center 10 stitches and 12 rows. If your swatch is larger than 2 inches, go down a hook size. If smaller, go up a hook size. Accurate gauge keeps the band from stretching too much when worn and helps the motifs sit evenly.
Main Pattern Instructions
Anklet Band
With 2.75 mm hook and Color A, ch 8.
Row 1: Sc in 2nd ch from hook and in each ch across. (7 sc) Turn.
Row 2: Ch 1, sc in each st across. (7 sc) Turn.
Repeat Row 2 until the band measures approximately 8.5 inches (or until it fits comfortably around your ankle with a small overlap for the button). Do not fasten off yet.
Buttonhole row: Ch 1, sc in first 2 sts, ch 3, skip 3 sts, sc in last 2 sts. Turn.
Next row: Ch 1, sc in first 2 sts, 3 sc in ch-3 space, sc in last 2 sts. (7 sc)
Work 2 more rows of plain sc. Fasten off, leaving a 12-inch tail for sewing the button later if desired. Weave in the starting tail.
The band should feel slightly firm. If it is too stretchy, redo with a smaller hook.
Giraffe Motif
With 2.25 mm hook and Color B, ch 6.
Row 1: Sc in 2nd ch from hook and in each ch across. (5 sc) Turn.
Row 2: Ch 1, sc in each st across. (5 sc) Turn.
Row 3: Ch 1, sc in first st, sc2tog, sc in last 2 sts. (4 sc) Turn.
Row 4: Ch 1, sc in each st across. (4 sc) Turn.
Row 5: Ch 1, sc in first st, sc2tog, sc in last st. (3 sc) Turn.
Row 6: Ch 1, sc in each st across. (3 sc) Turn.
Row 7 (neck): Ch 1, sc in each of the 3 sts. Do not turn. Ch 4 for the first ossicone, sl st in 2nd ch from hook and in next 2 ch, sl st back into the top of the neck. Ch 4 for the second ossicone, sl st in 2nd ch from hook and in next 2 ch, sl st into the same neck stitch. Fasten off Color B.
With Color C, embroider 4–5 small spots randomly on the body using short straight stitches or French knots. With black floss, make two tiny eyes and a short line for the mouth. Weave in all ends carefully on the wrong side.
Elephant Motif
With 2.25 mm hook and Color A, ch 7.
Row 1: Sc in 2nd ch from hook and in each ch across. (6 sc) Turn.
Row 2: Ch 1, sc in each st across. (6 sc) Turn.
Row 3: Ch 1, sc in first 2 sts, sc2tog, sc in last 2 sts. (5 sc) Turn.
Row 4: Ch 1, sc in each st across. (5 sc) Turn.
Row 5: Ch 1, sc in first st, sc2tog, sc in last 2 sts. (4 sc) Turn.
Row 6: Ch 1, sc in each st across. (4 sc) Do not turn.
Trunk: Ch 6, sc in 2nd ch from hook and in next 4 ch, sl st into the side of Row 6. Fasten off Color A.
Ear: With Color D, join with sl st to the upper side of the body (about Row 3–4). Ch 1, work 4 hdc in the same place, sl st to next st on the body. Fasten off.
With black floss, add a small eye and a tiny curve at the end of the trunk for the nostril. Weave in ends.
Zebra Motif
With 2.25 mm hook and Color D, ch 7.
Row 1: Sc in 2nd ch from hook and in each ch across. (6 sc) Turn.
Row 2: Ch 1, sc in each st across. (6 sc) Turn.
Row 3: Ch 1, sc in first 2 sts, sc2tog, sc in last 2 sts. (5 sc) Turn.
Row 4: Ch 1, sc in each st across. (5 sc) Turn.
Row 5: Ch 1, sc in first st, sc2tog, sc in last 2 sts. (4 sc) Turn.
Row 6: Ch 1, sc in each st across. (4 sc) Fasten off Color D.
With Color C, embroider 5–6 vertical stripes across the body using short straight stitches, keeping them slightly irregular for a natural look. Add a small black eye with floss. For the mane, use Color C to work a short fringe: cut 6 strands of 1.5-inch yarn, fold in half, and pull through the top edge of the head with a crochet hook, then tighten. Trim to about ¼ inch. Weave in ends.
Lion Motif
With 2.25 mm hook and Color E, ch 6.
Row 1: Sc in 2nd ch from hook and in each ch across. (5 sc) Turn.
Row 2: Ch 1, sc in each st across. (5 sc) Turn.
Row 3: Ch 1, sc in first st, sc2tog, sc in last 2 sts. (4 sc) Turn.
Row 4: Ch 1, sc in each st across. (4 sc) Turn.
Row 5: Ch 1, sc in first st, sc2tog, sc in last st. (3 sc) Turn.
Row 6: Ch 1, sc in each st across. (3 sc) Fasten off Color E.
Mane: With Color B, join with sl st to any edge stitch around the head area. Work (sc, hdc, sc) in each st around the top and sides of the head, creating a soft ruffled mane. Fasten off.
Add two black eyes and a small triangular nose with floss. Weave in ends neatly.
Assembly and Finishing
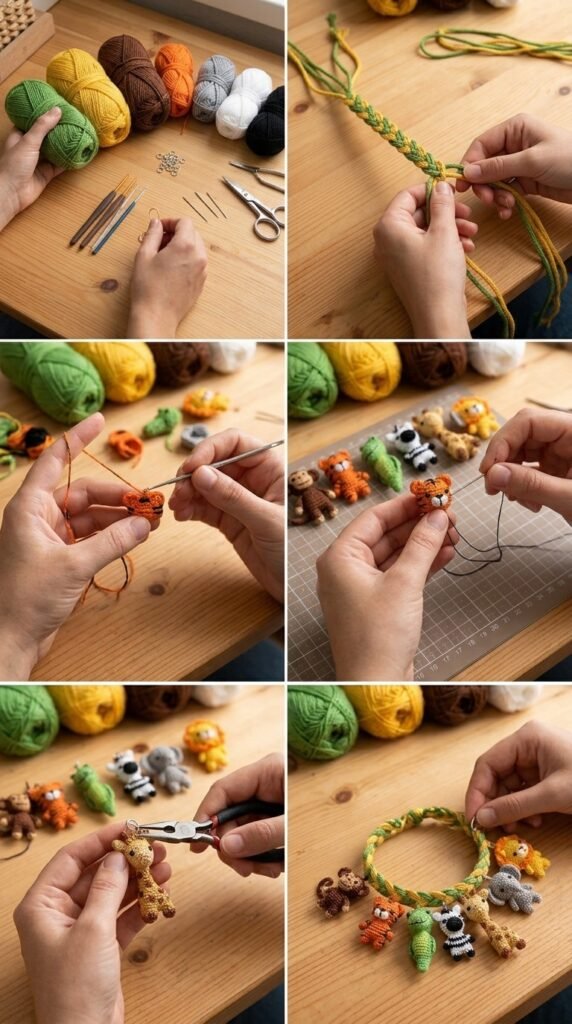
Lay the band flat with the buttonhole end on the left. Arrange the four motifs in this order from left to right: giraffe, elephant, zebra, lion. Space them evenly so there is roughly ½–¾ inch between each motif and a small margin at both ends of the band. The animals should sit slightly above the lower edge of the band so their legs (if any) or lower bodies rest just above the bottom.
Using matching yarn or the long tails, sew each motif securely around its outer edge with small, invisible stitches. Take care not to pull too tightly or the band will pucker. Once all motifs are attached, sew the button to the opposite end of the band, positioned so it closes comfortably without strain.

Weave in every remaining end on the wrong side. Check that no dark yarn shows through to the right side.
Blocking and Care
Lightly dampen the finished anklet with a spray bottle of cool water. Pin it flat on a blocking board, gently shaping the motifs so the ears, trunk, and mane look open and natural. Allow to dry completely (usually 4–6 hours). Do not stretch the band forcefully; just ease it into a smooth rectangle.
Care: Hand wash in cool water with mild soap. Do not wring. Roll in a towel to remove excess water, then lay flat to dry. Never hang the anklet while wet — the weight of the motifs can stretch the band. Store flat or loosely rolled.
Fit and Troubleshooting Tips
If the band feels too loose after wearing a few times, you can add a second buttonhole a short distance from the first or sew a small snap as a backup closure.
If a motif curls or cups, it usually means the stitches are too tight. Re-block that motif alone with a slightly larger pin spread, or redo it with a half-size larger hook.
If the animals look flat or lose their shape after sewing, take a few extra stitches through the center of each motif to anchor them more firmly to the band.
For a child’s size, simply work fewer rows on the band until it measures about 6.5–7 inches before the buttonhole. The motifs stay the same size and still look charming.
FAQ’s
Can I use a different yarn weight?
Sport weight cotton is ideal for the scale of the motifs. DK will make everything larger and bulkier; fingering will make the animals quite tiny and more delicate. If you change weight, adjust hook size so the fabric feels firm but not stiff.
How long does this project take?
Most crocheters finish the band in under an hour and each motif in 20–30 minutes. Sewing and finishing usually take another 30–45 minutes. Plan on an afternoon or two relaxed evenings.
Are the animals safe for young children?
The finished anklet is intended for older children and adults. The small embroidered eyes and yarn details are not suitable for babies or toddlers who might chew on them. For a child-safe version, embroider all facial features with yarn only and omit any glued elements.
Can I rearrange the animal order or omit one?
Absolutely. Place them in any order you like, or make two of a favorite animal. The design is flexible.
My color changes look messy. Any tips?
Always finish the last yarn-over of a stitch with the new color. Carry the unused color along the wrong side for short distances if needed, or cut and weave in for cleaner work on these small pieces.
Will the anklet stretch with wear?
Cotton has minimal stretch once blocked. If you prefer more give, switch the band to a soft acrylic or a cotton-acrylic blend, but keep the motifs in cotton for better stitch definition.
Final Thoughts
There is something quietly joyful about finishing a tiny safari and fastening it around your ankle. Every time I wear mine I notice the little giraffe first, then the curve of the elephant’s trunk, and I remember why I started designing in the first place — to put a bit of playfulness into everyday things.
I hope your Safari Animals Anklet makes you smile every time you put it on. If you make one, I would love to see how your animals turned out. Share a photo in the comments or tag your project so others can admire your parade of little beasts. Happy crocheting, and may your stitches stay even and your motifs full of personality.


Leave a Reply
You must be logged in to post a comment.